
CM/ECF Civil Manual
FOR NEW USERS
Updated: December 8, 2020

Electronic Case Filing Procedures Guide - CIVIL CASES
Page | i
CONTENTS
GETTING STARTED .........................................................................................................................................1
INTRODUCTION .......................................................................................................................................1
HELP DESK ...............................................................................................................................................1
ECF INFORMATION AND RESOURCES ........................................................................................................1
REQUIREMENTS .............................................................................................................................................1
HARDWARE AND SOFTWARE REQUIREMENTS ..........................................................................................1
CENTRAL SIGN-ON (CSO) ACCOUNT ................................................................................................................3
PUBLIC ACCESS TO COURT ELECTRONIC RECORDS (PACER) ACCESS ............................................................3
ELECTRONIC CASE FILING (ECF) ACCESS .....................................................................................................3
STEP-BY-STEP FILING GUIDE ...........................................................................................................................3
LOG IN TO ECF/PACER THROUGH CSO (CENTRAL SIGN-ON) .......................................................................4
ECF MENU OPTIONS .................................................................................................................................5
LOGOUT OF THE LIVE SYSTEM ..................................................................................................................5
GENERAL INFORMATION ................................................................................................................................5
GENERAL RULES AND MANIPULATIONS ....................................................................................................6
MAINTAINING YOUR ACCOUNT ......................................................................................................................7
EMAIL INFORMATION ..............................................................................................................................7
VIEW YOUR TRANSACTION LOG .....................................................................................................................9
MAILING INFORMATION FOR A CASE ..............................................................................................................9
FILING A NEW CIVIL CASE (E.G., COMPLAINTS, PETITIONS, NOTICES OF REMOVALS ....................................... 10
PART I: ENTER THE CASE DATA .............................................................................................................. 10
part ii: filing initiating documents ........................................................................................................... 15
FILING DOCUMENTS FOR CIVIL CASES ........................................................................................................... 21
FILING AN ANSWER ................................................................................................................................ 21
KEY REMINDERS ABOUT THE NOTICE OF ELECTRONIC FILING................................................................... 24
DOCUMENT AND ATTACHMENT NUMBERING......................................................................................... 25
FILING A MOTION .................................................................................................................................. 25
FILING A NOTICE OF HEARING ON MOTION ............................................................................................ 27
FILING A MEMORANDUM IN SUPPORT OF A MOTION ............................................................................. 27
FILING AN AFFIDAVIT WITH ATTACHMENTS/EXHIBITS IN SUPPORT OF A MOTION ................................... 28
FILING EXHIBITS ..................................................................................................................................... 29
FILING A MEET AND CONFER STATEMENT ............................................................................................... 31
FILING A PROPOSED ORDER ................................................................................................................... 31
FILING A STIPULATION ........................................................................................................................... 32
FILING A CERTIFICATE OF SERVICE .......................................................................................................... 33
VIEWING RESTRICTED CASES & FILINGS IN ECF .............................................................................................. 34
SOCIAL SECURITY & IMMIGRATION ........................................................................................................ 34
RESTRICTED FILING IN ECF ...................................................................................................................... 34
ADD/CREATE PARTY FOR THIRD-PARTY COMPLAINT ..................................................................................... 35
ADDITIONAL INFORMATION REGARDING ECF ............................................................................................... 36
SELECTING FILER IN A LARGE CASE .......................................................................................................... 36
COMMON ERRORS WITH ECF FILING ...................................................................................................... 36
ATTACHMENTS AND ATTACHMENT SIZE ................................................................................................. 37
PACER FEES WINDOW ............................................................................................................................ 37
SEALED DOCUMENTS ............................................................................................................................. 37
PERSONAL IDENTIFIERS .......................................................................................................................... 38
CREATING AN APPENDIX WITH DOCUMENT LINKS .................................................................................. 39
ACCESSING THE NEW CASES REPORT ...................................................................................................... 40
MDL CASE REPORT ................................................................................................................................. 40
MOBILE QUERY ...................................................................................................................................... 41

Electronic Case Filing Procedures Guide - CIVIL CASES
Page | 1
GETTING STARTED
INTRODUCTION
This manual provides instructions on how to use the Electronic Filing System to file documents with the
court, or to view and retrieve docket sheets and documents for all cases assigned to this system. Users
should have a working knowledge of word processing, web browsers, file management, and Portable
Document Format (PDF).
HELP DESK
Contact the court’s ECF Help Desk for assistance between the hours of 8:00 a.m. – 4:30 p.m., Monday
through Friday.
Local: 612-664-5155
Toll Free: 1-866-325-4975
Email: ecfhelpdesk@mnd.uscourts.gov
ECF INFORMATION AND RESOURCES
For up-to-date information regarding ECF, visit the U.S. District Court’s website.
The Case Information tab provides access to:
Live login to ECF
Training Information
PACER Information
Electronic Filing Tools
New Cases
Transcript Information
Violation Notices
Sentencing Information
Criminal Debt Information
Statistics
PACER Fee Exemption Information
REQUIREMENTS
HARDWARE AND SOFTWARE REQUIREMENTS
The hardware and software needed to electronically file, view, and retrieve case documents are the
following:
A personal computer running a standard platform such as Windows or Macintosh.
A PDF-compatible word processor like Macintosh and Windows based version of Corel WordPerfect
or Microsoft Word.
An Internet Service provider.
A Web browser.
Software, such as Adobe Acrobat, to convert documents from a word processor format to portable
document format (PDF).
Adobe Acrobat Reader, which is available for free, is needed for viewing PDF documents.

Electronic Case Filing Procedures Guide - CIVIL CASES
Page | 2
A scanner may be necessary to create electronic images of documents not in your word processing
system.
How to View a PDF File
1. Start a Portable Document Format program such as Adobe Acrobat.
2. Click File > Open.
3. Click the location and file name of the PDF document to be viewed.
4. Adobe Acrobat Exchange loads the file and displays it on the screen.
How to Convert Documents to a PDF
The conversion process requires special software such as Adobe Acrobat Writer or FinePrint pdfFactor7.
Some software (e.g., WordPerfect and Microsoft Word) have Acrobat components built-in or available
as add-ins. These can be used to convert documents to PDF.
Once PDF conversion software is loaded on your computer:
1. Open the document to be converted.
2. Select Print option.
3. Change printer option to the PDF choice available.
4. “Print” the file. The file will not actually print; instead, the option to save the file as a PDF file will
appear.
5. Name the file, giving it the extension “.PDF” and click the Save button.
PDF/A Documents
PDF/A is a standard format that allows for the long-term archiving of electronic documents with the
assurance that the documents will be accessible in the future. CM/ECF will accept both PDF and PDF/A
documents.
NOTE: Scanning is only used for documents that cannot be produced electronically. Scanned
documents lessen the level of service we provide by slowing down the entire system. We are
moving away from the utilization of scanned documents internally and ask you do the same
whenever possible.
NOTE: If the displayed document is larger than the screen or consists of multiple pages, use the
scroll bars to move through the document. Click the View menu for other options for viewing the
displayed document. Choose the option that is most appropriate for the document.
NOTE: Depending on the word processing program being used, it may be necessary to find the
printer selection option elsewhere. At that point, change the printer to Adobe PDFWriter, and
follow the directions above.
NOTE: Make a note of the file location so you can find the document later when you are ready
to file it to ECF. Change the location, if necessary.

Electronic Case Filing Procedures Guide - CIVIL CASES
Page | 3
CENTRAL SIGN-ON (CSO) ACCOUNT
The Central Sign-On functionality in the Next Generation (NextGen) of CM/ECF allows filers to access
PACER and NextGen CM/ECF systems using a single PACER account. Once logged in with a CSO account,
admitted attorneys with filing privileges can:
Electronically file pleadings and documents.
View official docket sheets and documents.
View various case related reports.
PUBLIC ACCESS TO COURT ELECTRONIC RECORDS (PACER) ACCESS
PACER is an electronic access service that allows users to obtain case and docket information from
Federal Appellate, District, and Bankruptcy courts, and from the U.S. Party/Case Index. Attorneys must
have an individual PACER account in order to file in the ECF system. All requests for ECF filing privileges
are submitted through PACER. You may register for a PACER account online. Your CSO Account is
maintained though PACER. Name, address, login, password, and primary email address information can
be updated in the “Manage My Account” section of PACER’s website. If you have forgotten your PACER
username and/or password, PACER has an automated password reset and username recovery on the
PACER login page.
ELECTRONIC CASE FILING (ECF) ACCESS
Existing attorneys (those who were admitted in the District of Minnesota prior to October 5, 2015 and
have an active ECF account) will link their ECF account to their individual PACER account for filing access.
Please see the Case Information page for additional information and procedures.
Attorneys seeking admission and filing access must make a request through PACER. Please review the
attorney admissions forms for specific instructions. Please note that pro hac vice and Multi District
Litigation (MDL) attorneys also obtain filing access with the court through PACER.
Attorneys will only retain filing access while in good standing with the bar of this court or when admitted
pro hac vice. To be in good standing, an attorney must comply with the requirements of LR 83.6,
including the timely payment of the re-registration fee due every third year during the court’s re-
registration. If you do not re-register with the court, your admission status will become inactive and you
will need to re-register with the court to return to good standing and have filing privileges reactivated.
After being admitted, attorneys must file a notice of appearance in the case(s) they wish to appear as
attorney of record.
STEP-BY-STEP FILING GUIDE
Below is a step-by-step guide for accessing the ECF system, preparing a document for filing, filing a
motion or application, and displaying a docket sheet. Before actually filing for the first time, it is
recommended to practice filing in the training database.

Electronic Case Filing Procedures Guide - CIVIL CASES
Page | 4
LOG IN TO ECF/PACER THROUGH CSO (CENTRAL SIGN-ON)
1. Click on the U.S. District Court of Minnesota – Document Filing System link. To access this link either:
Navigate to PACER and click on File a Case.
OR
Navigate to the District of Minnesota’s website and click on the E-Filing (CM/ECF) link on the left
panel.

Electronic Case Filing Procedures Guide - CIVIL CASES
Page | 5
2. Enter your PACER/CSO Username and Password in the appropriate entry fields.
3. Check the box confirming you will comply with the redaction rules. Click Continue and the main ECF
screen will appear.
ECF MENU OPTIONS
The following options are accessible from the menu bar at the top of the main window.
Option
Use this option to:
Civil
Electronically file all civil case pleadings, motions, and other court documents.
Criminal
Electronically file all criminal case pleadings, motions, and other court documents.
Query
Search by specific case number, party name, or nature of suit to retrieve documents
relevant to the case. You will incur PACER search fees.
Reports
Retrieve docket sheets and case-filed reports. You will incur PACER search fees.
Utilities
View your personal ECF transaction log and maintain secondary email addresses for
noticing purposes.
Search
Use to find and get to the menu option or docket event that you need. Type in a
partial or full word and a complete list of menus and events containing the word is
displayed. The items appearing are links to the filing of the event.
Logout
Sign out of ECF/PACER and prevent any filing with your password until the next time
you log in.
See a help file for the screen you are viewing.
LOGOUT OF THE LIVE SYSTEM
After you have completed all transactions for a particular session in ECF, you should exit from the system.
1. Click Log Out.
2. A pop-up message will appear stating: “Although you have logged out from CM/ECF, data remains in
the browser’s memory (and might be available to someone else using your PC.) Please close your
browser now to clear this data.” Click OK.
GENERAL INFORMATION
Filer will use the Civil feature of ECF to electronically file a variety of pleadings and other documents for
civil cases.
NOTE: The Client Code is an optional field that can be used for organizing your monthly bill to
associate costs specific to clients.

Electronic Case Filing Procedures Guide - CIVIL CASES
Page | 6
GENERAL RULES AND MANIPULATIONS
Correcting a Mistake
Up until the filing has been completed, users can click the Back button on the browser toolbar to go back
and correct an entry made on a previous screen. Once the document is transmitted to the court, only
the court can make changes or corrections.
Signatures
A pleading or other document requiring a signature must be signed in the following manner:
s/Pat Attorney
Pat Attorney
Bar Number 12345
Attorney for (Plaintiff/Defendant) XYZ Company
ABC Law Firm
123 South Street
Minneapolis, MN 55415
Telephone: (612) 555-5555
Fax: (612) 555-5554
Stipulations
The following procedure applies when a stipulation or other document (e.g., a joint motion, joint exhibit
list, and 26(f) report) requires two or more signatures:
1. The filer must initially confirm that the content of the document is acceptable to all signatories by
obtaining their original signatures to the document.
2. The filer then must file the document electronically, indicating the signatories with an “s/signature”
(e.g., “s/Jane Doe,” “s/John Smith,” etc.) for each signatory.
By filing the document the attorney certifies that: (1) the document has been signed by all necessary
people, including affiant and notary, if applicable, and (2) the ink signed originals exist and will be
available in their offices for inspection.
1
Documents containing original signatures must be filed
electronically with originally executed copies maintain by the filer until after final resolution of the
action, including final disposition of all appeals.
3. Any party who disputes the authenticity of an electronically filed document containing multiple
signatures or the authenticity of the signatures themselves must file an objection to the document
within 14 days of service of the document. Upon request, the document must be made available for
review.
1
This procedure applies when the third-party document exists on the computer of the attorney or client. If so, after obtaining
the ink signatures on a paper copy, the filer should affix “s/ signature(s)” to the word processing version, convert the
document to PDF, and upload it in ECF. If the document is not available in electronic format, the ink signed paper version may
be scanned and filed in ECF. Scanning, however, is not the preferred method.
Electronic Case Filing Procedures Guide - CIVIL CASES
Page | 7
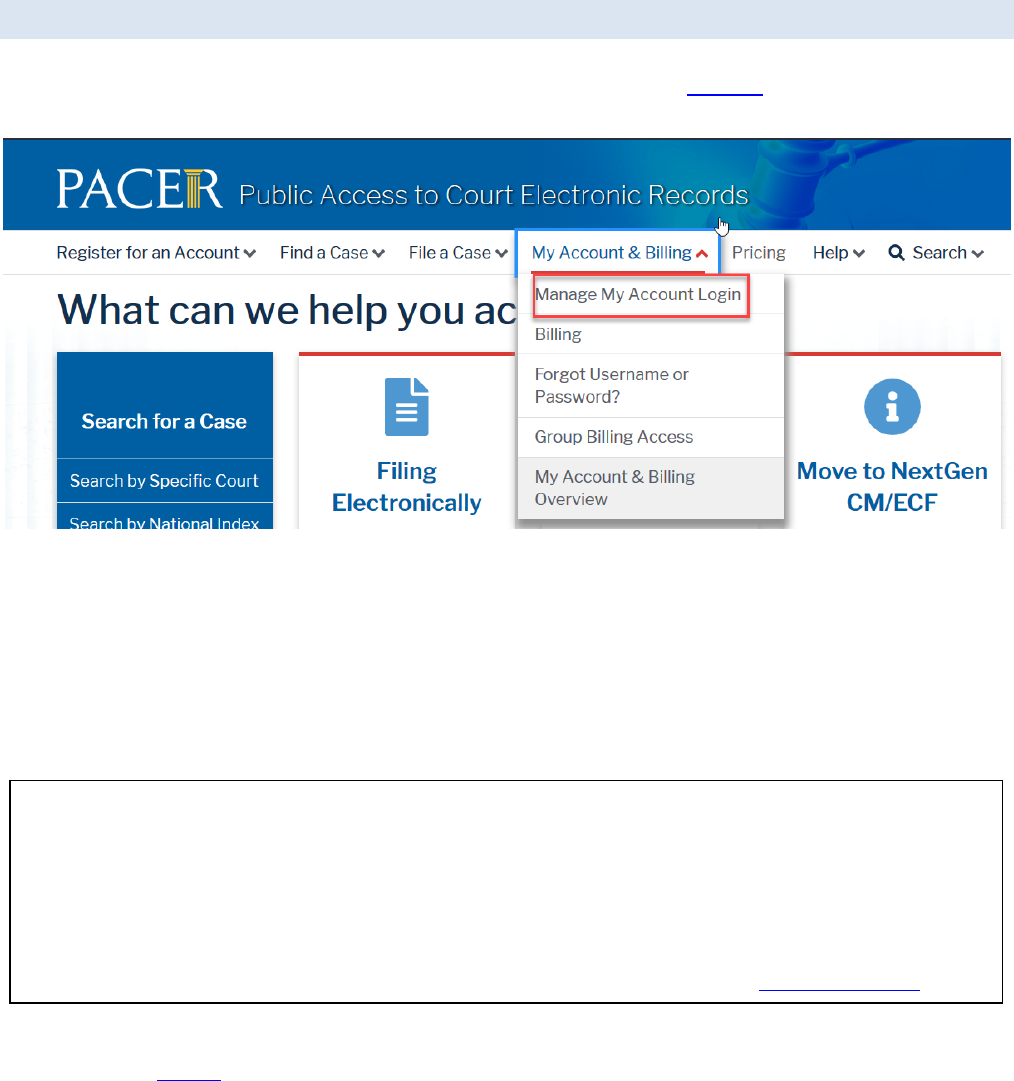
MAINTAINING YOUR ACCOUNT
All account information, other than secondary email addresses, is held in your CSO account and can be
accessed through the Manage My Account option on PACER’s website . It is each attorney’s
responsibility to keep the account information up to date.
EMAIL INFORMATION
The primary email address is added and updated through PACER. Secondary email addresses are only
added and updated through ECF. Email addresses are used for Notices of Electronic Filing (NEFs). It is
recommended that all accounts include a primary email address and at least one secondary email
address for the purpose of receiving NEFs.
Updating Primary Email
1. Navigate to PACER. Note that this can also be accessed through ECF by clicking on Utilities>Manage
your PACER Account.
2. Click on Manage My Account and Login.
3. Click the Maintenance tab.
4. Click Update E-Filer Noticing and Frequency.
5. Check the box to apply your changes to the District of MN.
6. Enter and confirm the Primary Email Address, select frequency and format preferences and click
Submit.
NOTE: Filers access CM/ECF systems using a single PACER account. If attorneys share these account
credentials with a third-party service provider, the provider will be able to access restricted
documents (including sealed documents) to which the filer has access. If the third-party service
providers place the restricted documents they obtain in internet repositories, other users of the
third-party service or software may access the documents and/or make them publicly available.
Once an attorney obtains ECF filing access, the attorney is responsible for all documents filed using
the attorney’s username and password and is subject to Rule 11 sanctions (Fed. R. Civ. P. 11).

Electronic Case Filing Procedures Guide - CIVIL CASES
Page | 8
7. You will get a confirmation screen. Click Close.
Updating/Adding Secondary Emails
1. Click Utilities>Your Account>Maintain Your Account.
2. Click Email information at the bottom of the screen.
3. If a primary email address is listed, skip to step 5. If no primary email address is listed, click add new
e-mail address. Although primary email addresses are maintained through PACER, there must be
one listed in ECF in order to add secondary addresses. Enter the account’s PRIMARY email address.
Once an address is entered, the secondary email address options will appear on the left.
4. Click add new e-mail address under Secondary e-mail addresses.
5. Enter the secondary email address and change the configuration options if desired. Note that
multiple secondary email addresses can be added by clicking on add new email address.
Configuration Options
Option
Description
Should this email
address receive notices?
For the primary email address, the default is Yes. If set to No, the
primary email address will not receive NEFs –
this is NOT
recommended.
How should notices be
sent to this email
address?
Per Filing: Email sent for each individual filing.
Summary Report: One daily email listing all transactions for that day,
sent on the following day.
NOTE: If the Summary Report is selected, an additional prompt
appears, “Should this email address receive a ‘no activity’ notice
when no summary noticing occurs?”
Yes: an email will be sent with the message, “no
transactions found for this time period” when no activity
occurs in the cases for which the user is configured to
receive summary notices.
No: no email will be sent unless there were filings.
In what format should
notices be sent to this
email address?
Controls the format of the emails – HTML is generally preferred.
Should this email
address receive general
announcement notices
from this court?
The court prefers that users select Yes so they will receive email
notifications regarding important E
CF system information such as
down-times and upgrades.
6. To remove a secondary email address, click on the address on the left and delete it in the text box
on the right.

Electronic Case Filing Procedures Guide - CIVIL CASES
Page | 9
7. After all changes have been made, click Return to Person Information Screen. DO NOT use the Back
button in your browser-information will not be saved if you click Back.
8. You will return to the main account maintenance screen. Click Submit to save changes. A
confirmation screen will appear.
9. If the Clerk’s Office receives a “bounce back” (i.e., an undeliverable e-mail) notice from a Registered
User’s primary or secondary e-mail account, no follow up will occur by Court staff. It is the Registered
User’s responsibility to update all information as it pertains to the user’s account.
10. Continue working in ECF by clicking on any menu item at the top.
VIEW YOUR TRANSACTION LOG
As a free service, ECF filers may view their transaction logs. This may be helpful to verify all transactions
entered are reflected in the system, and that no unauthorized individuals have entered transactions into
ECF.
1. Click Utilities>Your Account>View Your Transaction Log.
2. Enter the Date Parameters and click Run Report.
3. A list of transactions occurring during the designated dates will appear.
MAILING INFORMATION FOR A CASE
Attorneys can check ECF to see if a party is registered to receive email noticing in ECF.

Electronic Case Filing Procedures Guide - CIVIL CASES
Page | 10
1. Select Utilities>NEFs & Mailings>Mailings.
2. Click Mailing Info for a Case.
3. Enter the desired case number and click Submit.
4. A window will appear listing mailing information for the case.
5. Note that any names listed under the Manual Notice List need to be noticed conventionally.
FILING A NEW CIVIL CASE (E.G., COMPLAINTS, PETITIONS, NOTICES OF
REMOVALS
Initiating documents (e.g., complaints, petitions, notices of removal, etc.) along with civil cover sheets
should be filed electronically in ECF. Filers are responsible for entering all case information including the
Nature of Suit, Cause of Action and named parties. Sealed civil cases cannot be opened electronically by
attorneys and will be opened by the Clerk’s Office.
Electronic civil case opening is a two part process: 1) enter the case data and 2) file the initiating
documents. For assistance during this process, please contact the CM/ECF Help Desk at 612-664-5155
or 866-325-4975.
PART I: ENTER THE CASE DATA
1. After logging into CM/ECF with the filing attorney’s CM/ECF account, select Civil from the menu bar
at the top of the ECF screen.
2. Click Civil Case under Open a Case.
3. A window will appear with important instructions on the case opening process. Review this
information, and then click Next.
4. Bypass the next screen without making any changes. Do not change the code in the “Office” field.
Click Next.
5. Enter the Case Data:
The Case Data Screen may be completed using the information provided on the Civil Cover Sheet.
The Civil Cover Sheet (JS44) is available in fillable form on the court’s website. A completed Civil
Cover Sheet must be attached as a PDF file when filing the case initiating document in PART II of the
Electronic Civil Case Opening process.
Please note: Only attorneys fully admitted to the District of Minnesota or MDL attorneys filing
a new MDL case may open a new case.

Electronic Case Filing Procedures Guide - CIVIL CASES
Page | 11
Selections made on the Case Data Screen are very important. If an error message appears on the
screen, double-check the accuracy of the information entered, which must be corrected before case
opening may continue.
Jurisdiction
Jurisdiction is a term that refers to whether a court has the power to hear a given case. “Federal
Question” jurisdiction means federal courts will hear cases that involve issues regarding the
Constitution or other federal laws. “Diversity Jurisdiction” is where the opposing parties are citizens
of different states. “Diversity Jurisdiction” enables a federal court to hear cases where there is not a
federal question. The federal law governing diversity jurisdiction states that a case must have an
“amount-in-controversy” of $75,000 or more before a federal court can hear a case.
Jurisdiction defaults to 3 (Federal Question). The drop-down list displays additional options for
jurisdiction, including 1 (U.S. Government Plaintiff), 2 (U.S. Government Defendant), 4 (Diversity), 5
(Local Question).
Cause of Action
Available statutes, which are also referred to as Cause of Action, are listed in numerical order. To
enter the applicable Cause of Action, click the drop-down list and scroll down to find the appropriate
selection. Or, use the Filter field by entering a full or partial statute number or text description.
CM/ECF will narrow the drop-down list to only the items that match the statute number or
description entered. If you cannot locate a specific Cause of Action, select a generic statute, e.g.
28:1332 Diversity, 28:1441 Petition for Removal.
Nature of Suit
Nature of suit codes are listed in numerical order. To enter the Nature of Suit, click the drop-down
list and scroll down to find the appropriate selection. Or, use the Filter field by entering a full or
partial number or text description. CM/ECF will narrow the drop-down list to only the items that
match the number or description entered.

Electronic Case Filing Procedures Guide - CIVIL CASES
Page | 12
Origin
A Complaint originating in Federal Court is classified under origin code 1 (Original Proceeding). A
Notice of Removal is classified under origin code 2 (Removal from State Court). Use the drop-down
box to select the appropriate origin code for the case.
Citizenship
The citizenship of the parties must be provided only for cases in which Diversity has been selected
as the basis for jurisdiction. When filing a diversity case, select the appropriate citizenship statement
for the plaintiff and the defendant.
Jury Demand
Jury demand should be selected only if there is a jury demand contained within the case initiating
document(s). The jury demand status may be entered by the plaintiff when filing a Complaint or the
defendant when filing a Notice of Removal. N (none) should be selected if none of the parties have
formally demanded a jury trial.
Class Action
If the Complaint alleges a class action, select “y” in the Class Action field. To request class
certification, a separate motion must be filed after the case has been opened.
Demand
If a monetary demand is included in the Complaint, enter the amount to the nearest thousand
dollars. For example, if the demand is $1,500,000 enter 1500, without a dollar sign, comma or
decimal. The CM/ECF system will automatically add three zeroes to a number added in this field.
Arbitration Code
Leave this field blank.
County
Click the County drop-down list to display a list of all counties in the District of Minnesota. From the
list, select the county of residence of the first listed plaintiff. If the U.S. Government is the plaintiff,
select the county of residence of the first listed defendant.
Fee Status
Unless filing on behalf of a U.S. governmental agency or if filing an Application to Proceed in District
Court without Prepaying Fees or Costs, the fee status should be set to pd (paid). If an Application to
Proceed in District Court without Prepaying Fees or Costs is being filed, pend (IFP pending) should be
selected. Attorneys for the United States or agencies of the United States government should select
wv (waived) as the fee status.
Fee Date
Leave this date defaulted. Do NOT modify.
Date Transfer
Leave this field blank.
6. Enter Party Names:

Electronic Case Filing Procedures Guide - CIVIL CASES
Page | 13
Perhaps the most critical component of electronic civil case opening is the entry of party names. It is
important that this be done correctly because it impacts not only the case being filed, but the general
records of the Court. The Party Name Guide is available on the court’s website to provide assistance
in adding party names. IMPORTANT: Please consult the guide before entering a new party into the
court’s CM/ECF database. If filing a Notice of Removal, enter the parties from the Complaint.
Searching for a Party
The Party Search screen is divided into two panels. The left panel contains controls to Add New Party
and Create Case. The search filed in the right panel allows users to search the CM/ECF database for
party names.
To enter a party name, first search existing names in the CM/ECF database by entering at least two
letters of the party’s last name in the Last/Business Name field. If the party is a business, enter the
first two letters of the business name. Omit articles such as A, An, and The. Please do NOT enter
parties in all CAPS.
Click the Search button to view a list of available party names.
As the system searches for a party name match, CM/ECF will display a list of existing party names.
Scroll through the list to review the potential party name matches. If the name of the party appears
in the list, click on the party name to highlight it, and then click the Select Party button. If there are
multiple parties with the same name, double click on the party name to determine if there is address
information entered. Do not pick a party with address information. If the name of a party does not
appear in the list, consult the Creating a New Party instructions below.
Creating a New Party
If the system does not find a match after performing a party name search, click the Create New Party
button to create a new party record in the CM/ECF database.
CM/ECF will display the Party Information screen. Although several data entry boxes appear on the
Party Information screen, only the following fields should be completed.
Last name;
First name;
Middle name or initial (If applicable);
Generation (If applicable);
Title (If applicable);
Role (If applicable); and
Party text (If applicable)
Note: The Corporation and Notice fields do not need to be modified.
Do NOT enter any additional information (address, phone, email, etc.).
Party Name
Party names must be entered as they appear on the case caption with no variations, including
punctuation. For businesses, the entire company name must be entered in the Last/Business Name
field. For individuals, the Last name, First name, and Middle name fields are used. The Generation
field (e.g., Jr., Sr.) and Title field may also be completed, if applicable.
Role

Electronic Case Filing Procedures Guide - CIVIL CASES
Page | 14
The Role type defaults to defendant. Important: Modify this field to the correct party role from the
drop-down list.
Party Text
The Party text field is optional and may be used to add descriptive information about the party as it
appears in the caption of the case initiating document. Examples of party text are: A Minnesota
Corporation, Individually, and in the Official Capacity, as Trustees of, etc.
When all required information is entered, click the Add Party button at the bottom of the screen to
add the party to the case.
As each party is added, the party name will appear in the panel on the left side of the screen. The
information in the left side panel is referred to as the Case Participant Tree.
An alias may be entered for a party only if the party alias appears in the caption of the complaint.
For example, if the complaint reads: “COMPANY X, formerly known as BUSINESS Q.” In this situation,
BUSINESS Q should be entered as the alias for COMPANY X.
Never enter a corporate parent or attorney for a party. Instead, file a Rule 7.1 Disclosure Statement
after filing the initiating documents.
The following chart provides a description of the icons and functions that are available in the left side
panel of the Case Participant Tree.
The Expand all hyperlink displays all party information in the case, including aliases. The Collapse
all hyperlink displays only the names of the parties in the case, with all other information
collapsed in the tree.
Each branch of the case participant tree may be expanded or collapsed individually by clicking on
the + and – icons.
After entering all parties in the case, expand the Case Participant Tree to review the party names
for accuracy. If necessary, click the appropriate icon in the Case Participant Tree to add or correct
information. Important: Do not click the back button when entering parties as you will lose any
parties already entered on the case.

Electronic Case Filing Procedures Guide - CIVIL CASES
Page | 15
7. Create Case
When all parties have been added and appear correctly in the Case Participant Tree, click Create
Case on the left panel.
CM/ECF provides one last opportunity to make changes to case opening information. Clicking No
will allow you to add, delete or modify parties. If the information is correct, click Yes to create
the case and obtain a case number.
The case data is now entered in CM/ECF and a case number has been assigned. Please make a
note of the case number.
Click on the hyperlink, CLICK HERE NOW TO DOCKET THE COMPLAINT OR OTHER INITIATING
DOCUMENT to continue with PART II of the case opening process.
All case initiating documents (e.g., Complaint, Notice of Removal, civil cover sheet) must be
filed immediately after the case has been opened.
IMPORTANT: If a case has been opened incorrectly, STOP and contact the Clerk’s Office for
assistance at 612-664-5155 or 866-325-4975. Do NOT open the case a second time.
PART II: FILING INITIATING DOCUMENTS
IMPORTANT: Filing a Complaint or Notice of Removal in CM/ECF requires the electronic payment of the
filing fee. Before filing the initiating document(s), it is important to obtain relevant financial account
information in the form of either:
The routing number and account number for a savings or checking account; or
NOTE: After the initiating documents (e.g., Complaint, Notice of Removal) have been filed,
the Clerk’s Office will randomly assign a district judge and magistrate judge to the case. A
text only notice will be docketed and the judge information will be displayed on the Notice
of Electronic Filing.

Electronic Case Filing Procedures Guide - CIVIL CASES
Page | 16
The account number, expiration date, and 3-digit security code for a credit card.
To complete PART II of the electronic civil case opening process, click on the hyperlink to docket the
complaint or other initiating document after obtaining the case number, or click on the Complaints and
Other Initiating Documents menu on the Civil Events screen.
1. The civil case number will populate, click Next.
2. A window will appear stating, “You are not an attorney of record on this case. Please verify that you
have entered the correct case number,” click Next.
3. Make the appropriate selection of the case initiating document, e.g., Complaint or Notice of Removal
from the list of available events, click Next.
4. Select the filing party from the list of parties in the case and click Next. When filing a Complaint,
select the plaintiff(s). When filing a Notice of Removal, select the filing defendant(s).
5. ECF will prompt the filing attorney to add himself/herself as counsel for the filing party. Check the
box(es) to the left of the party name(s) to create an attorney/party association. Click Next.
6. Select the Parties that the filing is against and click Next. If selecting individual parties under Select
the Party, each party name will carry over in the final docket text. If there are more than ten parties
select All Defendants under Select a Group. If selecting a group, the final docket text will display
“filed against all Defendants.”
7. Attach the initiating document (e.g., Complaint or Notice of Removal) in the Main Document field
using the Browse button to locate the PDF file.
For Removals, select the filer(s) of the state court Complaint, e.g., plaintiff(s).
When Filing a Complaint
Upload the Complaint as the Main Document. Any exhibits to the Complaint must be filed as
attachments. Exhibits can be attached as one PDF or separately, up to 35 MB in size. Following any
exhibits, the Civil Cover Sheet must be filed as an attachment to the Complaint. File all other
documents separately, including a Notice of Appearance or an Application to Proceed in District Court
Without Prepaying Fees or Costs.
NOTE: When filing a new case on behalf of the USA or with an Application to Proceed in District
Court Without Prepaying Fees or Costs, it is not necessary to submit a filing fee payment with the
initiating document(s).
NOTE: If a party was not added on Part 1 of the case opening process, select the New Filer
button and add additional parties listed in the initiating document.

Electronic Case Filing Procedures Guide - CIVIL CASES
Page | 17
When Filing a Notice of Removal
Upload the Notice of Removal as the Main Document. Attach the State Court Summons and
Complaint as Attachment 1. Attach any other pertinent State Court documents as individual
attachments starting at Attachment 2, e.g., Motion for Temporary Restraining Order. Next, attach as
a separate document the Notice of Filing of Removal in State Court, and then attach the Civil Cover
Sheet.
NOTE: All other documents, including the Answer to Complaint, may not be attached to the
initiating document and must be filed separately.

Electronic Case Filing Procedures Guide - CIVIL CASES
Page | 18
Only when filing a Notice of Removal, the following window will appear. Enter the name and court
number from state court.

Electronic Case Filing Procedures Guide - CIVIL CASES
Page | 19
8. Select yes or no to the question, “Do you request the Clerk’s Office to issue a summons?” and click
Next.
9. ECF will inquire about the payment of fees. Select No and click Next unless the case is being filed in
combination with an Application to Proceed Without Prepayment of Fees OR if the case is being filed
on behalf of the United States. If either of these, select Yes to bypass the fee payment screen.
10. Click Next at the informational window after reviewing the fee, receipt, and processing information.
ECF will temporarily route the filer to PACER’s website for collection of fees.
IMPORTANT: Do not use the internet browser’s back button from this point forward in the
transaction.
11. Select either credit card or ACH account as payment method and click Next. If you have a credit card
on file in your PACER account you can select that card.
12. Enter all required credit card or ACH account information.
13. If desired, enter the email address(es) to which PACER should send a receipt for the transaction.
Check the box at the bottom of the screen to authorize payment of the filing fee and click Submit.
14. Click Next at the informational window.
15. If necessary, edit the docket text by typing in the white text box and click Next.
16. Verify that the correct documents are attached and click Next to commit the filing to ECF.
17. The Notice of Electronic Filing (NEF) screen will appear. This is confirmation that the initiating
document has been submitted to ECF. The docket text will indicate if a summons was requested.
IMPORTANT: If a case has been opened incorrectly or if you have further questions, contact the
CM/ECF Help Desk at 612-664-5155 or 866-325-4975.

Electronic Case Filing Procedures Guide - CIVIL CASES
Page | 20
Judge Assignment
After initiating documents are filed in a civil case, the Clerk’s Office will make a random judge assignment
in ECF. A text only notice will be docketed, and the judge information will be displayed on the Notice of
Electronic Filing (NEF). Please make a note of the district and magistrate judge assignments for future
reference. Subsequent filings should include the judges’ initials in the case number within the document
caption.
Summonses
If the filer requested a summons be issued while docketing the initiating document, the Clerk’s Office
will issue the summons electronically through ECF. The summons can be accessed by the filer via the NEF
email hyperlink. The filing attorney must serve the summons and complaint in accordance with Fed. R.
Civ. P. 4.

Electronic Case Filing Procedures Guide - CIVIL CASES
Page | 21
If a summons was not initially requested during the filing of the initiating document, file the event
Request to Clerk’s Office to Issue Summons.
FILING DOCUMENTS FOR CIVIL CASES
There are eight basic steps involved in filing a document. These are essentially the same for each event
filed in ECF:
1. Select the type of document to file.
2. Enter the case number in which the document is to be filed.
3. Designate the party(s) filing the document.
4. Specify the PDF file name and location for the document to be filed.
5. Add attachments, if any, to the document being filed.
6. Modify the docket text as necessary.
7. Submit the pleading to ECF.
8. Receive notification of electronic filing (NEF).
FILING AN ANSWER
The process for filing an Answer is similar for filing other pleadings in ECF.
Select the appropriate menu from the ECF Menu Bar for filing:
1. Click Civil>Initial Pleadings and Service>Answers to Complaints.
2. Enter the case number then:
NOTE: After filing the initiating documents, submit any additional filings separately, using the
appropriate filing events, such as an Application to Proceed in District Court Without Prepaying Fees
or Costs, Answer to Complaint, or a Rule 7.1-Disclosure Statement.

Electronic Case Filing Procedures Guide - CIVIL CASES
Page | 22
3. Click on the filer to select the appropriate party, click Next.
(Necessary)
4. Check the box in front of the party’s name to associate the attorney to the filing party.
(Optional)
5. Check the box in front of Lead if attorney is lead attorney.
(Strongly Recommended)
6. Check the box in front of Notice to receive notification when any documents are filed in this case. If
this box is unchecked, the attorney will not receive notices of electronic filing.
7. Click Next.
NOTE: If this is the first time the attorney is filing in the case, the following attorney-party
association window will appear.

Electronic Case Filing Procedures Guide - CIVIL CASES
Page | 23
8. Click the box next to the pleading you are answering.
9. The screen below will appear. Click the appropriate radio button, click Next.
10. Review the ECF Filing Tips. Click Browse, to attach the appropriate Main Document.
11. Click on the file and click Open (or double-click on the file) to attach it to the filing.
12. If necessary, attach any Attachments to the Answer and click Next.
13. If applicable, check the box next to any additional claims or complaints to the Answer and click Next.
14. Click the radio button (Yes) or (No) regarding a jury demand and click Next.
15. If necessary, click in the white Docket Text fields to type additional text and click Next. Note that
modifying docket text is optional; examples may include: “First” Answer, “Amended” Answer.
16. Confirm information in window is correct and click Next to submit the Answer. Note that clicking
Next finalizes the filing. If corrections need to be made, click the Back button in your browser before
clicking Next. To abort the filing, click any item on the menu bar.
The following Notice of Electronic Filing (NEF) window will appear confirming the filing:
NOTE: It is recommended for the user to verify the correct document has been selected before
linking it to the filing. To do so, right-mouse click on the selected file. A short-cut menu will
appear. Click Open. Adobe Acrobat Read (or other loaded .pdf software) will open the PDF
document. View and confirm the document to be filed. Close the .pdf program window. From
this point forward, this informative note will not be included in the documentation.

Electronic Case Filing Procedures Guide - CIVIL CASES
Page | 24
KEY REMINDERS ABOUT THE NOTICE OF ELECTRONIC FILING
It is strongly recommended to copy and save the NEF to your computer or to print and retain a hard
copy in your files.
The NEF will be emailed to the attorneys and parties, associated with the case, who have supplied
their e-mail addresses to the Court. The NEF also displays the names and addresses of individuals
who will not be electronically notified of the filing.
It is the filer’s responsibility to serve hard copies of the pleading and the NEF to attorneys and parties
who are not set up for electronic notification. These names are identified in the NEF.
Individuals who receive the NEF via email are permitted one “free look” at the document by clicking
on the associated hyperlinked document numbers listed in the NEF.
Pursuant to the guidelines set by the Administrative Office of the U.S. Courts, the free look is only
available for 15 days from the date of the filing.
Subsequent retrieval of the case docket sheet and pleading from ECF must be made through your

Electronic Case Filing Procedures Guide - CIVIL CASES
Page | 25
CSO account and is subject to regular PACER fees.
Pursuant to Fed. R. Civ. P. 5(b)(2)(E), service is constituted by filing in ECF to a registered user.
If service is not made through ECF, the filing party must file a certificate of service in ECF. The
certificate must state how service or notice was accomplished on each party so entitled. Filers are
required to service copies of any electronically filed pleading, document, or proposed order to parties
not served electronically by ECF according to the Federal Rules of Civil Procedure.
DOCUMENT AND ATTACHMENT NUMBERING
The document selection screen includes the main document number, and the attachments are
numbered beginning with 1. This way, the attachment numbers are consistent everywhere they appear
(e.g., docket text, the document selection screen).
Also, the filing sizes and the total size of all the documents for a docket entry are displayed on the
document selection screen when viewing a document via the docket report.
The cumulative limit when viewing all or downloading all documents in a single entry is 60 MB.
FILING A MOTION
The process for filing a Motion is similar for filing other pleadings in ECF. Pursuant to Local Rule 7.1,
before filing a motion, a party must contact the judge’s courtroom deputy to schedule a hearing.
1. Click Civil>Motions and Related Filings>Motions
2. Read the ECF Filing Tips and click Next.
3. Enter the case number and click Next.
4. A screen will appear with the case name and number. Confirm the information is correct and click
Next.
5. Select the type of motion being filed. The selected event will appear on the right side of the window.
Click Next.
6. Click on the party(s) filing the document, click Next.
7. Click Browse to attach the appropriate Main Document.
8. If applicable, add Attachments, click Next.

Electronic Case Filing Procedures Guide - CIVIL CASES
Page | 26
9. If necessary, click the drop-down arrow or in the white Docket Text field to modify the docket text,
click Next.
10. Confirm the information in window, click Next to submit the Motion.
11. The NEF window will appear confirming the filing.
NOTE: If there are attachments, Click the second Browse and link the attachment to the filing, select
the category or enter in a document description, then click Next.

Electronic Case Filing Procedures Guide - CIVIL CASES
Page | 27
FILING A NOTICE OF HEARING ON MOTION
Pursuant to Local Rule 7.1, before filing a motion, a party must contact the judge’s courtroom deputy to
schedule a hearing. Select the appropriate menu from the ECF Menu Bar for filing a Notice of Hearing on
Motion:
1. Click Civil>Other Filings>Notices
2. Enter the case number, click Next.
3. A screen will appear with the case name and number. Confirm the information is correct, click Next.
4. Select the Notice of Hearing on Motion event. It will appear on the right side of the window. Click
Next.
5. A warning message will appear as a reminder to file the Motion before the Notice of Hearing on
Motion. If applicable, check the box noting that no hearing has been scheduled and click Next.
6. Click Browse to attach the appropriate Main Document.
7. If applicable, attach any Attachments and click Next.
8. If no hearing has been scheduled, skip to step 9. If a hearing has been scheduled, complete ALL
hearing information. Please be sure to list the Judge’s Courtroom, not chambers when selecting the
location.
9. Click the box next to the Motion to which the Notice of Hearing relates and click Next.
10. If necessary, click the drop-down arrow or in the white Docket Text field to modify the docket text,
click Next.
11. Confirm the information in the window and click Next to submit the Notice of Hearing on Motion.
12. The NEF window will appear confirming the filing.
FILING A MEMORANDUM IN SUPPORT OF A MOTION
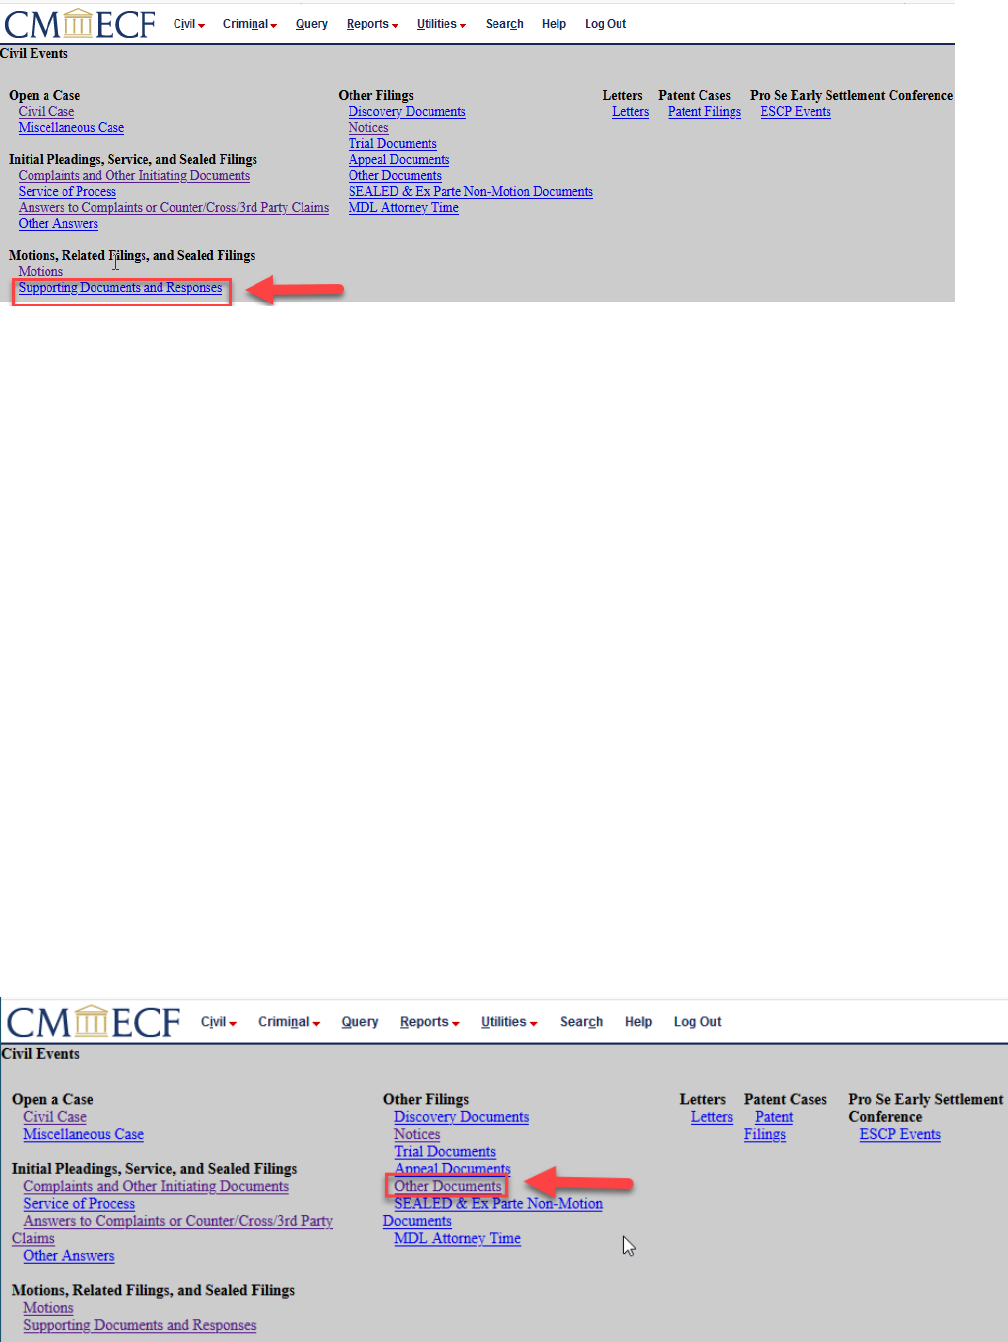
1. Click Civil>Motions and Related Filing>Supporting Documents and Responses.

Electronic Case Filing Procedures Guide - CIVIL CASES
Page | 28
2. Review the ECF Filing Tips and click Next.
3. Enter the case number and click Next.
4. A screen will appear with the case name and number. Confirm the information is correct, click Next.
5. Click the type of document being filed. It will appear on the right side of the window, click Next.
6. Click on the party(s) filing the document, click Next.
7. Indicate whether the document should be sealed by clicking the appropriate radio button, click Next.
8. Click Browse to attach the desired Main Document.
9. Click Browse to attach the Attachment(s) to the Memorandum.
10. Click the drop-down arrow to select the Category type of attachment. When finished, click Next.
11. Click the box to link the Memorandum to the related motions(s), click Next.
12. If necessary, click in the white Docket Text field to modify the docket text, click Next.
13. Confirm information in window, click Next to submit the Memorandum.
14. The NEF window will appear.
FILING AN AFFIDAVIT WITH ATTACHMENTS/EXHIBITS IN SUPPORT OF A MOTION
1. Click Civil>Motions and Related Filings> Supporting Documents and Responses.
NOTE: The only attachment allowed to the Memorandum is LR 7.1/LR 72.2 Word Count
Compliance Certificate. Attachments filed electronically must be less than 35 MB (35,840 KB) in
size after being converted to .pdf.

Electronic Case Filing Procedures Guide - CIVIL CASES
Page | 29
2. Review the ECF Filing Tips and click Next
3. Enter the case number and click Next.
4. A screen will appear with the case name and number. Confirm the information is correct and click
Next.
5. Click the type of document being filed (e.g., Affidavit in Support of a Motion), click Next.
6. Click on the party(s) filing the document, click Next.
7. Indicate whether the document should be sealed by clicking the appropriate radio button, click Next.
8. Click Browse to attach the appropriate Main Document.
9. If applicable, click Browse to attach any Attachment(s) to the Affidavit and click Next.
10. Enter in the Name of the Affiant, click Next.
11. Click in the box to link the Affidavit to the related document(s) already filed, click Next.
12. If necessary, click in the white Docket Text field to modify the docket text, click Next.
13. Confirm the information in the information window, click Next to submit the Affidavit.
14. The NEF window will appear confirming the filing.
FILING EXHIBITS
If the exhibit is one PDF document, follow the steps outlined in previous sections to locate and open the
document to attach to this event.
Depending upon how exhibits are filed, there are three menus available in which to file exhibits when
they are not attached to other documents or filings.
Motions and Related Filings>Supporting Documents and Responses
Other Filings>Trial Documents
Other Filings>Other Documents
The example outlined below includes attaching more than one exhibit to the Exhibit Event.
1. Click Civil>Motions and Related Filings>Supporting Documents and Responses.
NOTE: Remember to add a clear explanation of each attachment into the Description field; one that
matches either the document title or label. For Exhibits, select the Category “Exhibit(s)”, then tab to the
Description field and enter the title or label. (Do not re-type the word Exhibit or any abbreviation of the
word.)

Electronic Case Filing Procedures Guide - CIVIL CASES
Page | 30
2. Review the ECF Filing Tips and click Next.
3. Enter the case number and click Next.
4. A screen will appear with the case name and number. Confirm the information is correct and click
Next.
5. Select Exhibit (Motions and Related Filings) and click Next.
6. Select the filing party(s) and click Next.
7. Indicate whether the document should be sealed by clicking the appropriate radio button, click Next.
8. Enter List or the Exhibit Identifier(s) uploaded as the Main Document. Click Browse to attach the
appropriate Main Document.
9. Click Browse to attach any Attachment(s) to the Main Document.
10. Select a Category and/or Enter a description of the Attachment and click Next.
11. Click the box to link the attachment to another document and click Next.
12. If necessary, click in the white Docket Text field to modify the docket text, click Next.
13. Confirm information in window, click Next to submit the Exhibit(s).
14. The NEF window will appear confirming the filing.

Electronic Case Filing Procedures Guide - CIVIL CASES
Page | 31
FILING A MEET AND CONFER STATEMENT
1. Select Civil>Motions and Related Filings>Supporting Documents and Responses.
2. Review the ECF Filing Tips and click Next.
3. Enter the case number and click Next.
4. A screen will appear with the case name and number. Confirm the information is correct and click
Next.
5. Select Meet & Confer Statement and click Next.
6. Click on the party(s) filing the document, click Next.
7. Indicate whether the document should be sealed by clicking the appropriate radio button, click Next.
8. Click Browse to attach the appropriate Main Document.
9. Select the appropriate event/motion to which your even relates and click Next.
10. Click Next.
11. Confirm the information in the window, click Next to submit the filing.
12. The NEF window will appear confirming the filing.
FILING A PROPOSED ORDER
In addition to filing the Proposed Order in ECF, a copy of the Proposed Order must be emailed to
chambers in word processing format. Please see the Proposed Orders section of the Electronic Case Filing
Procedures Guide – Civil Cases for further information.
1. Select Civil>Motions, Related Filings, and Sealed Filings>Supporting Documents and Responses.
Electronic Case Filing Procedures Guide - CIVIL CASES
Page | 32
2. Review the ECF Filing Tips and click Next.
3. Enter the case number and click Next.
4. A screen will appear with the case name and number. Confirm the information is correct and click
Next.
5. Select Proposed Order to Judge re Motion and click Next.
6. Click on the party(s) filing the document, click Next.
7. Select whether the document is sealed or not, click Next.
8. Click Browse to attach the appropriate Main Document, click Next.
9. Select the appropriate motion to which your proposed order relates, click Next.
10. Click Next.
11. Confirm the information in the window, click Next to submit the filing.
12. The NEF window will appear confirming the filing.
FILING A STIPULATION
When filing a stipulation in ECF, be sure the pleading does not include a signature line for the Judge or a
proposed order. Proposed orders are to be filed as a separate filing on ECF and emailed to the Judge’s
chambers e-mail box.
1. Click Civil>Other Filings>Other Documents

Electronic Case Filing Procedures Guide - CIVIL CASES
Page | 33
2. Enter the case number and click Next.
3. A screen will appear with the case name and number. Confirm the information is correct and click
Next.
4. Select the filing party(s).
5. Select Stipulation or Stipulation of Dismissal and click Next.
6. Read the ECF Filing Tips and click Next.
7. Click Browse to attach the appropriate document and click Next.
8. Check the box if the document you are filing should link to another document in the case. If not, click
Next and skip to step 9.
If the checkbox is selected, click on the Next button and a list of documents will appear for selection.
Select the appropriate document and click Next.
9. Enter the name(s) of all other parties who have jointly signed the document and click Next.
10. If necessary, add additional names and click Next.
11. The Docket Text window appears. If necessary, type additional text in the box provided to describe
the stipulation. Click Next.
12. Review the filing and click Next to submit.
13. The NEF window will appear confirming the filing.
FILING A CERTIFICATE OF SERVICE
Pursuant to Fed. R. Civ. P. 5(b)(2)(E), service is completed by filing a document in ECF to a registered
user.
If service is not made through ECF, the filing party must file a certificate of service in ECF. The certificate
must state how service or notice was accomplished on each party so entitled.
Filers are required to serve copies of any electronically filed pleading, document, or proposed order to
parties not served electronically by ECF according to the Federal Rules of Civil Procedure.
To determine the party mailing information for a specific case, click Utilities>Mailings>Mailing Info for
a Case.
Certificates of Service can either be filed as an attachment in ECF during a filing or as a separate filing.
When filing multiple events at the same time, a separate certificate service can be filed and linked to the
relevant documents as outlined below:
1. Click Civil>Initial Pleadings, Service, and Sealed Filings>Service of Process.

Electronic Case Filing Procedures Guide - CIVIL CASES
Page | 34
2. Read the ECF Filing Tips and click Next.
3. Enter the case number and click Next.
4. A screen will appear with the case name and number. Confirm the information is correct and click
Next.
5. Select Certificate of Service, click Next.
6. Click Browse to attach the appropriate document and click Next.
7. Select the filing party(s) and click Next.
8. Click the box to link the attachment to the appropriate document and click Next.
9. If necessary, click in the white Docket Text field to modify the docket text, click Next.
10. Confirm the information in the window and click Next to submit the Certificate of Service.
11. The NEF window will appear confirming the filing.
VIEWING RESTRICTED CASES & FILINGS IN ECF
SOCIAL SECURITY & IMMIGRATION
Case-level restrictions will apply to civil cases involving social security and immigration matters. Pursuant
to Fed. R. Civ. P. 5.2, parties and their attorneys of record may have internet access to all documents
filed in social security and immigration cases. The public will have internet access only to docket sheets,
opinions, orders, judgments, and dispositions of the court.
RESTRICTED FILING IN ECF
Documents electronically filed in ECF may have different restriction levels, i.e. sealed, court only,
applicable party, or ex parte. When both the document and the docket entry are restricted, the docket
report will have skipped document numbers.
If a user does not have appropriate access to view a restricted document, when clicking on the document
number the user will be prompted with a message stating the document is not available or you do not
have permission to view this document.

Electronic Case Filing Procedures Guide - CIVIL CASES
Page | 35
If a document is restricted and the user has appropriate access to it, when clicking on the document
number the user will be prompted for his/her CSO login. This is simply a security measure to ensure that
the user has proper access to view the document(s).
ADD/CREATE PARTY FOR THIRD-PARTY COMPLAINT
1. Click Civil>Initial Pleadings, Service, and Sealed Filings>Answers to Complain or Counter/Cross/3
rd
Party Claims.
2. Enter the case number and click Next.
3. Select the filing party(s) and click Next.
4. Click the box to link the attachment to the appropriate document and click Next.
5. Indicate whether the document should be sealed by clicking the appropriate radio button, click Next.
6. Click Browse to attach the appropriate document and click Next.
7. Indicate whether the filing includes a counterclaim, crossclaim, or third-party complaint and click
Next.
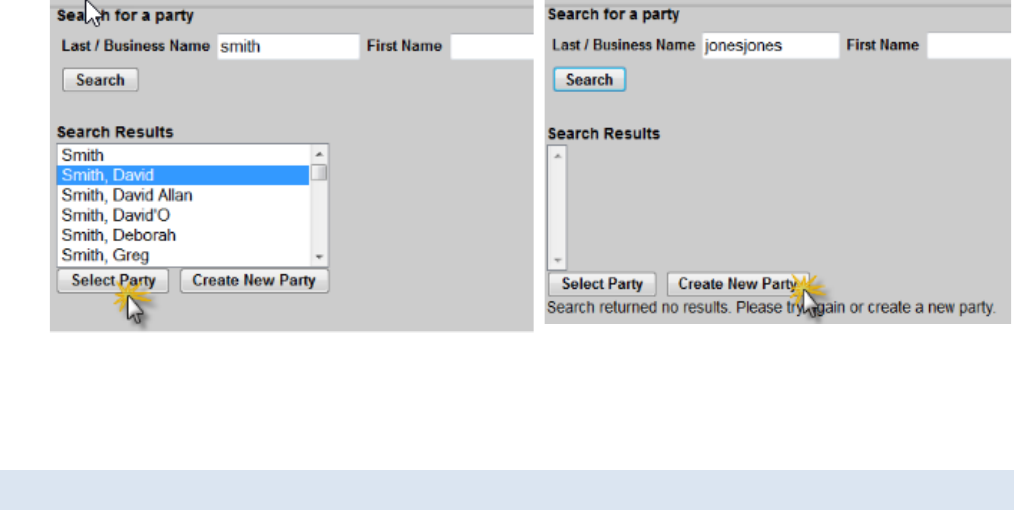
8. In the Select the Party window click New Party.
9. Enter in full or partial values for Name fields, click Search to determine whether party already exists
in ECF.
10. If the correct party is listed, click to highlight the name and click Select Party. If the correct party is
not listed, click Create New Party.
NOTE: If the “free look” has been used/is expired, login first to ECF (for identification as a case participant),
then user will be prompted for PACER login.
Electronic Case Filing Procedures Guide - CIVIL CASES
Page | 36
Correct Party
Listed
Correct Party
NOT LISTED
11. Modify the Role if necessary (the Role defaults to Defendant) and click Add Party.
12. Continue with the filing.
ADDITIONAL INFORMATION REGARDING ECF
SELECTING FILER IN A LARGE CASE
When a civil case has a large number of participants, the participants are sorted in alphabetical order by
last name and are grouped in chapters. Each chapter is displayed in the participant tree as a hyperlink.
If the user clicks a chapter hyperlink, the participants in the chapter are listed in the tree.
COMMON ERRORS WITH ECF FILING
Documents Filed in Error
A document incorrectly filed in a case may result from a) attaching the wrong PDF file to a docket entry;
b) entering the wrong case number and not discovering the error before completing the transaction; or
c) selecting the wrong document type from the menu.
After a document is filed electronically, corrections to the docket must only be made by the Clerk’s
Office. ECF will not permit the filer to make changes to the document(s) or docket entry once the
transaction has been submitted. Upon discovery of an error, the filer must call the ECF Help Desk at
612-664-5155 or 866-325-4975.
If a document has been incorrectly filed in the correct case, Clerk’s Office staff will edit the docket text
of the incorrect entry indicating “DOCUMENT FILED IN ERROR” at the beginning of the docket entry. The
user should immediately file the correct document in ECF and modify the title of the pleading as
appropriate (e.g., “Amended”, “Substituted”, “Corrected”).
If a document is filed in the wrong case Clerk’s Office staff will edit the docket text of the incorrect entry
indicating, “DOCUMENT FILED IN ERROR” at the beginning of the docket entry. The user should then file
the document in the correct case.
Selecting the Wrong Document Type

Electronic Case Filing Procedures Guide - CIVIL CASES
Page | 37
In the event you attempt to attach a file that is not in PDF format, ECF will display the following error
message after you click on the Next button:
1. Click the Back button and ECF will return to the previous screen.
2. Select the PDF file of your pleading and proceed as before.
Failure to Select a Document to File
If you fail to select a document to file with your pleading, ECF will display the following error message:
If you click OK ECF will return you to the Attachments screen. You cannot proceed without attaching a
PDF document.
ATTACHMENTS AND ATTACHMENT SIZE
The maximum file size limit for uploading individual documents (including exhibits) filed in ECF is 35 MB
(35,840 KB) per PDF document. The combined file size of PDFs being uploaded technically does not have
a limit and will be determined by your internet speed. However, the court recommends limiting the
combined file size to a total of 350 MB (358,400 KB), i.e., 10 PDFs at 35 MB each, which is the maximum
file size that is possible to be downloaded at one time.
PACER FEES WINDOW
When accessing or printing a document that incurs PACER fees, a Transaction Receipt table appears at
the bottom of the window. This table provides the total charges billed.
SEALED DOCUMENTS
For more details about filing under seal, please refer to the Sealed Civil User’s Manual and the Filing
Documents Under Seal section of the Electronic Case Filing Procedures Guide – Civil Cases.

Electronic Case Filing Procedures Guide - CIVIL CASES
Page | 38
PERSONAL IDENTIFIERS
Under Fed. R. Civ. P. 5.2(a), unless the court orders otherwise, an electronic or paper filing with the court
that contains an individual’s social-security number, taxpayer-identification number, or birth date, the
name of an individual known to be a minor, or a financial-account number, the filing party or nonparty
may include only:
The last four digits of the social-security number and taxpayer-identification number;
The year of the individual’s birth;
The minor’s initials; and
The last four digits of the financial-account number.
In addition, exercise caution when filing documents that contain the following:
Personal Identifying Number (e.g., driver’s license number);
Medical Records, Treatment, and Diagnosis;
Employment History;
Individual Financial Information;
Propriety or Trade Secret Information.
Under Fed. R. Civ. P. 5.2(b), the redaction requirements do not apply to the following:
A financial-account number that identifies the property allegedly subject to forfeiture in a forfeiture
proceeding;
The record of an administrative or agency proceeding;
The official record of a state-court proceeding;
The record of a court or tribunal, if that record was not subject to the redaction requirement when
originally filed;
A filing covered by Rule 5.2(c) or (d); and
A pro se filing in an action brought under 28 U.S.C. §§ 2241, 2254, or 2255.
Waiver of Protection of Identifiers
A person waives the protection of Rule 5.2(a) as to the person’s own information by filing it without
redaction and not under seal. Fed. R. Civ. P. 5.2(h).
Enforcement
It is the sole responsibility of counsel and the parties to be sure that all pleadings comply with the rules
of this court requiring redaction of personal identifiers. The Clerk will not screen documents for redaction
and will not reject documents solely on the basis that the documents contain personal identifiers.
Filing Unredacted Documents Under Seal
1. Under Fed. R. Civ. P. 5.2(f)-(g), a person making a redacted filing may also file:
An unredacted copy of the document under seal without seeking leave of the court in accordance
with the Filing Documents Under Seal section of the Electronic Case Filing Procedures Guide –
Civil Cases regarding filing documents under seal; or

Electronic Case Filing Procedures Guide - CIVIL CASES
Page | 39
A reference list under seal without seeking leave of the court in accordance with the Filing
Documents Under Seal section of the Electronic Case Filing Procedures Guide – Civil Cases
regarding filing document under seal. The reference list must contain the complete personal
identifier(s) and the redacted identifier(s) used in its place in the filing.
2. The redacted version of the document must be filed electronically in ECF.
3. File the sealed version or list in accordance with the Filing Documents Under Seal section of the
Electronic Case Filing Procedures Guide – Civil Cases.
Sample of Reference List of Personal Identifiers Redacted
CREATING AN APPENDIX WITH DOCUMENT LINKS
A set of radio button options labeled “Include documents in Appendix” and “Include document
hyperlinks in Appendix” appear at the bottom of the Docket Report. These options allow users to indicate
if the PDF documents they selected for inclusion in the appendix docket sheet should be appended to
the docket sheet or if hyperlinks to those documents should be included instead.

Electronic Case Filing Procedures Guide - CIVIL CASES
Page | 40
Options for Creating an Appendix
When the Docket Report is run with the Create Appendix option selected, two radio buttons are included
at the bottom of the report: Include documents in Appendix and Include document hyperlinks in
Appendix.
Creating an Appendix with the “Include documents in Appendix” Option
If the Include documents in Appendix option is selected when the appendix is generated, the application
produces a PDF version of the docket sheet with the selected documents appended.
Creating an Appendix with the “Include document hyperlinks in Appendix” Option
If the Include document hyperlinks in Appendix option is selected when the appendix is generated, the
application produces a PDF version of the docket sheet that does not include the documents from the
case record.
Instead, this PDF includes document hyperlinks which direct the user clicking on them back to the District
Court’s CM/ECF application to view the document(s).
ACCESSING THE NEW CASES REPORT
The New Cases Report lists new civil and criminal cases filed in the U.S. District Court, District of
Minnesota each day. It indicates the date and time (within the hour) the case was assigned, case number,
case name, the District Judge assigned to the case, and the Magistrate Judge assigned to the case. The
information will be available on the New Cases Report for 30 days. This report is designed to assist the
public with viewing new case filings in the U.S. District Court. The judge assignments in the New Cases
Report are listed with their initials. Click on the Judge Initials link to view a listing of the Judge’s initials
and corresponding full names.
1. Navigate to the District of Minnesota’s website.
2. Click on the Case Information tab.
3. Click New Cases.
4. Click Access To The New Cases Report.
MDL CASE REPORT
The MDL Case Report lists all cases associated with a Judicial Panel on Multidistrict Litigation (JMPL)
action pending in the District of Minnesota. The report is sorted by case number and case type (the main
MDL case is always listed first). The user can choose whether all MDL-related cases or only pending MDL-
related cases should display.
This report is accessed through PACER, which is an electronic public access service that allows users to
obtain case and docket information.
Follow the steps below to access the MDL Case Report through PACER:
1. Log into the ECF system with your CSO login and password.
2. Click on Query on the menu bar.
3. Enter a master MDL case number or an associated case number for a JPML case pending in the
District of Minnesota.
4. Click Run Query.

Electronic Case Filing Procedures Guide - CIVIL CASES
Page | 41
5. Click the link, MDL Case Report.
6. Select the applicable radio button to display all cases or pending cases only then click Run Query.
7. The output will then display accordingly.
MOBILE QUERY
The mobile query interface offers a simplified user experience optimized for display on mobile devices.
This interface incorporates the following functions:
Search interface
Party selection from party name search result list
Case selection from case search result list based on case or party name search
Attorney information for selected case
Deadlines/Hearing for selected case
Docket entries for selected case
Accessing the Mobile Query
Users can access the mobile query via one of the following:
The Mobile Query link on the Query selection criteria page.
The Mobile Query link on the Query results page.

Electronic Case Filing Procedures Guide - CIVIL CASES
Page | 42
Mobile Query User Interface
All interfaces in the mobile query include these five elements:
1. Back button
2. Title CM/ECF Mobile – MND
3. Logout button
4. Court home page button
5. Search field for party name or case searched
The default search screen contains one text field that allows users to search by case number, party name,
or attorney.
At the bottom of each page, a Full Site button provides access to the standard-formatted application
interface page. If the user clicks the Full Site button, the full site is set as the default for approximately
twelve hours. If any specific page generates a PACER billing receipt, a summary form of the billing
information is displayed in the black bar along the bottom of the page.
Name Searches
For name searches, the required format is Last Name, First Name, where a comma separates the two
parts. The first name is optional. When searching by name, the user must enter at least two letters of
the last name. If only on letter is entered, the search will only find parties or attorney whose last names
are exactly that letter. If a party name search returns more than one possible match based on the criteria
provided, the mobile interface presents the user with a list of all matching names and requires the user
to select a specific name.
If more than eight results are returned on any query page (excluding the docket entries page), above the
list, an on-page filter allows the user to search the results already downloaded to the browser. This does
not affect PACER billing.
Electronic Case Filing Procedures Guide - CIVIL CASES
Page | 43
If only one case is linked to a specific name, the case results for that case is returned.
If one name matches the initial search but is linked to multiple cases, or if a user selects a name from
the result list of a multi-response search, a list of cases associated with that party is displayed. When a
case is selected from this list, the case query result page is displayed.
Case Searches
Entering a numeric search term triggers a case number search. If an alphanumeric search term is entered,
it triggers a party or attorney name search. If a case number search returns no results, the system
automatically runs a name search using the same terms. Spaces can be used in case numbers instead of
dashes or other punctuation. The case number search does not generate a PACER billing receipt, since
the standard query application does not bill for the case number lookup.
If a case search returns more than one possible match based on the criteria provided, the mobile
interface presents the user with a list of all matching cases and requires the user to select a specific case
before proceeding to the case query results screen. When a case is selected from this list, the case query
result for that specific case is displayed.
If only one case matches the case criteria provided, the case query result page is displayed.
Case Query Results
When a search is run, the Mobile Query displays results in the case query result page This screen presents
the following information:
case number, short title, and date filed;
link to see attorney information in the case;
link to see party information in the case;
link to see deadline/hearing information in the case;
link to show all docket entries, and the number of docket entries that will be shown;
search icon that brings up a search box to find docket entry information that matches the text
entered.
The Case Query Results screen is similar to the full site Query result page, which does not produce a
PACER billing receipt. Billing will occur based on additional selections from this page.
Detailed Case Information Displays
Attorneys, parties, deadlines, and docket entries are listed in similarly formatted lists that wrap to fit on
small screens.
Each list header shows the case number, item listed, and the number of the matches. If more than eight
items appear in the list, a Filter Items search box at the top of the list allows the user to narrow down
the list. This Filter Items search box is available on all case details except for the docket entries. The user
is billed for receiving the total data, not for using this filter to hide data already received.
The docket entry information includes document numbers, the filed date, and the docket text. For
documents, the document number appears in its own cell on the left. The entire cell is clickable to make
clicking the link easier on small screens. Clicking on a document takes the user to familiar ECF screens to
view the document.
The mobile query ignores PACER billing display preferences and displays PACER receipts via the standard
ECF PACER interface.
