
____________________________________________________________________
Drag Racing System
DragPro 2000
DragPro 3000
USER MANUAL
___________________________________________________________________
www.TrackmateRacing.com
1

Introduction
Trackmate Racing, formerly known as TrakMate has been making drag racing systems
since 1999. Now covering many forms of drag racing that not only include Slot Cars
and Radio Control Cars but also Full Scale Cars, Snowmobile, ATV, Boats.
The help file in this manual will cover the software and hardware installations for HO
and 1:24 scale slot cars. All systems are completely tested before shipping,but should
you encounter any problems please check out the troubleshooting section. Toll Free
support is also provided during business hours.
Help File Version 6.8 updated July 2020
2

TABLE OF CONTENTS
Introduction 2
Features 4
Full Tree 4
Computer Requirements 4
USB or Com port (9 pin male connector)Screen samples 4
Important Settings 6
Options 9
Win Lights 9
Time Slip Printer 9
Drag Racing 10
Bracket Racing (Dial-in) 12
Running A Race 13
U-Sensors for 1:24 scale 15
16 inch LED tree 16
How to remove tree cables 16
Tree power 16
Reference 17
Identify your type of DP3000 19
Sensor Location 21
Troubleshooting 21
Testing Board and the Tree 22
FAQ (Frequently Asked Questions) 23
Glossary 24
3

Features
● Full Tree
● Pro Tree
● Bracket Racing
● Index Racing
● Two staging modes
● .0001 accuracy 1/10000 of a second
● Print race slips Automatically or Manually
● View logged races
● View/Print top qualifiers
● Sensor Test
● Auto Tree for hands free operation
● Supports non standard Pro Treeand Full Tree times
● Swap Lanes in a single click
● Supports LED sign
● Supports Win Lights
● Flash winner on tree option
● Can be used for trial runs
● Built-in spreadsheet to view and sort logged races
● Option to announce ETs etc over speakers automatically
● Use the countdown clock to force racers to start the race (completely
configurable). A must have for big events
Note: Countdown clock is a paid option
Computer Requirements
PC requirements are very low as it can run on old and new computers; desktops and
laptops. No CD is required and internet connection is not required. Size of memory and
hard drive is never a problem.
Minimum requirements are:
● Windows XP/VISTA/7/8/10
USB or Com port (9 pin male connector)
4
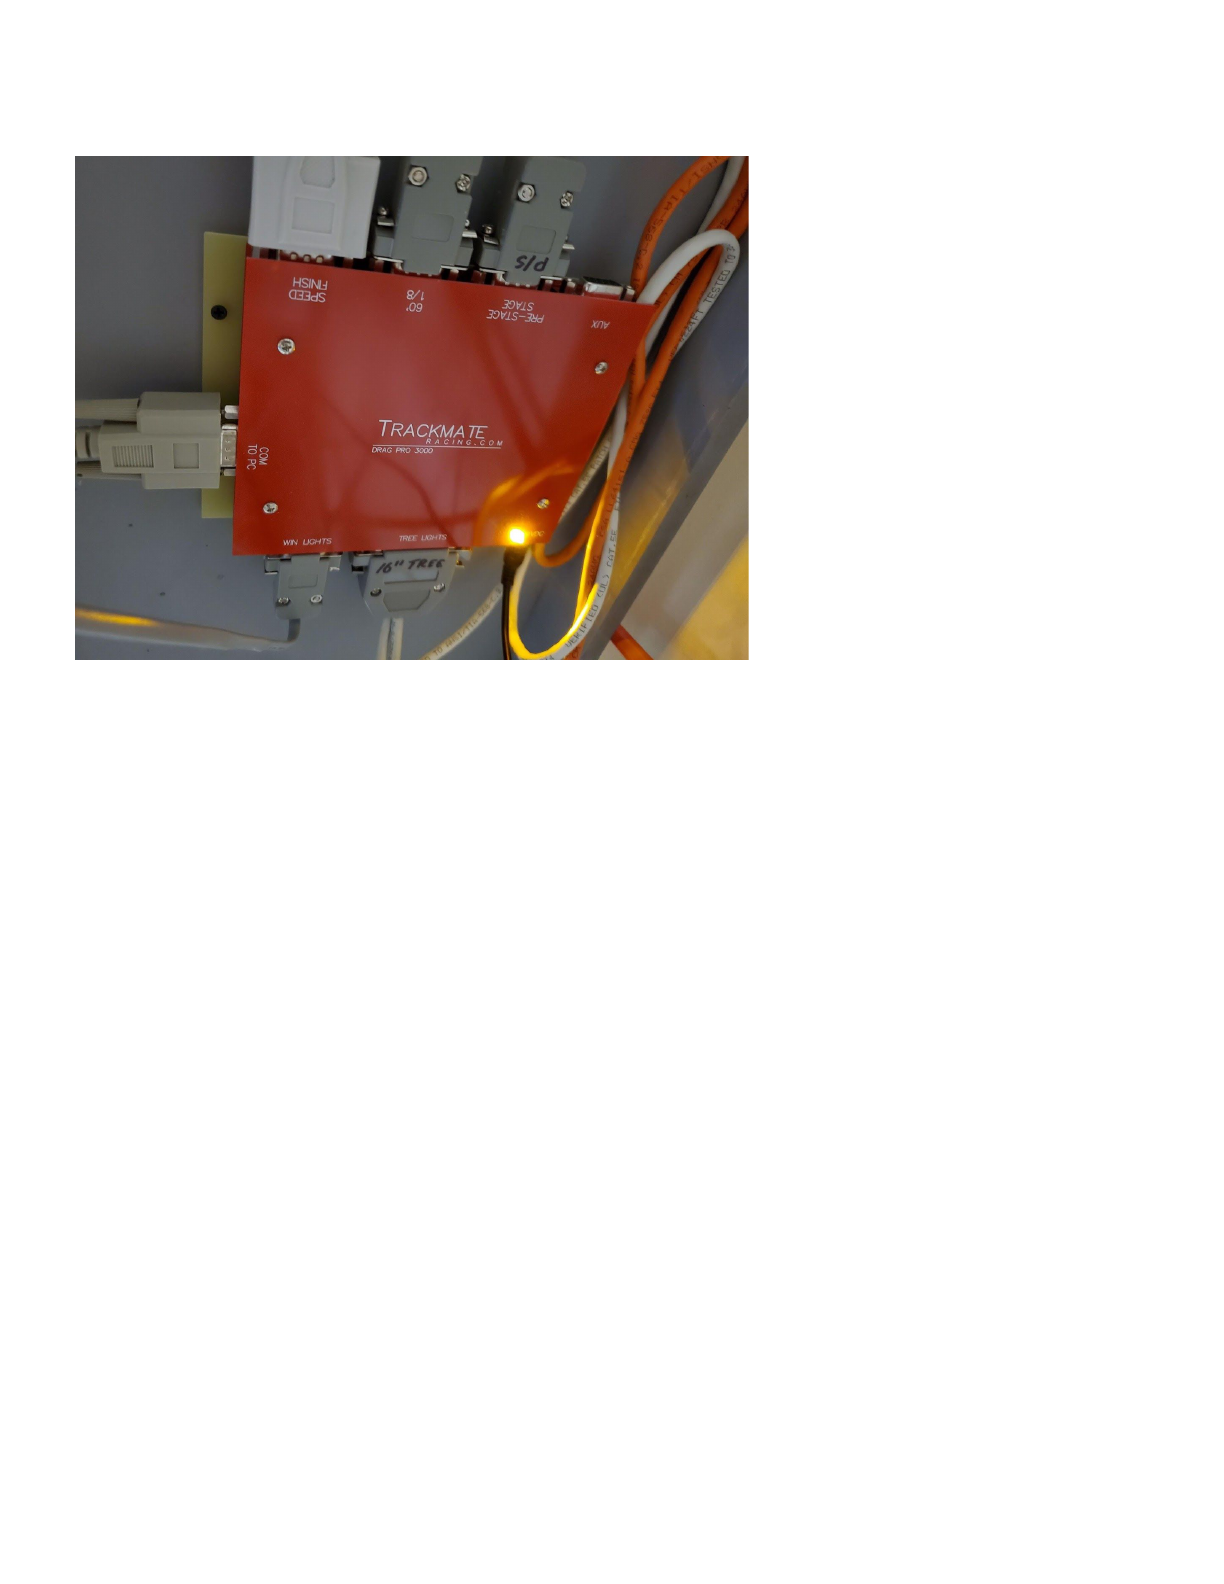
Hardware Hookup
Mount the Red module underneath the track near the starting line. The Red module is powered by
the 12volt adapter. (ignore the 9v label) LED on the module should come on.
The 6 inch LED tree requires no power. The 16 inch LED tree requires a 24 volt adapter which we
include.
AUX connector is normally for the optional 1000ft (scale) sensors.
Install the sensor board that has dual sensors on them at the starting line.
5

Important Settings
In order for the system to work we need to set some important settings.
Click Settings, On password prompt just click OK. There is no password after
installation.
Com Port:A USB to Serial cable is shipped with each system. This cable creates a
virtual COM port. We need to set the COM port. Fortunately it's very easy to do with the
latest software. Simply go to the (top menu) Settings>Track andclick “Auto Set Com
Port”.
Select Units of Measure: Select Imperial for MPH or Metric for KPH
Track Name: Enter Track Name, this is what will appear on printed time slips.
Inches between Speed Trap and Finish Line: Enter in inches, distance between the
speed trap sensor and finish line sensors.It must be entered in inches even if
metricwas selected, 2.54cm = 1 inch. Normally HO is 12 inches. 1:24 scale 30 inches.
Track Length: This number is not used to compute any data but will appear in the time
slip, you mayenter scaleor real length.
Speed Multiplier: Normally left at 1.Multiplies real speed by the number in this box.
Can be used to display a more realistic speed in some smaller scale applications such
as slot cars.
Invert Sensor Signal: This should be left unchecked
6

Installed Sensors: Check mark all the sensors installed
Pro-Tree, Yellow on Time: Normally left at .4 This means the yellow lights will stay
on for .4 seconds.Full Tree, Yellow on Time: Normally left at .5
Flash Winner on Tree: Instead of having winlights you can flash the winner on tree.
The Green light will flash. This will also display breakouts. The top yellow will stay on if
the racer does a break out.
Invert Tree Signal: Depending on the tree used, this setting may need to be checked
or unchecked. If this setting is incorrect the lights that should be off will be on and vice
versa.
7

Staging
You can run two different modes of staging as follows:
Go to Settings>Staging
Staging:
Pre-stage/ Stage: Both pre-stage sensor and Stage sensor should be blocked
when staging.
Pre-stage/ Start: Block Prestage Only, If the pre-stage sensor is not installed,
roll up to the start line without blocking the stage sensor. When this mode is
selected the prestage and stage lights will both come on when the sensor is
blocked.
Printing: Set number of copies for time slips
Time Out: Set how many seconds you want to wait for both cars to cross the finish
line. If one car is unable to complete the race or cross the finish line, the system will
force the end of the race after this predetermined amount of time. It's important that
you set this about 5-10 seconds more than anticipated ET times.
Hardware Installation
8

Options
Win Lights
Red/Black wires = Left Lane
Yellow/Green wires = Right Lane
Win Lights are a paid option
Time Slip Printer
To install the time slip printer the computer will require a 2nd serial/com port (9 pin
male connector) or a USB to serial adaptor.
Run DP3000sp712_Driver.exe
Select Star SP712 Line Printer
Select Com Port. It should be different from the one the DP3000 module is connected
to.
Select the SP712 as your default printer in windows control panel->Printers
To autoprint timeslips click on Preference->autoprint
.
Drag Racing
PRO and FULL Tree
9

Pro Tree
On a Pro tree all 6 amber lights come on for .4 seconds then the green lights come on.
In full scale drag racing drivers will react as soon as they see the ambers come on. If
you watch drag racing on TV you will most likely see the Pro Tree.
Full Tree
On a Full tree yellows come down in sequence each one staying on for .5 seconds.
Full Tree is normally used in bracket racing .
10

Pro Tree Time Adjustable In Trackmate Software - WHY?
The following applies mostly for slot cars. We made the amber lights on time
adjustable in the software (see settings), read on to find out why. On a Pro tree all 6
amber lights come on for .4 seconds then the green lights come on. In full scale drag
racing drivers will react as soon as they see the ambers come on. Human reaction
time takes about .2 seconds, that’s the time it takes to respond to a visual. There’s
another .020 seconds before the light is perceived as on. 0.2 + .02 = .220 seconds,
that leaves .180 seconds. It will take at least .180 seconds for the car to roll out of the
stage beam. The driver never has to worry about Red lighting if he reacts when the
amber lights come on. Now for slot cars it’s a different story. A slot car will move
forward a ¼ “ in about .010 seconds from a stand still, this means you will be Red
lighting every time if you react as soon as the ambers come on. This is why
TrackMate Dragpro software has made the Pro Tree adjustable. It has been requested
by customers who race full scale drag racing cars. They believe that it should not be
possible or difficult just as it is in full scale drag racing to red light on a Pro Tree if you
react as soon as the ambers come on. I recommend adjusting the pro tree to .200
seconds if you’re using external tree lights (for LED trees you will need to adjust the
Pro Tree time to a lower value) you might experience better racing because both cars
will be coming off the line within a fraction of a second. It’s easy as soon as you see
the ambers come on pull the trigger. Changing the Pro Tree time will not affect ET
times as ET times do not include reaction time. Some racers prefer a .200 second Pro
Tree you just might like it also!!!!
11

Bracket Racing (Dial-in)
What is Bracket Racing?
Why?
Bracket racing is a form of drag racing whereby vehicles of different performance levels
can compete on a potentially even basis. The anticipated elapsed times are compared
for each vehicle, with the slower car receiving a head start equal to the difference of
the two. With this system, virtually any two vehicles can be paired in a competitive
drag race.
How it works
If car A chooses a dial of 16.00 seconds and car B chooses a dial of 14.50, car A will
get a 1.5-second head start. The win will go to the driver who crosses the finish line
first. TrackMate software simply enters the dial-in for both drivers and the tree will
come down staggered giving one lane the appropriate head start. Bracket racing only
works with the Full Tree. (Some clubs also do it with the PRO tree but this is rarely
done)
Disqualifications
If a driver runs quicker than his or her dial, he or she is said to break out and is
disqualified. If both drivers run quicker than their dials, the win goes to the driver who
breaks out by the least. A foul start, or red-light, takes precedence over a breakout, so
a driver who red-lights is automatically disqualified even if his or her opponent breaks
out. If both red-light the driver who red-lighted first loses. TrackMate Drag software
takes care of all this and will display appropriate winner
Choosing a Dialin
Example: Car "A" has recorded times of 17.78, 17.74, and 17.76, and the driver feels
that a "dial-in" of 17.74 is appropriate. Meanwhile, driver "B", has recorded times of
15.27, 15.22, and 15.26 on the same track, and has opted for a dial-in of 15.22.
Accordingly, car "A" will get a 2.5 second (17.75-15.25=2.5) head start over car "B"
when the Tree counts down to each car's starting green light.
Strategy
Picking a Dialin that is too slow and you are more likely to break out. Pick a Dial-in that
is too quick and you will receive less of a head start or your opponent will receive more
of a head start. Having a car that runs consistent ETs will help.
12

Running A Race
Entering Names
To enter names for the race you must enter them in the database. From the top
menu Click on Database->Racers. Once the names are entered in the database, you
will be able to select the name for the race.
Classes
Class names are used to separate types of races, for example you may want to run
Modified and Stock. The class name will also be printed on the time slip.
Main Screen
The main screen is easy to use. To start a race hit the start button. You have the
option of staging before clicking the start button, or clicking the start button then stage.
The delay between the tree coming down and clicking the start button is determined
by the setting random tree delay
.
You will probably want a delay if you're by yourself,
and no delay if there's a race director. You can also have auto tree where clicking the
start button is not even necessary
To select the racers name you must first enter the racers name in the database. see
entering names.
To enter Dialin, you must select the type of tree that supports dial in. Then simply type
in the dialin for each racer.
When the race is over you will see the results on the screen
13

Dan's ET of 0.960 was lower than his Dialin of 1.000 That's called a breakout, Steve is
in Green indicating the winner.
Steves RT (Reaction Time) is below 0. meaning he Red lighted.
14

U-Sensors for 1:24 scale
Arrow should point towards the finish line.
It is written on the board which colored wires go where.
Left lane use: Green and Brown.
Right lane use: Blue and Orange
Connectors do have an orientation. Wires on the connector
must exit towards the edge of the board. See examples
below.
Left Prestage/Stage
Green and Brown wires
Right Prestage/Stage
Blue and Orange wires
Left Land Sensor
Green and Brown wires
Right Lane sensor
Blue and Orange wires
15

16 inch LED tree
How to remove tree cables
The LED tree is shipped with cables connected but if for some reason you need to
remove cables, do not use force, use a small screwdriver to release the tab.
To remove the top cable use a small flat screwdriver inserted from the side to push the
cable tab towards the rear.
To remove the bottom cable insert a small screwdriver through the hole. No force is
required to pull cable out. The two cables are marked T for Top and B for Bottom
Tree power
The LED Tree is shipped with a 24volt power supply and it plugs into the rear of the
tree near the bottom.
16

15
Reference
Connector Pinout
Pre-Stage Stage Cable
Pin#
Color
Lane
Sensor
1
Brown
Left
Prestage
6 – GND
Brown/White
2
Orange
Right
PreStage
7 – GND
Orange/White
3
Green
Left
Stage
8 – GND
Green/White
4
Blue
Right
Stage
9 – GND
Blue/White
5 - not used
17

Mid Sensors Cable
Pin#
Color
Lane
Sensor
1
Red – short cable
Left
60’
6 – GND
Black
Left
2
Yellow –short cable
Right
60’
7 – GND
Green
Right
3
Red – long cable
Left
1/8 MILE
8 – GND
Black
Left
4
Yellow –long cable
Right
1/8 MILE
9 – GND
Green
Right
5 – Not Used
Speed Trap / Finish Cable
Pin#
Color
Lane
Sensor
1
Brown
Left
Speed
6 – GND
Brown/White
2
Orange
Right
Speed
7 – GND
Orange/White
3
Green
Left
Finish
8 – GND
Green/White
4
Blue
Right
Finish
9 – GND
Blue/White
5 - not used
1000’ Sensor Cable (Optional)
Pin#
Color
Lane
Sensor
1
Red
Left
1000’
6 –GND
Black
Left
2
Yellow
Right
1000’
7 -GND
Green
Right
18

Identify your type of DP3000
There are two types of DP3000 boards
Board on the left is for Trackmate 6 inch and 16 inch LED trees. Do not plug a 12 volt
with trailer lights type tree into this type of board.
Board on the right (notice gap between connectors and top plate) is for 12 volt trees,
Trees built with trailer lights.
Tree using trailer lights (old TrixTrax trees)
The following information is for modules that have transistor outputs for the Tree.
(module on the right in picture above)
Tree lights cable connects to the DB25 (25 pin connector) on board.
The common for all the lights will connect to the POSITIVE of the power supply. (Yes
positive NOT negative)
The negative of the power supply will connect to pins 18-25 of the 25-pin connector on
the DragPro board.
19

Tree Lights
DB25 male PIN#
Left side lights
DB25 male PIN#
Right side lights
PRESTAGE
1 - Brown
8 - Brown/White
STAGE
2 - Orange
9 –Orange/White
TOP YELLOW
3 – Green
10 – Green/White
MID YELLOW
4 – Blue
11 – Blue/White
BOT YELLOW
5 – Brown
12 – Brown/White
2
nd
Cable
GREEN
6 – Orange
13 – Orange/White
2
nd
Cable
RED
7 - Green
14 – Green/White
2
nd
Cable
GND –
Connect ground from Tree Power Supply to pins 18-25 (or use
the two green terminal screws near the 25pin tree connector
available on some modules)
One side of the entire tree lights will be tied together to connect this to the
Positive of the trees power supply. If using automotive trailer lights a 12volt 10
amp power supply is recommended.
Win
Lights
DB9
PIN#
LEFT
DB9
PIN#
RIGHT
WIN
2
1
GND
6-9
6-9
Or gnd screws
The side of both win lights will be connected together, connect this to the Positive
of the trees power supply or other 12volt supply, the negative of the power supply
will go to pins 6-9.
20

Sensor Location
Use this table to determine where to place the sensors on your track
1 mile = 5280’
HO (1/64)
1/32
1/24
¼ mile
20’ 7.5”
41’3”
55’
1000 feet
15’ 7.5”
31’3”
41’8”
1/8 mile
10’3.75”
20’7.5”
27’6”
330 ft
5’ 1.875”
10’ 3.75”
13’ 9”
60 feet
11.25 inches
22.5 inches
30 inches
Stage sensor
0 inches
0 inches
0 inches
Prestage sensor
- 0.3 inches
-0.3 inches
-0.3 inches
Recommended
Speed Trap
12 inches before
finish
30 inches before
finish
30 inches before
finish
Guide flag sensors have prestage and stage on the same board, so prestage location is fixed.
Troubleshooting
I don’t have the password
There is no password on a fresh install, just click OK
Tree Does not come down when I click start?
Go to settings and click AUTO SET COM port button
Race finishes immediately after lights goes green
Most likely a bad finish sensor click menu>test to test sensors.
DNF Not reading finish line sensors or No speed
Make sure the sensor is all the way up and touching the braid, there should be no
material between the sensor and braid. Braid on the car should be flat, so the guide
flag is as deep as possible on the slot. Try replacing the sensor. Verify that there is no
bump on the track, like a speed sensor pushing too much on the braid causing a
bump. It can also be that the car is going fast and the air is lifting the car, try adjusting
the aerodynamics of the car.
Error 430
Uncheck All sounds or install voice drivers. There are two programs in the voice driver
directory run those two programs then voice should work
21

Error on startup
In Settings>Display/Print.....Make sure you have a printer selected for both time slip
and regular. You can not leave it blank. If you have no printer installed on your
computer, you can select Microsoft XPS printer.
When running one car I have to wait a long time for results
Use the ESC key to force the end of the race. You can also reduce time out delay in
settings
ET-DI not showing up in results screen
Note: You need to be using Dialin or Index.
Uninstall program and reinstall in C:\DP3000v670 instead of c:\program files\...
Right side of the screen is missing, not all the data fits on the screen.
This is caused by having the screen resolution set to low. You must have at least a
resolution of 1024x768. To increase resolution right click a blank area on your desktop
and then click properties>settings and adjust screen resolution.
Both Prestage and Stage Lights come on at the same time
Go to Settings>Stagging You can select prestage/ stage on newer software version
it is called Place car in stage beam.
Invalid Com Port, Trackmate Interface not found
First try this... Trackmate software go to Setting> click on Auto Detect Com port button.
If the computer is not connected to the internet you will encounter this problem.
Install the USB-to-serial-driver, which is a small program you need to run just once.
You should be able to find it on the Trackmate USB stick supplied or the software link
provided. After installing software plug the USB to serial cable into the computer, and
try again. In the Trackmate software go to Setting> click on Auto Detect Com port
button. If it still doesn’t work, exit the program and wait 10 minutes and try again. If it
still doesn’t work, reboot and try again.
Script out of range
Go to View>logged Races and clear data
Testing Board and the Tree
To test the board and the tree no PC is required. When you power on the board the
Tree should start a left - right sequence going from top to bottom, Starting with the top
left Prestage bulb and ending with the Right bottom Red bulb.
All the Tree lights are on, it seems backwards
22

Go to settings and just click OK to update the module with the settings, if lights still
remain on.. go to settings and change check/uncheck Invert Tree signal
Test Sensors
To access the Diagnostic Screen click Test on top main menu
When the sensor is not blocked square will appear Green, when the sensor is blocked
square will appear Red.
Square will also appear Red if that sensor is not installed. It is important that you
actually block the sensor to verify that it turns red. Paper is not sufficient to block the
sensor and you must use something that is completely opaque.
Sensors not working (HO sensor type)
You need to have sufficient light above the sensors. Fluorescent, CFL, and LED lights
will not work. Use halogen, incandescent light, or Trackmate Infrared LEDs. Contact
Trackmate for more information.
Run Time error
If you don’t have speakers plugged in you may get a runtime error, In the Trackmate
software go to menu> sound and uncheck all the sound boxes.
FAQ (Frequently Asked Questions)
When I pre-stage both pre-stage and stage lights come on?
That's how it works if you have ‘place car before stage’
selected in settings. This
means only the first sensor is used for staging the second sensor starts time and red
lights. Only block the first sensor when using this mode.
I’m getting weird times, what is causing it?
Click on topMenu>Test. This will bring up the diagnostic screen. GREEN means the
sensors see light; RED means the sensors are blocked.
When I stage the car the Pre-stage and Stage lights go out, it’s working
backwards, why?
Uncheck invert sensor signal in settings
On Pro tree The Yellow lights seem to stay on too long/too short
Go to settings and verify that the pro tree time is set at .400
23

The MPH doesn’t seem right
Is the distance of the speed trap set correctly in the settings?
Set the speed multiplier in the settings to 1 for actual MPH.
Is there a way to shorten the time for the tree to start after clicking start?
You can set the tree delay range in the settings.
My ET was quicker and I still lost, why?
ETs do not include the reaction time.
Glossary
Auto Start: Allows hands free operation of the system
Breakout: Used only in handicap racing, “breakout” refers to a contestant running
quicker than he or she “dialed” his or her vehicle (predicted how quick it would run).
Unless the opponent commits a more serious foul (e.g., red-lights, crosses the
centerline, or fails a post-race inspection), the driver who breaks out loses. If both
drivers break out, the one who runs closest to his or her dial is the winner.
Burnout: spinning the rear tires in water to heat and clean them prior to a run for better
traction. A burnout precedes every run.
Christmas Tree: Also called the Tree, it is the noticeable electronic starting device
between the lanes on the starting line. It displays a calibrated-light countdown for each
driver.
Deep stage: to roll a few inches farther into the beams after staging, which causes the
pre-stage lights to go out. In that position, a driver is closer to the finish line but
dangerously close to a foul start.
Dial under: when drivers in Super Stock and Stock (handicap categories) select an
elapsed time quicker than the national index. Drivers select a dial-under, or e.t., that
they think their cars will run based on previous performance. The breakout rule is in
effect.
ET: Elapsed Time
Elapsed time: the time it takes a vehicle to travel from the starting line to the finish
line. Also called e.t.
Eliminations: After qualifying, vehicles race two at a time, resulting in one winner from
each pair. Winners continue in tournament-style competition until one remains.
Foul start: indicated by a red light on the Christmas Tree when a car has left the
starting line before the green light, or starting signal.
Full Tree: used in Competition, Super Stock, and Stock, for which a handicap starting
system is used to equalize competition. The three amber bulbs on the Christmas Tree
24

flash consecutively five-tenths of a second apart, followed five-tenths later by the green
starting light. A perfect reaction time on a full Tree is .500.
Holeshot: when a driver reacts quicker to the Christmas Tree to win a race against an
opponent with a quicker e.t.
Index: the expected performance for vehicles in a class as assigned by NHRA. It
allows various classes of cars in the same category to race together competitively.
Interval timers: part of a secondary timing system that records elapsed times,
primarily for the racers’ benefit, at 60, 330, 660, and 1,000 feet.
Pre-stage: to position the front wheels about seven inches behind the starting line so
the small yellow lights atop that driver’s side of the Christmas Tree are glowing. The
next step is to stage and be ready to race.
Pro Tree: used in Top Fuel, Funny Car, Pro Stock, Pro Stock Motorcycle, Top Alcohol
Dragster, Top Alcohol Funny Car, Super Comp, Super Gas, and Super Street, which
feature heads-up competition. All three large amber lights on the Christmas Tree flash
simultaneously, followed four-tenths of a second later by the green starting light.
RT: Reaction Time
Reaction time: the time it takes a driver to react to the green starting light on the
Christmas Tree, measured in thousandths of a second. The reaction-time counter
begins when the last amber light flashes on the Tree and stops when the vehicle clears
the stage beam.
Sixty-foot time: the time it takes a vehicle to cover the first 60 feet of the race track. It
is the most accurate measure of the launch from the starting line and in most cases
determines how quick the rest of the run will be.
Speed trap: the final 10 feet to the finish line where speed is recorded.
Stage: to position the front wheels right on the starting line so the small yellow lights
below the pre-stage lights are glowing. Once both drivers are staged, the calibrated
countdown (see Christmas Tree) may begin.
25

26

Trackmate Racing
Web: www.trackmateracing.com
Support: [email protected]
Sales: [email protected]
Trackmate Racing
877-756-8227 Toll Free USA and Canada
604-582-1946
updated April 19, 2020
27
