
V5.1
VISION 3
ACTION CAMERA


1
CONTENTS
What's in the Box--------------------------------------------------------------------------------------- 02
Your Vision 3 --------------------------------------------------------------------------------------------- 03
Getting Started ------------------------------------------------------------------------------------------ 05
Overviews of Modes ---------------------------------------------------------------------------------- 06
Customizing Your Vision 3 -------------------------------------------------------------------------- 09
Connecting to the XDV App------------------------------------------------------------------------- 13
Playing Back Your Content-------------------------------------------------------------------------- 14
Deleting Your Content on the Vision 3 --------------------------------------------------------- 14
Transferring Your Content -------------------------------------------------------------------------- 14
Adjusting the Zoom Level -------------------------------------------------------------------------- 17
Reformatting Your Memory Card ---------------------------------------------------------------- 17
Maintaining Your Camera--------------------------------------------------------------------------- 17
Maximizing Battery Life ------------------------------------------------------------------------------ 18
Battery Handling and Storage --------------------------------------------------------------------- 18
Remote ----------------------------------------------------------------------------------------------------- 19
Mounting Your Camera ------------------------------------------------------------------------------ 21
Contact Us------------------------------------------------------------------------------------------------- 23
EN

2
Waterproof
Housing x 1
Battery Charger
x 1
Battery
x 2
USB Cable
x 1
Remote Control
x 1
Remote Control
Strap x 1
C Mount
x 1
Buckle Mount
x 1
J-Hook Mount
x 1
E Mount
x 1
D Mount
x 1
Helmet Mount 2
x 1
A Mount
x 1
H Mount
x 1
Helmet Mount 1
x 1
F Mount
x 1
Bandage
x 4
Tether
x 5
Lens Cloth
x 1
Double-Sided
Adhesive Tape x 2
Quick Start
Guide x 1
Clip 1
x 1
Protective
Backdoor x 1
Clip 2
x 1
What's in the Box
EN

3
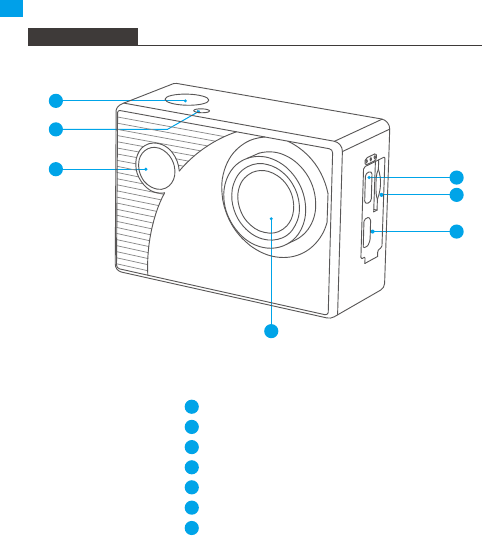
Shutter / OK Button
Wifi indicator
Power / Mode / Exit Button
USB / External Mic Port
Memory Card Slot
Micro HDMI Port
Lens
1
2
3
4
5
7
6
4
7
5
6
1
3
2
Your Vision 3
EN

4
Note: The camera will not record audio when it is in the waterproof case.
14
8
11
12
13
9
10
Display Screen
Charging Indicator
Working Indicator
Up / Wifi Button
Down Button
Speaker
Battery Cover
8
9
11
12
13
14
10
EN

5
Getting Started
Welcome to your new Vision 3 action camera. To capture videos and photos, you will
need a memory card (sold separately).
Memory Card Use
Use brand name memory cards that meet these requirements:
• Class 10 or UHS-I rating
• Capacity up to 128GB (FAT32)
Note:
1. Before using this camera, please format the memory card first. To keep your
memory card in good condition, reformat it on a regular basis. Reformatting
deletes all of your data, so be sure to transfer your photos and videos first.
2. The FAT32 format memory card will stop recording when the storage of each file
exceeds 4GB and start to record again in a new file.
3. Using a memory card with a capacity larger than what is required can lead to
complications such as failure to recognize the card. In addition, it may cause
camera malfunctions, including unresponsiveness or firmware failure.
Powering on or off
To power on: Press and hold the Power button for 3 seconds. You will hear a beep
and see the working indicator turn on. Once information appears on the display
screen, you'll know that your camera is turned on.
To power off: Press and hold the Power button for 3 seconds. You will hear a beep
and see the working indicator turn off. Once the display screen blacks out, you'll
know that your camera is turned off.
Turning Wifi on or off
To turn on: When on the preview screen, press and hold the Wifi button turn on
Wifi. Alternatively, enter the camera's system settings to enable Wifi.
To turn off: When on the preview screen, press the Wifi button to turn off Wifi.
EN

6
Switching Modes
To switch: When on the preview screen, press the Mode button to switch modes.
To exit: Press the Mode button again to exit the current mode.
Using the Shutter Button
When in Photo or Video mode, press the Shutter button to capture photos or start
video recording. To stop recording in Video mode, press the Shutter button again.
Charging the Camera
Locate the USB power port, and connect the camera to a USB adapter or computer
using the USB cable. The charging indicator will be flashing red while charging, and
black out when fully charged. Once fully charged, disconnect the cable.
Tip: The camera can record up to 70 minutes in 4K when fully charged.
Overviews of Modes
There are 8 modes of this camera: Video, Photo, Slow Motion, Playback, Video
Settings, Photo Settings, General Settings, and System Settings.
When on the preview screen, press the Mode button to switch modes.
4K30FPS
01/01/2024 10:09:23
TF
Video Mode
The camera is in Video mode by default
when it's turned on.
In this mode, press the Shutter button to
start recording. To stop recording, simply
press the Shutter button again.
EN

7
Video Settings Mode
On the preview screen, press the Mode
button several times till you see a gear
icon show on the screen, then press the
OK button to enter Video Settings Mode.
In this mode, you're free to change the
video settings.
Video Resolution
Recording Sound
Time-Lapse Close
Close
720P 120FPS
Loop Recording
Slow Motion
4K 30FPS
Photo Mode
On the preview screen, press the Mode
button once to enter Photo Mode.
In this Mode, press the Shutter button to
take a photo.
Slow Motion Mode
On the preview screen, press the Mode
button twice to enter Slow Motion Mode.
In this mode, you can press the Shutter
button to record a slow motion video at
the set resolution.
Playback Mode
On the preview screen, press the Mode
button 3 times to enter Playback Mode.
In this mode, you can press the Up/ Down
button to select a video or photo file for
playback.
16M 4373
01/01/2024 10:11:23
TF
720P120FPS 14.4G
01/01/2024 10:13:23
TF
00001 /04372
01/01/2024 10:11:23
EN

8
System Settings Mode
After accessing the general settings
screen, press the Mode button to enter
System Settings Mode.
In this mode, you're free to change the
system settings.
Language
Date-Time
Format
Reset To Factory Settings
Firmware Version
English
Photo Settings Mode
After accessing the video screen screen,
press the Mode button to enter Photo
Settings Mode.
In this mode, you're free to change the
photo settings.
General Settings Mode
After accessing the photo settings
screen, press the Mode button to enter
General Settings Mode.
In this mode, you're free to change the
general settings.
Photo Resolution
Self-Timer
Auto-Shoot Close
Close
CloseBurst
20M
Exposure
White Balance
Wifi
Auto
Image Rotation
Driving Mode
0
EN

9
Customizing Your Vision 3
Video Settings
When on the video settings screen, press the Down button to choose a setting from
the available options, then press the OK button to confirm your selection and
change the setting. To return to the preview screen, press the Mode button several
times and then press the OK button.
1. Video Resolution
4K 30FPS/2.7K 30FPS/1080P 60FPS/1080P 30FPS/720P 120FPS/720P 60FPS/720P
30FPS (Default setting: 4K 30FPS)
This camera is capable of recording video up to 4K30fps. The higher resolution, the
greater clarity and detail, thus the larger the file.
Note: Capturing high-resolution or high-fps videos in warm environments can cause
the camera to heat up and consume more power.
2. Recording Sound
On / Off (Default: On)
Turn "Recording Sound" on or off. With this setting disabled, the camera will record
video without audio.
3. Time-lapse
Off/0.5s/1s/2s/5s /10s/30s/60s (Default setting: Off)
Set the interval at which the camera captures frames of video. Once you’re done
configuring, return to the preview screen. The camera will enter Time-lapse mode. In
this mode, the camera will capture frames at the preset interval and seamlessly
compile them into a short video.
Note: Time-lapse video is captured without audio.
4. Loop Recording
Off/1min /3 min /5 min (Default setting: Off)
Set the length of videos captured in Loop Recording mode. For instance, if you set
“Loop Recording” to "1 min", the camera will record and save videos every minute.
When the memory is full, the camera will automatically delete the earliest videos to
continue recording. Once you’re done configuring, return to the preview screen. The
camera will enter Loop Recording mode.
EN

10
5. Slow Motion
720P 120FPS/1080P 60FPS (Default setting: 720P 120FPS)
Set the resolution at which the camera records video in Slow Motion mode. The
video footage will appear to be in slow motion when played back.
Note: Slow motion video is captured without audio.
6. Image Stabilization
On/Off (Default setting: Off)
Image Stabilization can efficiently smooth out the lens shakes, resulting in smooth
and pristine videos. This feature is ideal for capturing scenes involving activities like
riding, skating, and handheld use.
7. External Mic
Off/On (Default setting: Off)
Turn the external microphone feature on or off. With this feature enabled, connect a
compatible external microphone to the camera's USB port to achieve better sound
quality.
Photo Settings
When on the photo settings screen, press the Down button to choose a setting from
the available options, then press the OK button to confirm your selection and
change the setting.
1. Photo Resolution
20M /16M / 12M / 8M / 5M / 2M (Default setting: 20M)
This camera is capable of capturing 20MP photos. The higher resolution, the greater
clarity and detail, thus the larger the file.
2. Self-Timer
Off / 3s / 5s / 10s / 20s (Default setting: Off)
Set the countdown time to take a photo. The camera will initiate the preset
countdown, then automatically activate the shutter to take a photo. Once you’re
done configuring, return to the preview screen. The camera will enter Self-Timer
mode.
3. Auto-Shoot
Off / 3s / 10s / 15s / 20s / 30s (Default setting: Off)
Specify the frequency at which the photo is taken. For instance, if you select the "3s"
option, a photo will be taken automatically every 3 seconds. Once you’re done
configuring, return to the preview screen. The camera will enter Auto-Shoot mode.
EN

11
4. Burst
Off, 3P/S, 5P/S 10P/S (Default setting: Off)
Burst lets you specify the number of consecutive shots per second, making it ideal
for capturing fast-moving activities. Once you’re done configuring, return to the
preview screen. The camera will enter Burst mode.
General Settings
On the general settings screen, press the Down button to choose a setting from the
available options, then press the OK button to confirm your selection and change
the setting.
1. Exposure
-3 / -2 / -1 / 0 / 1 / 2 / 3 (Default setting: 0)
Adjust the brightness of your photos and videos. A higher exposure value creates a
brighter image, while a lower value results in a darker image.
2. White Balance
Auto / Sunny / Cloudy / Incandescent / Fluorescent (Default setting: Auto)
White Balance fine-tunes the color temperature of your videos and photos, ensuring
optimal color accuracy in both warm and cool lighting conditions.
3. Wifi
Off / On (Default setting: Off)
Choose to enable Wifi in this setting.
Tip: You can also press and hold the Wifi button to turn on Wifi in Video or Photo
Mode. The camera will then enter Wifi mode and display the Wifi information.
4. Image Rotation
Off / On (Default setting: Off)
This setting determines the orientation of your video and photos, helping to prevent
upside down footage.
Note: The user interface will be upside down when this feature is enabled.
5. Driving Mode
Off / On (Default setting: Off)
With Driving Mode enabled, if you connect the camera to the car cigarette lighter
and start your car, the camera will automatically turn on to start video recording and
save the video file at the set interval. It will save the file and automatically turn off
when you stop your car. When the SD card is full, the camera will automatically
delete the earliest videos to ensure continuous recording.
EN

12
6. Light Source Frequency
Auto / 50Hz / 60Hz (Default setting: Auto)
You can set the light source frequency to avoid the “water ripples” phenomenon
(light waves) while capturing indoors.
7. LED Indicator Light
Off / On (Default setting: Off)
Turn this setting on or off. With this setting enabled, the camera's LED indicator
lights will illuminate or flash based on your operations, and vice versa.
8. Auto Screensaver
Off / 10s / 20s / 30s (Default setting: 30s)
Auto Screensaver turns off the LCD display after a period of inactivity to save battery
life. To turn the display back on, simply press any button of the camera.
9. Auto Shutdown
Off/1 min/3 min/ 5 min (Default setting: 3 min)
Auto Shutdown will power off your Vision 3 after a period of inactivity to save battery
life.
10. Time Watermark
Off / On (Default setting: On)
With this setting enabled, a watermark will be added to the video or photo.
System Settings
When on the system settings screen, press the Down button to choose a setting
from the available options, then press the OK button to confirm your selection and
change the setting.
1. Language
简体中文, 繁體中文, English, 日本語, Deutsch, Français, Italiano, Español, Português,
Русский, 한국어 (Default setting: English)
You can choose the system language for your Vision 3 action camera.
2. Date-Time
YYYY-MM-DD, HH-MM-SS
Manually set the camera's date and time according to your local time. The date and
time will also be automatically updated when you connect your camera to the XDV app.
EN

13
Connecting to the XDV App
You can control your camera to capture photos and videos using the phone app. To
do this, please download and install the XDV App on the App Store or Google Play
first. When your camera is connected to the app, you can control it to capture, or
change the camera's settings using your phone. You can also live preview, playback,
download, and edit videos via this app. Please follow the instructions below to
connect your camera to the app.
1. Turn on the camera, then press and hold the Wifi button to turn on Wifi. The
camera will enter Wifi mode and display the Wifi information.
2. Turn on your phone’s Wifi to enter the Wifi settings page, find the Wifi SSID named
"Vision3_****" in the list and tap on it, then enter the password 1234567890 for
connection.
Warm tip: Once the camera Wifi is connected, it will give you a "No Internet
Connection" or “Weak Security” notice since your phone's 4G signal is blocked.
You can ignore it and continue the app connection.
3. Open the XDV app on your phone or tablet, and tap on the Wifi SSID again.
4. Your camera will be connected to the app in seconds.
Note: This camera does not support MacBook or iPad.
3. Format
Confirm / Cancel (Default setting: Cancel)
To keep your memory card in good condition, reformat it on a regular basis.
Reformatting erases all of your content, so be sure to offload your photos and
videos first.
4. Reset to Factory
Confirm / Cancel (Default setting: Cancel)
This option resets all settings to their default values.
5. Firmware Version
This option allows you to check the brand, model, and firmware version of your camera.
EN

14
Playing Back Your Content
Deleting Your Content on the Vision 3
1. Enter Playback Mode.
2. Press the Up or Down button to scroll through the video or photo files.
3. Press and hold the OK button for 3 seconds. The screen will display "Delete this
file / Confirm / Cancel".
4. Press the Up button followed by the OK button, and the selected file will be
deleted.
5. To exit Playback Mode, press the Mode button.
Transferring Your Content
Transferring Your Content to a Computer
To play back your videos and photos on a computer, you must first transfer these
files to the computer. Transferring also frees up space on your memory card for new
content. To download files to a computer using a card reader (sold separately),
please insert a memory card into your card reader, then connect the card reader to
the computer via a USB port. You can then transfer files to your computer or delete
selected files by using the file explorer.
You can play back your contents on the camera, your computer, TV, smartphone, or
tablet. To play back your videos and photos on a computer, you need to transfer
these files first. Transferring files also frees up space on your memory for new
contents. With this method, the playback resolution depends on the resolution of
the device and its ability to play back that resolution.
Viewing Videos and Photos on the Vision 3
1. Turn on your camera, then press the Mode button 3 times to enter Playback mode.
2. Press the Up or Down button to scroll through the video or photo files.
3. After selecting the file you want to view, press the OK button. And the file will play.
EN

15
Available:29.67G Total:28.74G
Phone Device
Downloading Your Content to a Smartphone or tablet
1. Open the XDV app, and connect it to your camera.
2. Tap the Media icon at the bottom of the screen.
3. Tap "Device" at the top of the screen to view all the video and photo files.
EN

16
Available:29.67G Total:28.74G
Phone Device
Available:29.67G Total:28.74G
Download
Cancel
Note:
1. Please do not alter Wifi settings or disconnect from the app during the download
progress.
2. If you cannot download videos or photos to your iPhone via the app, please enter
your phone’s Settings page → Privacy→ Photos, find "XDV", and select "All photos".
3. You cannot download 4K or 2.7K videos to an iPhone or iPad via the XDV App.
Please transfer these videos via a card reader.
4. Tap followed by to select the file you want to download.
5. Tap "Confirm" in the bottom right corner, and wait for the download process to
finish. The file will be saved to the album of your phone or tablet.
EN

17
Maintaining Your Camera
Follow these guidelines to get the best performance from your camera:
1. For best audio performance, shake the camera or blow on the mic to remove dust
or ash before use.
2. To clean the lens, wipe it with a soft lint-free cloth. Do not clean the lens with
anything else.
3. Do not touch the front lens directly with your fingers.
4. Keep the camera away from drops and bumps which may cause damage to the
parts inside.
5. Keep the camera away from high temperatures and strong sunlight to avoid
damage.
Adjusting the Zoom Level
The Zoom function enables you to adjust the proximity of the subject in your
footage. The Vision 3 action camera supports up to 4X zoom. The zoom feature is
available only in Video and Photo Mode. Please follow the steps below to zoom in or
out.
1. Turn on the Vision 3 action camera.
2. Enter Video or Photo mode.
3. Press the Up or Down button to adjust the zoom level.
Reformatting Your Memory Card
To keep your memory card in good condition, please reformat it on a regular basis.
Reformatting deletes all of your content, so be sure to transfer your photos and
videos first. Please follow the steps below to format the card.
1. Turn on the Vision 3 action camera.
2. Enter the system settings screen.
3. Press the Down button to find the "Format" option.
4. Press the OK button to confirm, and the screen will show "Format memory card?
Confirm / Cancel".
5. Press the Up button followed by the OK button. Your memory card will be
formatted successfully.
EN

18
Maximizing Battery Life
If battery power reaches 0% while recording, the camera will save the file and power
off. To maximize battery life, please follow the guidelines where possible:
• Turn off wireless connections.
• Capture video at lower frame rates and resolutions.
• Use the Screen Saver setting.
Battery Handling and Storage
1. If storing for extended periods, maintain a battery charge of 50-60%. Charge
every 3 months and discharge the battery every 6 months.
2. Do not store the battery with metal objects such as coins, keys, or necklaces. If
the battery terminals come close to metal objects, a short circuit may cause fire.
3. Store the battery in dry areas, safe from potential physical damage caused by
squeezing or collision.
4. Avoid using or storing the battery at high temperatures, such as in direct sunlight
or a hot compartment. The battery will heat up, malfunction, or have its service life
shortened in these conditions.
5. Avoid using or storing the battery in low-temperature environments, as this will
shorten the battery life or cause it to malfunction.
6. Avoid environments with strong static or magnetic fields; these can compro-mise
the battery’s protective unit, posing safety risks.
7. If the battery emits an odor, overheats, changes color, gets distorted, or exhibits
any anomalies, discontinue use and remove it immediately from the camera or
the battery charger whether it is being used, charged, or stored.
8. Safely insulate used electrodes to prevent potential hazards.
EN

19
Remote
Photo Button
Video Button
Note: The remote is splashproof only.
Replacing the CR2032 battery of the remote
1. Use a screwdriver to remove the four screws on the back, cover of the remote
allowing you to open it.
When the camera is turned on, it will be automatically connected to the remote
within 10 meters of distance. You can control the camera to take photos or record
videos using the remote.
Video
To record video, first make sure the camera is in Video mode, then press the Video
button. The camera's working indicator will be flashing during video recording. To
stop recording, press the Video button again.
Photo
To capture a photo, first make sure the camera is in Photo mode, then press the
Photo button. The camera will emit a shutter sound indicating the completion of the
shot.
EN

20
2. Remove another 4 screws on the remote's circuit board.
6. Install all the 4 screws back into the cover.
3. Lift the circuit board and slide out the battery, as shown below.
Note: Avoid rotating the circuit board to prevent reversing the remote control buttons.
4. Install the new battery, keeping the “+” pole facing up.
5. Install all the 4 screws back onto the circuit board.
EN

21
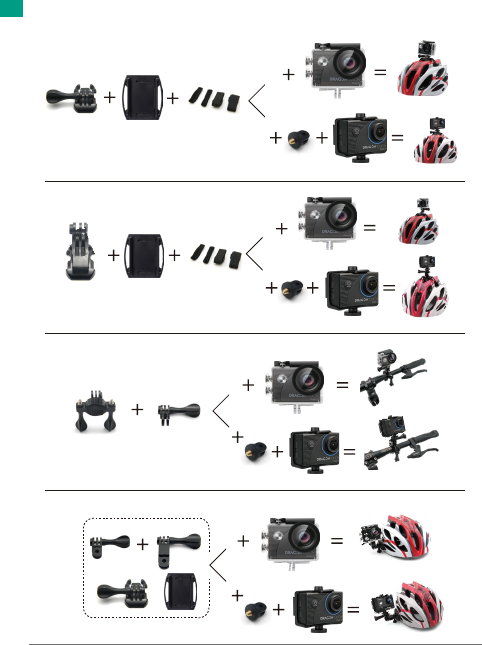
You can attach your camera to helmets, handlebars, and more to unlock more fun.
Note: Before diving, ensure the USB cover is tightly closed to prevent it from
getting soaked.
Mounting Your Camera
EN
22
EN

23
For any inquiries about DragonTouch products, please feel free to contact us.
We will respond within 24 hours.
Tel: 888-811-1140 (US)
Email: [email protected]
Web: www.dragontouch.com
Contact Us
EN

V5.1
VISION 3
A K T I O N K A M E R A
BENUTZERHANDBUCH

1
INHALTE
Was ist in der Box -------------------------------------------------------------------------------------- 02
Ihre Vision 3 ---------------------------------------------------------------------------------------------- 03
Erste Schritte -------------------------------------------------------------------------------------------- 05
Übersicht der Modi ----------------------------------------------------------------------------------- 07
Anpassen Ihrer Vision 3 ----------------------------------------------------------------------------- 10
Verbindung zur XDV App herstellen------------------------------------------------------------- 15
Wiedergabe Ihres Inhalts --------------------------------------------------------------------------- 16
Löschen von Inhalten auf dem Vision 3 ------------------------------------------------------- 16
Übertragen Ihrer Inhalten -------------------------------------------------------------------------- 17
Anpassen des Zoomstufen ------------------------------------------------------------------------- 20
Neuformatierung Ihrer Speicherkarte --------------------------------------------------------- 20
Die Wartung Ihrer Kamera-------------------------------------------------------------------------- 20
Maximierung der Batterielebensdauer -------------------------------------------------------- 21
Batteriehandhabung und -aufbewahrung --------------------------------------------------- 21
Fernbedienung ------------------------------------------------------------------------------------------ 22
Anbringen Ihrer Kamera ---------------------------------------------------------------------------- 25
Kontaktiere uns ---------------------------------------------------------------------------------------- 27
DE

2
Wasserdichtes
Gehäuse x 1
Ladegerät
x 1
Batterie
x 2
USB Kabel
x 1
Fernbedienung
x 1
Fernbedienungsband
x 1
C Halterung
x 1
Buckle Halterung
x 1
J-Haken Mount
x 1
E Halterung
x 1
D Halterung
x 1
Helmbefestigung 2
x 1
A Halterung
x 1
H Halterung
x 1
Helmbefestigung 1
x 1
F Halterung
x 1
Binden
x 4
Anbindungen
x 5
Linsentuch
x 1
Doppelseitiges
Klebeband x 2
Kurzanleitung
x 1
Klemme 1
x 1
Schutzgehäuse
x 1
Klemme 2
x 1
Was ist in der Box
DE
3
Auslöser / OK-Taste
Wifi-Indikator
Power- / Modus- / Exit-Taste
USB / Externer Mik-Anschluss
Speicherkartensteckplatz
Micro-HDMI-Anschluss
Linse
1
2
3
4
5
7
6
4
7
5
6
1
3
2
Ihre Vision 3
DE

4
Notiz: Die Kamera kann während sie in der wasserfesten Schutzhülle ist, keinen Ton aufnehmen.
14
8
11
12
13
9
10
Bildschirm
Ladeindikator
Arbeitsindikator
Aufwärts-/Wifi-Taste
Abwärts-Taste
Lautsprecher
Batterieabdeckung
8
9
11
12
13
14
10
DE

5
Erste Schritte
Willkommen zu deiner neuen Vision 3 Action-Kamera. Um Videos und Fotos
aufzunehmen, benötigst du eine Speicherkarte (separat erhältlich).
Verwendung der Speicherkarte
Verwende Markenspeicherkarten, die folgende Anforderungen erfüllen:
• Klasse 10 oder UHS-I Bewertung
• Kapazität bis zu 128GB (FAT32)
Notiz:
1. Bevor Sie diese Kamera verwenden, formatieren Sie bitte zuerst die Speicherkarte.
Um Ihre Speicherkarte in gutem Zustand zu halten, führen Sie regelmäßig eine
Neuformatierung durch. Durch das Neuformatieren werden alle Daten gelöscht,
übertragen Sie daher zuerst Ihre Fotos und Videos.
2. Eine Speicherkarte im FAT32-Format stoppt die Aufzeichnung, wenn der
Speicherplatz einer Datei 4 GB überschreitet, und beginnt dann mit einer neuen
Datei erneut aufzuzeichnen.
3. Die Verwendung einer Speicherkarte mit einer größeren Kapazität als erforderlich
kann zu Komplikationen führen, z.B. zur Nichterkennung der Karte. Darüber hinaus
kann dies zu Kameraproblemen wie Nicht-Reaktionsfähigkeit oder Firmwarefehlern
führen.
Ein- und Ausschalten
Um einzuschalten:
Drücken und halten Sie die Ein-/Aus-Taste 3 Sekunden lang gedrückt. Sie hören
einen Piepton und sehen, dass die Arbeitsanzeige eingeschaltet wird. Sobald
Informationen auf dem Display erscheinen, wissen Sie, dass Ihre Kamera
eingeschaltet ist.
Um auszuschalten:
Drücken und halten Sie die Ein-/Aus-Taste 3 Sekunden lang gedrückt. Sie hören
einen Piepton und sehen, dass die Arbeitsanzeige ausgeschaltet wird. Sobald das
Display dunkel wird, wissen Sie, dass Ihre Kamera ausgeschaltet ist.
DE

6
Wifi ein- oder ausschalten
Einschalten: Auf dem Vorschaubildschirm drücken und halten Sie die Wifi-Taste, um
Wifi einzuschalten. Alternativ können Sie über die Systemeinstellungen der Kamera
Wifi aktivieren.
Ausschalten: Auf dem Wifi-Bildschirm drücken Sie die Wifi-Taste, um Wifi
auszuschalten.
Wechseln der Modi
Zum Wechseln: Auf dem Vorschaubildschirm drücken Sie die Modus-Taste, um die
Modi zu wechseln.
Zum Beenden: Drücken Sie erneut die Modus-Taste, um den aktuellen Modus zu
beenden.
Verwendung der Auslösertaste
Im Foto- oder Video-Modus drücken Sie die Auslösertaste, um Fotos aufzunehmen
oder die Videoaufnahme zu starten. Um die Aufnahme im Video-Modus zu stoppen,
drücken Sie die Auslösertaste erneut.
Aufladen der Kamera
Suchen Sie den USB-Stromanschluss und schließen Sie die Kamera mit dem
USB-Kabel an einen USB-Adapter oder Computer an. Die Ladeanzeige blinkt rot
während des Ladevorgangs und erlischt, wenn der Ladevorgang abgeschlossen ist.
Sobald die Kamera vollständig aufgeladen ist, trennen Sie das Kabel.
Tipp: Die Kamera kann bei vollständiger Ladung bis zu 70 Minuten in 4K
aufnehmen.
DE

7
Fotomodus
Auf dem Vorschaubildschirm drücken Sie
einmal die Modus-Taste, um in den
Fotomodus zu gelangen. In diesem
Modus drücken Sie den Auslöserknopf,
um ein Foto aufzunehmen.
16M 4373
01/01/2024 10:09:23
TF
Übersicht der Modi
Diese Kamera hat 8 Modi: Video, Foto, Zeitlupe, Wiedergabe, Videoeinstellungen,
Fotoeinstellungen, Allgemeine Einstellungen und Systemeinstellungen.
Auf dem Vorschaubildschirm drücken Sie die Modus-Taste, um zwischen den Modi
zu wechseln.
4K30FPS
01/01/2024 10:09:23
TF
Videomodus
Die Kamera ist standardmäßig im
Videomodus, wenn sie eingeschaltet wird.
Im Videomodus drücken Sie den
Auslöserknopf, um mit der Aufnahme zu
beginnen. Um die Aufnahme zu beenden,
drücken Sie einfach erneut den
Auslöserknopf.
DE

8
Videoeinstellungenmodus
Auf dem Vorschaubildschirm drücken Sie
mehrmals die Modus-Taste, bis ein
Zahnrad-Symbol angezeigt wird, dann
drücken Sie die OK-Taste, um in den
Videoregelungen Modus zu gelangen.
In diesem Modus können Sie die
Videoregelungen ändern.
Videoauflösung
Video Ton
Zeitraffer Videoauf... Ausschalten
Ausschalten
720P 120FPS
Loop Aufnahme
Aufnahme in Zeitl...
4K 30FPS
Zeitlupmodus
Drücken Sie zweimal auf dem
Vorschaubildschirm die Modus-Taste, um
in den Zeitlupenmodus zu gelangen.
In diesem Modus können Sie den
Auslöserknopf drücken, um ein
Zeitlupenvideo in der festgelegten
Auflösung aufzunehmen.
Wiedergabemodus
Drücken Sie auf dem Vorschaubildschirm
3 Mal die Modus-Taste, um in den
Wiedergabemodus zu gelangen.
In diesem Modus können Sie die
Auf-/Ab-Taste drücken, um eine Video-
oder Fotodatei zur Wiedergabe
auszuwählen.
720P120FPS 14.4G
01/01/2024 10:09:23
TF
00001 /04372
01/01/2024 10:09:23
DE

9
Systemeinstellungenmodus
Nachdem Sie den Bildschirm für
allgemeine Einstellungen betreten haben,
drücken Sie die Modus-Taste, um in den
Systemeinstellungen Modus zu gelangen.
In diesem Modus können Sie die
Systemeinstellungen ändern.
Sprache
Datum Uhrzeit
Format
Werkseinstellungen
Firmware Version
Deutsch
Fotoeinstellungenmodus
Nachdem Sie den Videoscreen betreten
haben, drücken Sie die Modus-Taste, um in
den Fotoregelungen Modus zu gelangen.
In diesem Modus können Sie die
Fotoregelungen ändern.
Allgemeine Einstellungenmodus
Nachdem Sie den Fotoscreen betreten
haben, drücken Sie die Modus-Taste, um
in den Allgemeinen Einstellungen Modus
zu gelangen.
In diesem Modus können Sie die
allgemeinen Einstellungen ändern.
Pixeleinstellungen
Zeitaufnahme
Automatik Ausschalten
Ausschalten
AusschaltenSpur bewegen
20M
Belichtung
Weißabgleich
Fahrzeugmodus
Auto
WLAN
Bildrotation
0
DE

10
Anpassen Ihrer Vision 3
Videoeinstellungen
Wenn Sie sich im Bildschirm für die Videoeinstellungen befinden, drücken Sie die
Abwärtstaste, um eine Einstellung aus den verfügbaren Optionen auszuwählen, und
drücken Sie dann die OK-Taste, um Ihre Auswahl zu bestätigen und die Einstellung
zu ändern. Um zum Vorschaubildschirm zurückzukehren, drücken Sie mehrmals die
Modus-Taste und dann die OK-Taste.
1. Videoauflösung
4K 30FPS/2.7K 30FPS/1080P 60FPS/1080P 30FPS/720P 120FPS/720P 60FPS/720P
30FPS (Standard: 4K 30FPS)
Diese Kamera kann Videos mit bis zu 4K30fps aufnehmen. Je höher die Auflösung,
desto größer ist die Klarheit und Detailgenauigkeit, daher auch die Dateigröße.
Hinweis: Die Aufnahme von Videos mit hoher Auflösung oder hoher Bildfrequenz in
warmen Umgebungen kann dazu führen, dass sich die Kamera erhitzt und mehr
Strom verbraucht.
2. Tonaufnahme
An / Aus (Standard: An)
Schalten Sie die "Tonaufnahme" ein oder aus. Bei deaktivierter Einstellung nimmt
die Kamera Videos ohne Ton auf.
3. Zeitraffer
Aus/0,5s/1s/2s/5s/10s/30s/60s (Standard: Aus)
Legen Sie das Intervall fest, in dem die Kamera Videobilder aufnimmt. Nachdem Sie
die Konfiguration abgeschlossen haben, kehren Sie zum Vorschaubildschirm zurück.
Die Kamera wechselt in den Zeitraffermodus. In diesem Modus nimmt die Kamera
Bilder im voreingestellten Intervall auf und kompiliert sie nahtlos zu einem kurzen
Video.
Hinweis: Zeitraffervideos werden ohne Ton aufgenommen.
4. Schleifenaufnahme
Aus/1 min/3 min/5 min (Standard: Aus)
Legen Sie die Länge der in der Schleifenaufzeichnung aufgenommenen Videos fest.
Wenn der Speicher voll ist, löscht die Kamera automatisch die ältesten Videos, um
die Aufnahme fortzusetzen. Nachdem Sie die Konfiguration abgeschlossen haben,
kehren Sie zum Vorschaubildschirm zurück. Die Kamera wechselt in den
Schleifenaufnahmemodus.
DE

11
5. Zeitlupe
720P 120FPS/1080P 60FPS (Standard: 720P 120FPS)
Legen Sie die Auflösung fest, in der die Kamera im Zeitlupenmodus Videos
aufzeichnet. Das Videomaterial wird beim Abspielen in Zeitlupe erscheinen.
Hinweis: Zeitlupenvideos werden ohne Ton aufgenommen.
6. Bildstabilisierung
An/Aus (Standard-Einstellung: Aus)
Die Bildstabilisierung kann Kamerawackler effizient ausgleichen und somit für ruhige
und klare Videos sorgen. Diese Funktion eignet sich ideal für Aufnahmen bei
Aktivitäten wie Reiten, Skaten und dem Einsatz in der Hand.
7. Externes Mikrofon
Aus/An (Standard: Aus)
Schalten Sie die Funktion für das externe Mikrofon ein oder aus. Mit dieser Funktion
können Sie ein kompatibles externes Mikrofon an den USB-Anschluss der Kamera
anschließen, um eine bessere Tonqualität zu erzielen.
Fotoeinstellungen
Auf dem Fotosettings-Bildschirm drücken Sie die Abwärtstaste, um eine Einstellung
aus den verfügbaren Optionen auszuwählen, und drücken dann die OK-Taste, um
Ihre Auswahl zu bestätigen und die Einstellung zu ändern.
1. Fotoauflösung
20M /16M / 12M / 8M / 5M / 2M (Standard: 20M)
Diese Kamera kann Fotos mit einer Auflösung von bis zu 20 MP aufnehmen. Je
höher die Auflösung, desto größer ist die Klarheit und Detailgenauigkeit, daher auch
die Dateigröße.
2. Selbstauslöser
Aus/3s/5s/10s/20s (Standard: Aus)
Legen Sie die Countdown-Zeit für das Aufnehmen eines Fotos fest. Die Kamera
startet den voreingestellten Countdown und aktiviert dann automatisch den
Auslöser, um ein Foto aufzunehmen. Kehren Sie nach dem Konfigurieren zum
Vorschaubildschirm zurück. Die Kamera wechselt in den Selbstauslösermodus.
DE

12
Allgemeine Einstellungen
Wenn Sie sich im Bildschirm für die allgemeinen Einstellungen befinden, drücken Sie
die Abwärtstaste, um eine Einstellung aus den verfügbaren Optionen auszuwählen,
und drücken Sie dann die OK-Taste, um Ihre Auswahl zu bestätigen und die
Einstellung zu ändern.
1. Belichtung
-3 / -2 / -1 / 0 / 1 / 2 / 3 (Standard: 0)
Passen Sie die Helligkeit Ihrer Fotos und Videos an. Ein höherer Belichtungswert
erzeugt ein helleres Bild, während ein niedrigerer Wert zu einem dunkleren Bild
führt.
2. Weißabgleich
Auto / Sonnig / Bewölkt / Glühlampe / Leuchtstofflampe (Standard-Einstellung:
Automatisch)
Der Weißabgleich feinabstimmungstemperiert die Farbtemperatur Ihrer Videos und
Fotos und sorgt so für optimale Farbgenauigkeit bei warmen und kühlen
Lichtverhältnissen.
3. Auto-Shoot
Aus/3s/10s/15s/20s/30s (Standard: Aus)
Geben Sie die Häufigkeit an, mit der das Foto aufgenommen wird. Wenn Sie
beispielsweise die Option "3s" auswählen, wird alle 3 Sekunden automatisch ein
Foto aufgenommen. Nachdem Sie die Konfiguration abgeschlossen haben, kehren
Sie zum Vorschaubildschirm zurück. Die Kamera wechselt in den Auto-Shootmodus.
4. Serienbild
Aus, 3B/s, 5B/s, 10B/s (Standard: Aus)
Serie ermöglicht es Ihnen, die Anzahl der aufeinanderfolgenden Aufnahmen pro
Sekunde festzulegen, was ideal ist, um schnellbewegende Aktivitäten zu erfassen.
Nachdem Sie die Konfiguration abgeschlossen haben, kehren Sie zum Vorschaubild-
schirm zurück. Die Kamera wechselt in den Serienaufnahmemodus.
DE

13
3. WLAN
Aus / Ein (Standard: Aus)
Wählen Sie in dieser Einstellung, ob WLAN aktiviert werden soll.
Tipp: Sie können auch die WLAN-Taste gedrückt halten, um im Video- oder
Fotomodus WLAN einzuschalten. Die Kamera wechselt dann in den WLAN-Modus
und zeigt die WLAN-Informationen an.
4. Bildrotation
An / Aus (Standard: Aus)
Diese Einstellung bestimmt die Ausrichtung Ihrer Videos und Fotos und hilft, auf den
Kopf gestellte Aufnahmen zu verhindern.
Hinweis: Die Benutzeroberfläche wird auf den Kopf gestellt, wenn diese Funktion
aktiviert ist.
5. Fahrzeugmodus
An / Aus (Standard: Aus)
Mit aktiviertem Fahrmodus, wenn Sie die Kamera an den Zigarettenanzünder Ihres
Autos anschließen und Ihr Auto starten, wird die Kamera automatisch eingeschaltet,
um mit der Videoaufnahme zu beginnen und die Videodatei in festgelegten
Intervallen zu speichern. Sie speichert die Datei und schaltet sich automatisch aus,
wenn Sie Ihr Auto stoppen. Wenn die SD-Karte voll ist, löscht die Kamera
automatisch die ältesten Videos, um eine kontinuierliche Aufnahme zu gewährleis-
ten.
6. Frequenz der Lichtquelle
Auto/ 50 Hz / 60 Hz (Standard: Auto)
Sie können die Frequenz der Lichtquelle einstellen, um das Phänomen der
"Wasserwellen" (Lichtwellen) beim Aufnehmen in Innenräumen zu vermeiden.
7. LED-Anzeigelicht
Aus / En (Standard: Aus)
Wenn Sie diese Einstellung ausschalten, leuchtet die Anzeigeleuchte nicht auf, wenn
die Kamera arbeitet oder aufgeladen wird.
8. Automatischer Bildschirmschoner
Aus/10s/20s/30s (Standard: 30s)
Der automatische Bildschirmschoner schaltet das LCD-Display nach einer Zeit der
Inaktivität aus, um die Batterielebensdauer zu sparen. Zum Einschalten des Displays
drücken Sie einfach eine beliebige Taste der Kamera.
DE

14
Ortszeit ein. Das Datum und die Uhrzeit werden auch automatisch aktualisiert,
wenn Sie Ihre Kamera mit der XDV-App verbinden.
3. Formatieren
Bestätigen / Abbrechen (Standard: Abbrechen)
Um Ihre Speicherkarte in gutem Zustand zu halten, formatieren Sie sie regelmäßig
neu. Die Neuformatierung löscht alle Inhalte, daher sollten Sie Ihre Fotos und
Videos zuerst sichern.
4. Werksreset
Bestätigen / Abbrechen (Standard: Abbrechen)
Diese Option setzt alle Einstellungen auf ihre Standardwerte zurück.
5. Firmware-Version
Mit dieser Option können Sie Marke, Modell und Firmware-Version Ihrer Kamera
überprüfen.
Systemeinstellungen
Auf dem Systemeinstellungen-Bildschirm drücken Sie die Abwärtstaste, um eine
Einstellung aus den verfügbaren Optionen auszuwählen, und drücken dann die
OK-Taste, um Ihre Auswahl zu bestätigen und die Einstellung zu ändern.
1. Sprache
简体中文/繁體中文/English/日本語/Deutsch/Français/Italiano/Español/Português/ Р
усский/ (Standard: English)
Sie können die Systemsprache für Ihre Vision 3 Action-Kamera auswählen.
2. Datum und Uhrzeit
JJ/MM/TT, MM/TT/JJ, TT/MM/JJ (Standard: MM/TT/JJ)
Stellen Sie das Datum und die Uhrzeit der Kamera manuell entsprechend Ihrer
9. Automatische Abschaltung
Aus/1 min/3 min/5 min (Standard: 3 min)
Die automatische Abschaltung schaltet Ihre Vision 3 nach einer Zeit der Inaktivität
aus, um die Batterielebensdauer zu sparen.
10. Zeit-Wasserzeichen
Aus / En (Standard: En)
Mit dieser Einstellung wird ein Wasserzeichen zum Video oder Foto hinzugefügt.
DE

15
Verbindung zur XDV App herstellen
Sie können Ihre Kamera über die Telefon-App steuern, um Fotos und Videos
aufzunehmen. Um dies zu tun, laden Sie bitte zuerst die XDV App aus dem App
Store oder Google Play herunter und installieren Sie sie. Wenn Ihre Kamera mit
der App verbunden ist, können Sie sie steuern, um Aufnahmen zu machen oder
die Kameraeinstellungen zu ändern. Über diese app können Sie auch Live-
Vorschauen anzeigen, Wiedergaben durchführen, Videos herunterladen und
bearbeiten. Bitte folgen Sie den untenstehenden Anweisungen, um Ihre Kamera
mit der App zu verbinden.
1. Schalten Sie die Kamera ein und drücken und halten Sie dann die Wifi-Taste,
um das WLAN einzuschalten. Die Kamera wechselt in den WLAN-Modus und
zeigt die WLAN-Informationen an.
2. Schalten Sie das WLAN auf Ihrem Telefon ein, um zur WLAN-Einstellungsseite
zu gelangen. Suchen Sie in der Liste nach dem WLAN-SSID mit dem Namen
"Vision3_0e10" und tippen Sie darauf. Geben Sie dann das Passwort
1234567890 für die Verbindung ein.
Hinweis: Sobald das WLAN der Kamera verbunden ist, erhalten Sie möglicher-
weise eine Benachrichtigung wie "Keine Internetverbindung" oder "
Schwache
Sicherheit
", da das 4G-Signal Ihres Telefons blockiert ist. Ignorieren Sie diese
Meldung und fahren Sie mit der Verbindung über die App fort.
3. Öffnen Sie die XDV-App auf Ihrem Telefon oder Tablet und tippen Sie erneut
auf das WLAN-SSID.
4. Ihre Kamera wird innerhalb von Sekunden mit der App verbunden sein.
Hinweis: Diese Kamera unterstützt kein MacBook oder iPad.
DE

16
Wiedergabe Ihres Inhalts
Löschen von Inhalten auf dem Vision 3
1. Betreten Sie den Wiedergabemodus.
2. Drücken Sie die Aufwärts- oder Abwärtstaste, um durch die Video- oder
Fotodateien zu scrollen.
3. Drücken und halten Sie die OK-Taste für 3 Sekunden. Der Bildschirm zeigt
"Diese Datei löschen / Bestätigen / Abbrechen" an.
4. Drücken Sie die Aufwärtstaste, gefolgt von der OK-Taste, und die ausgewählte
Datei wird gelöscht.
5. Um den Wiedergabemodus zu verlassen, drücken Sie die Modustaste.
Sie können Ihren Inhalt auf der Kamera, Ihrem Computer, Fernseher, Smartphone
oder Tablet wiedergeben. Sie können den Inhalt auch wiedergeben, indem Sie die
Speicherkarte direkt in ein Gerät wie einen Computer oder einen kompatiblen
Fernseher einlegen. Bei dieser Methode hängt die Wiedergabeauflösung von der
Auflösung des Geräts und dessen Fähigkeit zur Wiedergabe dieser Auflösung ab.
Anzeigen von Videos und Fotos auf Ihrer Vision 3
1. Schalten Sie Ihre Kamera ein und drücken Sie dann drei Mal die Modustaste, um in
den Wiedergabemodus zu gelangen.
2. Drücken Sie die Aufwärts- oder Abwärtstaste, um durch die Video- oder
Fotodateien zu scrollen.
3. Nachdem Sie die Datei ausgewählt haben, die Sie anzeigen möchten, drücken
Sie die OK-Taste. Die Datei wird abgespielt.
DE

17
Übertragen Ihrer Inhalten
Übertragen Ihrer Inhalte auf einen Computer
Um Ihre Videos und Fotos auf einem Computer wiederzugeben, müssen Sie diese
zuerst auf den Computer übertragen. Die Übertragung gibt außerdem
Speicherplatz auf Ihrer Speicherkarte für neue Inhalte frei. Um Dateien mithilfe
eines Kartenlesers (separat erhältlich) auf einen Computer herunterzuladen,
legen Sie bitte eine Speicherkarte in Ihren Kartenleser ein und verbinden Sie den
Kartenleser über einen USB-Anschluss mit dem Computer. Anschließend können
Sie Dateien auf Ihren Computer übertragen oder ausgewählte Dateien mithilfe
des Datei-Explorers löschen.
XDV
Herunterladen Ihrer Inhalte auf ein Smartphone oder Tablet
1. Öffnen Sie die XDV-App und verbinden Sie sie mit Ihrer Kamera.
2. Tippen Sie auf das Album-Symbol am unteren Rand des Bildschirms.
DE

Verfügbar:29.67G Gesamt:28.74G
Telefon Gerät
Available:29.67G Total:28.74G
Telefon Gerät
3. Tippen Sie oben auf dem Bildschirm auf "Gerät", um alle Video- und
Fotodateien anzuzeigen.
4. Tippen Sie auf das Auswahlsymbol, gefolgt vom Download-Symbol , um die
Datei auszuwählen, die Sie herunterladen möchten.
DE
18

19
Verfügbar:29.67G Gesamt:28.74G
Download
Abbrechen
Hinweise:
1. Bitte ändern Sie während des Download-Vorgangs nicht die WLAN-Einstellungen
oder trennen Sie sich nicht von der App.
2. Wenn Sie Videos oder Fotos nicht über die App auf Ihr iPhone
herunterladen können, gehen Sie zu den Einstellungen Ihres Telefons
Datenschutz Fotos, suchen Sie nach "XDV" und wählen Sie "Alle Fotos".
3. Sie können 4K- oder 2,7K-Videos nicht über die XDV-App auf ein iPhone oder
iPad herunterladen. Übertragen Sie diese Videos bitte über einen Kartenleser.
5. Tippen Sie unten links auf "Bestätigen" und warten Sie, bis der Download
abgeschlossen ist. Die Datei wird im Album Ihres Telefons oder Tablets
gespeichert.
DE

20
Die Wartung Ihrer Kamera
Befolgen Sie bitte diese Richtlinien, um die beste Leistung von Ihrer Kamera zu
erhalten:
1. Für die beste Audioleistung schütteln Sie die Kamera oder blasen Sie auf das
Mikrofon, um Staub oder Asche vor der Verwendung zu entfernen.
2. Reinigen Sie das Objektiv mit einem weichen fusselfreien Tuch. Verwenden Sie
nichts anderes zur Reinigung des Objektivs.
Anpassen des Zoomstufen
Die Zoomfunktion ermöglicht es Ihnen, die Nähe des Motivs in Ihrem Filmmaterial
anzupassen. Die Actionkamera Vision 3 unterstützt einen Zoom von bis zu 4X. Die
Zoomfunktion ist nur im Video- und Fotomodus verfügbar. Bitte befolgen Sie die
folgenden Schritte, um herein- oder herauszuzoomen.
1. Schalten Sie die Vision 3 Action-Kamera ein.
2. Wählen Sie den Video- oder Fotomodus aus.
3. Drücken Sie die Aufwärts- oder Abwärtstaste, um das Zoomlevel anzupassen.
Neuformatierung Ihrer Speicherkarte
Um Ihre Speicherkarte in gutem Zustand zu halten, formatieren Sie sie bitte
regelmäßig neu. Durch die Neuformatierung werden alle Inhalte gelöscht, stellen Sie
daher sicher, dass Sie Ihre Fotos und Videos zuerst übertragen. Befolgen Sie bitte die
folgenden Schritte, um die Karte zu formatieren.
1. Schalten Sie die Vision 3 Action-Kamera ein.
2. Gehen Sie zum Systemeinstellungen-Bildschirm.
3. Drücken Sie die Abwärtstaste, um die Option "Format" zu finden.
4. Drücken Sie die OK-Taste. Der Bildschirm zeigt "
Speicherkarte formatieren?
Bestätigen / Abbrechen
" an.
5. Drücken Sie die Aufwärtstaste gefolgt von der OK-Taste. Ihre Speicherkarte wird
erfolgreich formatiert.
DE

21
3. Berühren Sie das vordere Objektiv nicht direkt mit den Fingern.
4. Halten Sie die Kamera fern von Stürzen und Stößen, die Schäden an den inneren
Teilen verursachen könnten.
5. Bewahren Sie die Kamera fern von hohen Temperaturen und intensivem
Sonnenlicht auf, um Schäden zu vermeiden.
Maximierung der Batterielebensdauer
Wenn die Batterie während der Aufnahme einen Ladestand von 0% erreicht, speichert
die Kamera die Datei und schaltet sich automatisch aus. Um die Batterielebensdauer
zu maximieren, befolgen Sie bitte nach Möglichkeit die folgenden Richtlinien:
• Schalten Sie die drahtlose Verbindung aus.
• Nehmen Sie Videos mit niedrigeren Bildraten und Auflösungen auf.
• Verwenden Sie die Auto-Bildschirmschoner-Einstellung.
Batteriehandhabung und -aufbewahrung
• Wenn Sie sie über einen längeren Zeitraum lagern, stellen Sie sicher, dass die
Batterie zu 50-60% aufgeladen ist. Laden Sie sie alle 3 Monate auf und entladen
Sie die Batterie alle 6 Monate.
• Lagern Sie die Batterie nicht zusammen mit Metallgegenständen wie Münzen,
Schlüsseln oder Halsketten. Wenn die Batteriekontakte in Kontakt mit Metallge-
gen-ständen kommen, kann ein Kurzschluss zu einem Brand führen.
• Lagern Sie die Batterie an trockenen Orten, fern von potenziellen physischen
Schäden durch Drücken oder Kollisionen.
• Vermeiden Sie die Verwendung oder Lagerung der Batterie bei hohen
Temperaturen, wie beispielsweise in direktem Sonnenlicht oder einem heißen
Fach. Die Batterie erhitzt sich in diesen Bedingungen, funktioniert fehlerhaft oder
hat eine verkürzte Lebensdauer.
• Vermeiden Sie die Verwendung oder Lagerung der Batterie in Umgebungen mit
niedrigen Temperaturen, da dies die Batterielebensdauer verkürzen oder zu
Fehlfunktionen führen kann.
DE

22
• Meiden Sie Umgebungen mit starken statischen oder magnetischen Feldern, da
diese die schützende Einheit der Batterie beeinträchtigen können und
Sicherheitsrisiken darstellen.
• Wenn die Batterie Gerüche abgibt, überhitzt, die Farbe ändert, sich verformt oder
Anomalien aufweist, stellen Sie die Verwendung ein und entfernen Sie sie
umgehend aus der Kamera oder dem Batterieladegerät, unabhängig davon, ob sie
verwendet, aufgeladen oder gelagert wird.
• Isolieren Sie gebrauchte Elektroden sicher, um potenzielle Gefahren zu vermeiden.
Fernbedienung
Foto-Taste
Video-Taste
Hinweis: Die Fernbedienung ist nur spritzwassergeschützt.
Wenn die Kamera eingeschaltet wird, wird sie automatisch mit der Fernbedienung in
einer Entfernung von 10 Metern verbunden. Sie können die Kamera zum
Aufnehmen von Fotos oder Videos mit der Fernbedienung steuern.
DE

23
Auswechseln der CR2032-Batterie der Fernbedienung
1. Verwenden Sie einen Schraubenzieher, um die 4 Schrauben auf der Rückseite der
Fernbedienung zu entfernen, um das Öffnen zu ermöglichen.
2. Entfernen Sie weitere 4 Schrauben auf der Leiterplatte.
Video
Um ein Video aufzunehmen, vergewissern Sie sich zunächst, dass sich die Kamera
im Videomodus befindet, und drücken Sie dann die Videotaste. Die Arbeitsanzeige
der Kamera blinkt während der Videoaufzeichnung. Um die Aufnahme zu beenden,
drücken Sie erneut die Videotaste.
Foto
Um ein Foto aufzunehmen, vergewissern Sie sich zunächst, dass sich die Kamera im
Fotomodus befindet, und drücken Sie dann die Fototaste. Die Kamera gibt einen
Auslöserton aus, der die Fertigstellung der Aufnahme anzeigt.
DE

24
6. Setzen Sie alle 4 Schrauben wieder in die Abdeckung ein.
3. Heben Sie die Leiterplatte an und ziehen Sie den Akku heraus, wie in der Abbildung
gezeigt.
Hinweis: Drehen Sie die Leiterplatte NICHT, um ein Umkehren der Kamera-und
Videotastenfunktionen zu vermeiden.
4. Setzen Sie die neue Batterie ein und halten Sie den Pluspol nach oben.
5. Installieren Sie alle 4 Schrauben wieder auf der Leiterplatte.
DE

25
Sie können Ihre Kamera an Helmen, Lenkstangen und vielem mehr befestigen, um noch
mehr Spaß zu bekommen.
Hinweis: Vergewissern Sie sich vor dem Tauchen, dass die USB-Abdeckung fest
verschlossen ist, damit sie nicht durchnässt wird.
Anbringen Ihrer Kamera
DE

26
DE

27
Für alle Anfragen zu AKASO-Produkten können Sie uns gerne kontaktieren.
Wir werden innerhalb von 24 Stunden antworten.
E-Mail-Addresse: [email protected]
Ozielle website:: www.dragontouch.com
Kontaktiere uns
DE

V5.1
VISION 3
C Á M A R A D E A C C I Ó N
MANUAL DE USUARIO

1
CONTENIDO
Qué hay en la caja-------------------------------------------------------------------------------------- 02
Su Vision 3 ------------------------------------------------------------------------------------------------ 03
Cómo empezar ------------------------------------------------------------------------------------------ 05
Resumen de Modos ----------------------------------------------------------------------------------- 07
Personalizar su Vision 3 ----------------------------------------------------------------------------- 10
Conectando a la aplicación XDV ------------------------------------------------------------------ 14
Reproduciendo tu contenido ---------------------------------------------------------------------- 15
Eliminación de videos y fotos en tu Vision 3 ------------------------------------------------- 15
Transferencia su contenido ------------------------------------------------------------------------ 16
Ajustar el nivel de zoom ----------------------------------------------------------------------------- 19
Formatear tu tarjeta de memoria---------------------------------------------------------------- 19
Mantenimiento de su cámara --------------------------------------------------------------------- 19
Maximización de la vida útil de la batería ---------------------------------------------------- 20
Manejo y almacenamiento de la batería ------------------------------------------------------ 20
Control remoto ----------------------------------------------------------------------------------------- 21
Montaje de la cámara -------------------------------------------------------------------------------- 23
Contáctenos --------------------------------------------------------------------------------------------- 25
ES

2
Carcasa
Impermeable x 1
Cargador
x 1
Batería
x 2
Cable USB
x 1
Control Remoto
x 1
Muñequera de
Control Remoto x 1
Montaje C
x 1
Hebilla de Montaje
x 1
Montaje J-Gancho
x 1
Montaje E
x 1
Montaje D
x 1
Soporte Para
Casco 2 x 1
Montaje A
x 1
Montaje H
x 1
Soporte Para
Casco 1 x 1
Montaje F
x 1
Vendaje
x 4
Ataduras
x 5
Paño Para Lente
x 1
Cinta Adhesiva
Doble Cara x 2
Guía de Inicio
Rápido x 1
Clip 1
x 1
Puerta Trasera
Protectora x 1
Clip 2
x 1
Qué hay en la caja
ES

3
Obturador / Botón OK
Indicador Wifi
Botón de encendido / Modo / Salir
Puerto USB / Puerto Mic externo
Ranura Tarjeta de Memoria
Puerto Micro HDMI
Lente
1
2
3
4
5
7
6
4
7
5
6
1
3
2
Su Vision 3
ES

4
Note: La cámara no grabará sonido cuando esté en el estuche impermeable.
14
8
11
12
13
9
10
Pantalla de Visualización
Indicador de Carga
Indicador de trabajo
Botón Arriba / Wifi
Botón Abajo
Altavoz
Tapa de la Batería
8
9
11
12
13
14
10
ES

5
Cómo empezar
Bienvenido a tu nueva cámara de acción Vision 3. Para capturar videos y fotos,
necesitarás una tarjeta de memoria (se vende por separado).
Tarjeta de Memoria
Utiliza tarjetas de memoria de marcas reconocidas que cumplan con los siguientes
requisitos:
• Clase 10 o calificación UHS-I
• Capacidad de hasta 128 GB (FAT32)
Notas:
1. Antes de usar esta cámara, formatea la tarjeta de memoria primero. Para
mantener en buen estado tu tarjeta de memoria, reformátala de manera regular.
El formateo eliminará todos tus datos, así que asegúrate de transferir tus fotos y
videos primero.
2. La tarjeta de memoria formateada en FAT32 dejará de grabar cuando el tamaño
de cada archivo supere los 4 GB y comenzará a grabar en un nuevo archivo.
3. Utilizar una tarjeta de memoria con una capacidad superior a la requerida puede
generar complicaciones, como la falta de reconocimiento de la tarjeta. Además,
podría causar mal funcionamiento de la cámara, incluyendo falta de respuesta o
falla del firmware.
Encendido y apagado
Para encender:
Mantén presionado el botón de encendido durante 3 segundos. Escucharás un
pitido y verás que el indicador de trabajo se enciende. Una vez que aparezca
información en la pantalla, sabrás que tu cámara está encendida.
Para apagar:
Mantén presionado el botón de encendido durante 3 segundos. Escucharás un
pitido y verás que el indicador de trabajo se apaga. Una vez que la pantalla se
oscurezca, sabrás que tu cámara está apagada.
ES

6
Activar o desactivar el Wifi
Para activar: En la pantalla de vista previa, presiona y mantén presionado el botón
de Wifi para encender el Wifi. Alternativamente, entra en los ajustes del sistema de
la cámara para habilitar el Wifi.
Para desactivar: En la pantalla Wifi, pulsa el botón Wifi para apagar Wifi.
Cambiar de modos
Para cambiar: En la pantalla de vista previa, presiona el botón de Modo para
cambiar de modos.
Para salir: Presiona nuevamente el botón de Modo para salir del modo actual.
Uso del disparador
En modo de Foto o Video, presiona el botón de Disparo para capturar fotos o
comenzar a grabar video. Para detener la grabación en modo de Video, presiona
nuevamente el botón de Disparo.
Cargando la cámara
Localiza el puerto de alimentación USB y conecta la cámara a un adaptador USB o
computadora utilizando el cable USB. El indicador de carga parpadeará en rojo
durante la carga y se apagará cuando esté completamente cargado. Una vez que
esté completamente cargado, desconecta el cable.
Consejo: La cámara puede grabar hasta 70 minutos en 4K cuando está
completamente cargada.
ES

7
Modo de foto
En la pantalla de vista previa, presiona
una vez el botón Modo para ingresar al
modo de Foto. En este modo, presiona el
botón de Disparo para tomar una foto.
16M 4373
01/01/2024 10:09:23
TF
Resumen de Modos
Esta cámara cuenta con 8 modos: Video, Foto, Cámara lenta, Reproducción, Confi
guración de video, Configuración de foto, Configuración general y Configuración del
sistema.
Para cambiar entre los modos Video, Foto, Cámara lenta y Reproducción,
primeroenciende tu cámara y luego presiona el botón Modo.
4K30FPS
01/01/2024 10:09:23
TF
Modo de video
La cámara está en modo de Video por
defecto al encenderse. En este modo,
presiona el botón de Disparo para
comenzar a grabar.
Para detener la grabación, simplemente
presiona nuevamente el botón de
Disparo.
ES

8
Modo de configuración de video
En la pantalla de vista previa, presiona
varias veces el botón Modo hasta que
veas un icono de engranaje, luego
presiona el botón OK para entrar al modo
de configuraciones de vídeo. En este
modo, puedes cambiar los ajustes de
vídeo libremente.
Resolución de video
Audio de video
Grabación de video... Apagar
Apagar
720P 120FPS
Grabación en bucle
Fotografía lenta
4K 30FPS
Modo de cámara lenta
En la pantalla de vista previa, presiona
dos veces el botón Modo para ingresar al
modo de Cámara lenta. En este modo,
puedes presionar el botón de Disparo
para grabar un video en cámara lenta con
la resolución establecida.
720P120FPS 14.4G
01/01/2024 10:09:23
TF
Modo de reproducción
En la pantalla de vista previa, presiona
tres veces el botón Modo para ingresar al
modo de Reproducción. En este modo,
puedes presionar los botones
Arriba/Abajo para seleccionar un archivo
de video o foto para reproducir.
00001 /04372
01/01/2024 10:09:23
ES

9
Modo de configuración del sistema
Después de acceder a la pantalla de
ajustes generales, presiona el botón
Modo para entrar al modo de
configuraciones del sistema. En este
modo, puedes cambiar los ajustes del
sistema libremente.
ldioma
Fecha-Hora
Formatear
Configuración predeterminada
Versión de firmware
Español
Modo de configuración de general
Después de acceder a la pantalla de
ajustes de foto, presiona el botón Modo
para ingresar al modo de configuración
general. En este modo, puedes cambiar
los ajustes generales libremente.
Ajustes de exposición
Balance de blancos
Modo de conducción
Auto
Interruptor de Wifi
Rotación de imagen
0
Modo de configuración de video
Después de acceder a la pantalla de
vídeo, presiona el botón Modo para
entrar al modo de configuraciones de
foto. En este modo, puedes cambiar los
ajustes de foto libremente.
Ajuste de pixeles
Temporización
Automática Apagar
Apagar
ApagarDesenfoque de movimiento
20M
ES

10
Personalizar su Vision 3
Configuración de vídeo
Cuando estés en la pantalla de configuración de vídeo, presiona el botón de abajo
para elegir una configuración de las opciones disponibles, luego presiona el botón
OK para confirmar tu selección y cambiar la configuración. Para volver a la pantalla
de vista previa, presiona el botón de modo varias veces y luego presiona el botón
OK.
1. Resolución de video
4K 30FPS/2.7K 30FPS/1080P 60FPS/1080P 30FPS/720P 120FPS/720P 60FPS/720P
30FPS (Por defecto: 4K 30FPS)
Esta cámara es capaz de grabar video hasta 4K30fps. A mayor resolución, mayor
claridad y detalle, resultando en archivos más grandes.
Nota: Capturar videos de alta resolución o alta velocidad de fotogramas en
temperaturas cálidas y ambientales puede hacer que la cámara consuma más
energía y se caliente rápidamente.
2. Sonido de vídeo
Encendido / Apagado (Por defecto: Encendido)
Activa o desactiva la "Sonido de vídeo". Con esta configuración desactivada, la
cámara grabará video sin audio.
3. Tiempo
Apagado/0.5s/1s/2s/5s /10s/30s/60s (Por defecto: Apagado)
Configura el intervalo en el que la cámara captura fotogramas de video. Una vez
que hayas terminado de configurar, vuelve a la pantalla de vista previa. La cámara
entrará en modo de Time Lapse. En este modo, la cámara capturará fotogramas a
intervalos preestablecidos y los compilará sin problemas en un video corto.
Nota: El video time lapse se captura sin audio.
4. Grabación en bucle
Apagado/1min /3 min /5 min (Por defecto: Apagado)
Configura la duración de los videos capturados en modo de grabación en bucle. Por
ejemplo, si configuras "Grabación en bucle" en "1 min", la cámara grabará y
guardará videos cada minuto. Cuando la memoria esté llena, la cámara eliminará
automáticamente los videos más antiguos para continuar grabando. Una vez que
hayas terminado de configurar, vuelve a la pantalla de vista previa. La cámara
entrará en modo de grabación en bucle.
ES

11
5. Cámara lenta
7720P 120FPS/1080P 60FPS (Por defecto: 720P 120FPS)
Configura la resolución a la que la cámara graba video en modo de cámara lenta.
Las imágenes de video parecerán estar en cámara lenta al reproducirlas.
Nota: El video de cámara lenta se captura sin audio.
6. Anti-vibración
Encendido / Apagado (Por defecto: Apagado)
La anti-vibración puede suavizar eficientemente los movimientos del objetivo, lo que
resulta en videos suaves y prístinos. Esta función es ideal para capturar escenas que
involucran actividades como montar, patinar y uso en mano.
7. Micrófono externo
Apagado/Encendido (Por defecto: Apagado)
Activa o desactiva la función de micrófono externo. Con esta función habilitada,
conecta un micrófono externo compatible al puerto USB de la cámara para lograr
una mejor calidad de sonido.
Configuración de foto
Cuando estés en la pantalla de configuración de fotos, presiona el botón Abajo para
elegir una configuración de las opciones disponibles, luego presiona el botón OK
para confirmar tu selección y cambiar la configuración.
1. Resolución de foto
20M /16M / 12M / 8M / 5M / 2M (Por defecto: 20M)
Esta cámara es capaz de capturar fotos de 20MP. A mayor resolución, mayor
claridad y detalle, resultando en archivos más grandes.
2. Temporizador
Apagado/ 3s / 5s / 10s / 20s (Por defecto: Apagado)
Configura el tiempo de cuenta regresiva para tomar una foto. La cámara iniciará la
cuenta regresiva preestablecida, luego activará automáticamente el obturador para
tomar una foto. Después de configurar, vuelve a la pantalla de vista previa. La
cámara entrará en modo de temporizador automático.
ES

12
3. Automática
Apagado / 3s / 10s / 15s / 20s / 30s (Por defecto: Apagado)
Especifica la frecuencia a la que se toma la foto. Por ejemplo, si seleccionas la
opción "3s", se tomará una foto automáticamente cada 3 segundos. Una vez que
hayas terminado de configurar, vuelve a la pantalla de vista previa. La cámara
entrará en modo de disparo automático.
4. Ráfaga
Apagado, 3P/s, 5P/s, 10P/s (Por defecto: Apagado)
La ráfaga te permite especificar el número de disparos consecutivos por segundo,
lo que la hace ideal para capturar actividades de rápido movimiento. Una vez que
hayas terminado de configurar, vuelve a la pantalla de vista previa. La cámara
entrará en modo de ráfaga.
Configuración general
Cuando estés en la pantalla de configuración general, presiona el botón Abajo para
elegir una configuración de las opciones disponibles, luego presiona el botón OK
para confirmar tu selección y cambiar la configuración.
1. Exposición
-3 / -2 / -1 / 0 / 1 / 2 / 3 (Por defecto: 0)
Ajusta el brillo de tus fotos y videos. Un valor de exposición más alto crea una
imagen más brillante, mientras que un valor más bajo resulta en una imagen más
oscura.
2. Balance de blancos
Auto / Soleado / Nublado / Incandescente / Fluorescente (Por defecto: Auto)
El balance de blancos ajusta la temperatura de color de tus videos y fotos,
asegurando una precisión de color óptima tanto en condiciones de iluminación
cálidas como frías.
3. Modo de Wifi
Encendido / Apagado (Por defecto: Apagado)
Elige habilitar Wifi en esta configuración.
Consejo: También puedes presionar y mantener presionado el botón deWifi para
encender Wifi en el Modo de Video o Foto. La cámara luego entrará en modo Wifi y
mostrará la información de Wifi.
ES

13
4. Rotación de imagen
Encendido / Apagado (Por defecto: Apagado)
Esta configuración determina la Esta configuración determina la orientación de tus
videos y fotos, ayudando a prevenir la grabación invertida.
Nota: La interfaz de usuario estará invertida cuando esta función esté habilitada.
5. Modo de conducción
Encendido / Apagado (Por defecto: Apagado)
Con el Modo de conducción habilitado, si conectas la cámara al encendedor de
cigarrillos del auto y arrancas el auto, la cámara se encenderá automáticamente para
comenzar la grabación de video y guardar el archivo de video en el intervalo
establecido. Guardará el archivo y se apagará automáticamente cuando detengas tu
auto. Cuando la tarjeta SD esté llena, la cámara eliminará automáticamente los videos
más antiguos para garantizar la grabación continua.
6. Frecuencia de la fuente de luz
Auto / 50Hz / 60Hz (Por defecto: Auto)
Puedes ajustar la frecuencia de la fuente de luz para evitar el fenómeno de
"ondas de agua" (ondas de luz) al capturar en interiores.
7. Indicador de luz LED
Encendido / Apagado (Por defecto: Apagado)
Activa o desactiva esta configuración. Con esta configuración habilitada, los
indicadores LED de la cámara se iluminarán o parpadearán según tus operaciones,
y viceversa.
8. Salvapantallas automático
Apagado / 10s / 20s / 30s (Por defecto: 30s)
El Salvapantallas Automático apaga la pantalla LCD después de un período de
inactividad para ahorrar energía de la batería. Para encender la pantalla de nuevo,
simplemente presiona cualquier botón de la cámara.
9. Apagado automático
Apagado/1 min/3 min/ 5 min (Default setting: 3 min)
El Apagado Automático apagará tu Vision 3 después de un período de inactividad
para ahorrar energía de la batería.
10. Marca de tiempo
Encendido / Apagado (Por defecto: Encendido)
Con esta configuración activada, se añadirá una marca de tiempo al video o foto.
ES

14
Conectando a la aplicación XDV
Puedes controlar tu cámara para capturar fotos y videos utilizando la aplicación de
tu teléfono. Para hacer esto, por favor descarga e instala primero la aplicación XDV
desde la App Store o Google Play. Una vez que tu cámara esté conectada a la
aplicación, podrás controlarla para capturar imágenes o cambiar la configuración de
la cámara. También puedes obtener una vista previa en tiempo real, reproducir,
descargar y editar videos a través de esta aplicación. Por favor, sigue las
instrucciones a continuación para conectar tu cámara a la aplicación.
1. Enciende la cámara y luego presiona y mantén presionado el botón Wifi para
activar el Wifi. La cámara entrará en modo Wifi y mostrará la información del Wifi.
Configuración del sistema
En la pantalla de configuración del sistema, presiona el botón Abajo para elegir una
opción de las disponibles, luego presiona el botón OK para confirmar tu selección y
cambiar la configuración.
1. Idioma
简体中文, 繁體中文, English, 日本語, Deutsch, Français, Italiano, Español, Português,
Русский, 한국어 (Por defecto: English)
Puedes elegir el idioma del sistema para tu cámara de acción Vision 3.
2. Fecha y hora
AA/MM/DD, MM/DD/AA, DD/MM/AA (Por defecto: MM/DD/AA)
Ajusta manualmente la fecha y hora de la cámara según tu hora local. La fecha y hora
también se actualizarán automáticamente al conectar tu cámara a la aplicación XDV.
3. Formatear
Confirmar / Cancelar (Por defecto: Cancelar)
4. Reinicio de fábrica
Confirmar / Cancelar (Por defecto: Cancelar)
Esta opción restablece todas las configuraciones a sus valores predeterminados.
5. Versión del Firmware
Esta opción te permite comprobar la marca, modelo y versión del firmware de tu
cámara.
ES

15
Reproduciendo tu contenido
Eliminación de videos y fotos en tu Vision 3
1. Ingresa al modo de reproducción.
2. Presiona el botón Arriba o Abajo para desplazarte por los archivos de video o foto.
Mantén presionado el botón OK durante 3 segundos. La pantalla mostrará
"Eliminar este archivo / Confirmar / Cancelar".
3. Presiona el botón Arriba seguido del botón OK, y el archivo seleccionado se
eliminará.
4. Presiona el botón Arriba seguido del botón OK, y el archivo seleccionado se
eliminará.
5. Para salir del modo de reproducción, presione el botón de Modo.
Puedes reproducir tu contenido en la cámara, tu computadora, televisión,
smartphone o tablet. También puedes reproducir el contenido insertando la tarjeta
de memoria directamente en un dispositivo, como una computadora o una
televisión compatible. Con este método, la resolución de reproducción depende de
la resolución del dispositivo y su capacidad para reproducir esa resolución.
Visualización de videos y fotos en tu Vision 3
1. Enciende tu cámara y luego presiona el botón de modo 3 veces para ingresar al
modo de reproducción.
2. Presiona el botón Arriba o Abajo para desplazarte por los archivos de video o foto.
3. Después de seleccionar el archivo que deseas ver, presiona el botón OK. y el
archivo se reproducirá.
2. Activa el Wifi de tu teléfono para ingresar a la página de configuración de Wifi
Encuentra el SSID de Wifi llamado "Vision3_0e10" en la lista y tócalo, luego ingresa
la contrase a 1234567890 para establecer la conexión.
Consejo: Una vez que el Wifi de la cámara esté conectado, verás un aviso de "Sin
conexión a internet" o "Seguridad débil" debido a que la senal 4G de tu teléfono
está bloqueada. Puedes ignorarlo y continuar con la conexión a la aplicación.
3. Abre la aplicación XDV en tu teléfono o tablet y vuelve a tocar el SSID de Wifi.
4. Tu cámara se conectará a la aplicación en segundos.
Note: Esta cámara no es compatible con MacBook ni iPad.
ES

16
Transferencia su contenido
Transferencia su contenidos en un ordenador
Para reproducir tus videos y fotos en una computadora, primero debes transferir
estos archivos a la computadora. La transferencia también libera espacio en tu
tarjeta de memoria para nuevo contenido. Para descargar archivos a una
computadora usando un lector de tarjetas (se vende por separado), por favor
inserta una tarjeta de memoria en el lector de tarjetas y luego conecta el lector de
tarjetas a la computadora a través de un puerto USB. Luego puedes transferir
archivos a tu computadora o eliminar archivos seleccionados utilizando el
explorador de archivos.
Descarga su contenidos en un smartphoneo una tableta
1. Abre la aplicación XDV y conéctala a tu cámara.
2. Toca el ícono de Álbum en la parte inferior de la pantalla.
ES
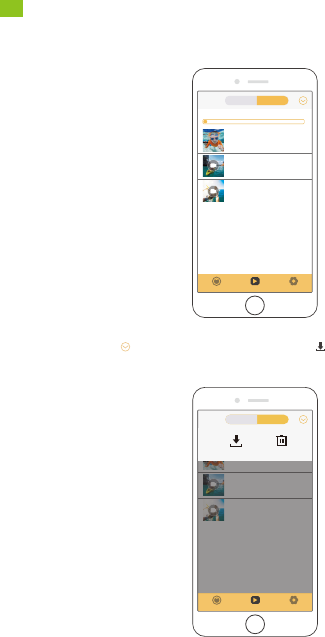
17
Disponible:29.67G Total:28.74G
Teléfono DV
Available:29.67G Total:28.74G
Teléfono DV
3. Toca "Dispositivo" en la parte superior de la pantalla para ver todos los archivos
de video y foto.
4. Pulsa el ícono de Seleccionar seguido del ícono de Descargar para
seleccionar el archivo que deseas descargar.
ES

18
Disponible:29.67G Total:28.74G
Descargar
Cancelar
Nota:
1. Por favor, no modifiques la configuración de Wifi ni te desconectes de la
aplicación durante el proceso de descarga.
2. Si no puedes descargar videos o fotos a tu iPhone a través de la aplicación,
ingresa a la página de Configuración de tu teléfono Privacidad Fotos, busca
"XDV" y selecciona "Todas las fotos".
3. No puedes descargar vídeos 4K o 2.7K a un iPhone o iPad a través de la
aplicación XDV. Por favor, transfiere estos vídeos a través de un lector de tarjetas.
5. Toca "Confirmar" en la esquina inferior izquierda y espera a que finalice el
proceso de descarga. El archivo se guardará en el álbum de tu teléfono o tablet.
ES

19
Mantenimiento de su cámara
Siga estas pautas para obtener el mejor rendimiento de su cámara:
1. Para obtener un mejor rendimiento de audio, agite la cámara o sople en el
micrófono para eliminar el polvo o las cenizas antes de usarla.
2. Para limpiar la lente, límpiela con un paño suave y sin pelusa. No limpie la lente
con nada más.
3. No toque directamente la lente frontal con los dedos.
4. Mantenga la cámara alejada de caídas y golpes que puedan dañar las partes
internas.
5. Mantenga la cámara alejada de altas temperaturas y de la luz solar intensa para
evitar daños.
Ajustar el nivel de zoom
La función de zoom te permite ajustar la proximidad del sujeto en tu metraje. La
cámara de acción Vision 3 admite un zoom de hasta 4X. La función de zoom está
disponible solo en el modo de video y foto. Sigue los pasos a continuación para
acercar o alejar la imagen.
1. Enciende la cámara de acción Vision 3.
2. Ingresa al modo de Video o Foto.
3. Presiona el botón de Subir o Bajar para ajustar el nivel de zoom.
Formatear tu tarjeta de memoria
Para mantener tu tarjeta de memoria en buen estado, por favor, formateala
regularmente. El formateo eliminará todo su contenido, así que asegúrate de
transferir tus fotos y videos primero. Por favor, sigue los siguientes pasos para
formatear la tarjeta.
1. Enciende la cámara de acción Vision 3.
2. Ingresa a la pantalla de configuración del sistema.
3. Presiona el botón de Bajar para encontrar la opción "Formato".
4. Presiona el botón OK. La pantalla mostrará "¿Formatear tarjeta de memoria?
Confirmar / Cancelar".
5. Presiona el botón de Subir seguido del botón OK. Tu tarjeta de memoria se
formateará exitosamente.
ES

20
Maximización de la vida útil de la batería
Si la energía de la batería alcanza 0% mientras se está grabando, la cámara
guardará el archivo y se apagará automáticamente. Para maximizar la vida útil de
la batería, siga las pautas siempre que sea posible:
• Apague la conexión inalámbrica.
• Capture video a velocidades de cuadro y resoluciones más bajas.
• Utilice la configuración de protector de pantalla automático.
Manejo y almacenamiento de la batería
1. Si vas a almacenarla durante períodos prolongados, mantén una carga de batería
del 50-60%. Cárgala cada 3 meses y descarga la batería cada 6 meses.
2. No guardes la batería junto a objetos metálicos como monedas, llaves o collares.Si
los terminales de la batería se acercan a objetos metálicos, puede producirse un
cortocircuito que cause incendios.
3. Almacena la batería en áreas secas, protegida de posibles daños físicos
causadospor aplastamiento o colisión.
4. Evita utilizar o almacenar la batería a altas temperaturas, como a pleno sol o en
compartimentos calientes. En estas condiciones, la batería se calentará,
funcionaráincorrectamente o tendrá una vida útil más corta.
5. Evita utilizar o almacenar la batería en entornos de baja temperatura, ya que esto
acortará su vida útil o puede provocar un mal funcionamiento.
6. Evita entornos con fuertes campos estáticos o magnéticos; estos pueden
comprometer la unidad de protección de la batería, ocasionando riesgos
deseguridad.
7. Si la batería emite un olor, se sobrecalienta, cambia de color, se deforma o
presenta alguna anomalía, deja de usarla y retírala de inmediato de la cámara o
elcargador de batería, ya sea que esté en uso, cargándose o almacenada.
8. Aísla de manera segura los electrodos usados para evitar posibles peligros.
ES

21
Control remoto
Botón Foto
Botón Video
Nota: El control remoto sólo es resistente a salpicaduras.
Cuando la cámara se encienda, se conectará automáticamente al control remoto
dentro de una cierta distancia. Podrás controlar la cámara para tomar fotos o grabar
videos usando el control remoto.
Video
Para grabar vídeo, asegúrese primero de que la cámara está en modo Vídeo y, a
continuación, pulse el botón Vídeo. El indicador de funcionamiento de la cámara
parpadeará durante la grabación de vídeo. Para detener la grabación, pulse de
nuevo el botón Vídeo.
Foto
Para capturar una foto, asegúrese primero de que la cámara está en modo Foto y, a
continuación, pulse el botón Foto. La cámara emitirá un sonido de obturador
indicando la finalización de la toma.
ES

22
Sustitución de la pila CR2032 del control remoto
1. Utilice un destornillador para quitar los 4 tornillos de la tapa trasera del control
remoto, lo que le permitirá abrirlo.
2. Retire otros 4 tornillos de la placa de circuitos del control remoto.
3. Levante la placa de circuito y deslice la batería hacia fuera, como se muestra
a continuación.
Nota: Evite girar la placa de circuitos para no invertir los botones del control remoto.
ES

23
6. Vuelva a colocar los 4 tornillos en la tapa.
4. Instale la nueva batería, manteniendo el polo "+" hacia arriba.
5. Vuelva a instalar los 4 tornillos en la placa de circuito.
Puedes acoplar tu cámara a cascos, manillares y mucho más para desbloquear más
diversión.
Nota: Antes de sumergirte, asegúrate de que la tapa del USB esté bien cerrada para
evitar que se empape.
Montaje de la cámara
ES

24
ES

25
Para cualquier consulta sobre los productos de AKASO, no dude en contactarnos.
Responderemos dentro de las 24 horas.
Correo electrónico: [email protected]
Sitio web oficial: www.dragontouch.com
Contáctenos
ES

VISION 3
C A M É R A D ' A C I O N
MANUEL D'UTILISATION
V5.1

1
SOMMAIRE
Qu'y a-t-il dans la boite------------------------------------------------------------------------------- 02
Votre Vision 3 -------------------------------------------------------------------------------------------- 03
Pour commencer --------------------------------------------------------------------------------------- 05
Aperçu des modes ------------------------------------------------------------------------------------ 07
Personnalisation de votre Vision 3 -------------------------------------------------------------- 10
Connexion à l'application XDV -------------------------------------------------------------------- 15
Lecture de votre contenu --------------------------------------------------------------------------- 16
Suppression de votre contenu sur Vision 3 -------------------------------------------------- 16
Transfert de votre contenu------------------------------------------------------------------------- 17
Ajuster le niveau de zoom -------------------------------------------------------------------------- 19
Réinitialisation de votre carte mémoire ------------------------------------------------------- 20
Entretien de votre appareil photo --------------------------------------------------------------- 20
Optimisation de la durée de vie de la batterie ---------------------------------------------- 20
Manipulation et stockage de la batterie------------------------------------------------------- 21
Télécommande ----------------------------------------------------------------------------------------- 22
Montage de l'appareil photo----------------------------------------------------------------------- 24
Contactez nous ----------------------------------------------------------------------------------------- 26
FR

2
Boîtier
Étanche x 1
Chargeur
x 1
Batterie
x 2
Câble USB
x 1
Télécommande
x 1
Sangle de
Télécommande x 1
Monture C
x 1
Boucle Mont
x 1
Monture en Crochet J
x 1
Monture E
x 1
Monture D
x 1
Supports Pour
Casques 2 x 1
Monture A
x 1
Monture H
x 1
Supports Pour
Casques 1 x 1
Monture F
x 1
Pansements
x 4
Attaches
x 5
Tissu Pour
Lentilles x 1
Ruban Adhésif
Double Face x 2
Guide de Démarrage
Rapide x 1
Clip 1
x 1
Protection de la
Porte Arrière x 1
Clip 2
x 1
Qu'y a-t-il dans la boite
FR

3
Obturateur / Bouton OK
Indicateur Wifi
Bouton Marche / Mode / Sortie
Port USB / Port Mic externe
Fente Pour Carte Mémoire
Port Micro HDMI
Lentille
1
2
3
4
5
7
6
4
7
5
6
1
3
2
Votre Vision 3
FR

4
Remarque : La caméra n’enregistre pas le son quand elle est dans le boîtier étanche.
14
8
11
12
13
9
10
Écran D'affichage
Indicateur de Charge
Indicateur de Travail
Bouton Haut / Wifi
Bouton Bas
Haut-parleur
Couvercle de la Batterie
8
9
11
12
13
14
10
FR

5
Pour commencer
Bienvenue dans votre nouvelle caméra d'action Vision 3. Pour capturer des vidéos et
des photos, vous aurez besoin d'une carte mémoire (vendue séparément).
Utilisation de la carte mémoire
Utilisez des cartes mémoire de marque répondant à ces exigences:
• Classe 10 ou avec une notation UHS-I
• Capacité jusqu'à 128 Go (FAT32)
Remarque :
1. Avant d'utiliser cette caméra, veuillez formater la carte mémoire en premier lieu.
Pour maintenir votre carte mémoire en bon état, reformatez-la régulièrement. Le
reformatage supprime toutes vos données, veillez donc à transférer vos photos et
vidéos au préalable.
2. La carte mémoire formatée en FAT32 s'arrêtera d'enregistrer lorsque le stockage
de chaque fichier dépasse 4Go, puis recommencera à enregistrer dans un
nouveau fichier.
3. L'utilisation d'une carte mémoire ayant une capacité supérieure à celle requise
peut entraîner des complications telles qu'une impossibilité de reconnaître la
carte. De plus, cela peut provoquer des dysfonctionnements de l'appareil photo,
notamment un manque de réactivité ou une défaillance du micrologiciel.
Mise en marche ou arrêt
Pour activer:
Appuyez et maintenez enfoncé le bouton d'alimentation pendant 3 secondes. Vous
entendrez un bip et verrez le témoin de fonctionnement s'allumer. Une fois que des
informations apparaissent sur l'écran, vous saurez que votre appareil photo est
allumé.
Pour désactiver:
Appuyez et maintenez enfoncé le bouton d'alimentation pendant 3 secondes. Vous
entendrez un bip et verrez le témoin de fonctionnement s'éteindre. Une fois que
l'écran s'éteint, vous saurez que votre appareil photo est éteint.
FR

6
Activer ou désactiver le Wifi
Pour activer : Sur l'écran de prévisualisation, appuyez sur le bouton Wifi enfoncé
pour activer le Wifi. Vous pouvez également accéder aux paramètres système de la
caméra pour activer le Wifi.
Pour désactiver : Sur l'écran Wifi, appuyez sur le bouton Wifi.
Changement de modes
Pour changer : Sur l'écran de prévisualisation, appuyez sur le bouton Mode pour
changer de mode.
Pour sortir : Appuyez à nouveau sur le bouton Mode pour quitter le mode actuel.
Utilisation du bouton d'obturateur
En mode Photo ou Vidéo, appuyez sur le bouton d'obturateur pour prendre des
photos ou commencer l'enregistrement vidéo. Pour arrêter l'enregistrement en
mode Vidéo, appuyez à nouveau sur le bouton d'obturateur.
Chargement de la caméra
Localisez le port d'alimentation USB et connectez la caméra à un adaptateur USB ou
à un ordinateur à l'aide du câble USB. Le témoin de charge clignotera en rouge
pendant la charge et s'éteindra une fois complètement chargé. Une fois
complètement chargée, débranchez le câble.
Astuce : L'appareil photo peut enregistrer jusqu'à 70 minutes en 4K lorsqu'il est
complètement chargé.
FR

7
Mode Photo
Sur l'écran de visualisation, appuyez une
fois sur le bouton Mode pour entrer en
mode Photo. Dans ce mode, appuyez sur
le bouton de l'obturateur pour prendre
une photo.
16M 4373
01/01/2024 10:09:23
TF
Aperçu des modes
Il y a 8 modes sur cette caméra : Vidéo, Photo, Ralenti, Lecture, Réglages vidéo,
Réglages photo, Réglages généraux et Réglages système.
Lorsque l'écran de prévisualisation est affiché, appuyez sur le bouton Mode pour
changer de mode.
4K30FPS
01/01/2024 10:09:23
TF
Mode Vidéo
La caméra est en mode Vidéo par défaut
lorsqu'elle est allumée. En mode Vidéo,
appuyez sur le bouton de l'obturateur
pour commencer l'enregistrement. Pour
arrêter l'enregistrement, appuyez
simplement à nouveau sur le bouton de
l'obturateur.
FR

8
Mode Réglages vidéo
Sur l'écran de visualisation, appuyez
plusieurs fois sur le bouton Mode jusqu'à
ce qu'une icône d'engrenage apparaisse à
l'écran, puis appuyez sur le bouton OK
pour entrer en mode Réglages vidéo.
Dans ce mode, vous êtes libre de modifier
les réglages vidéo.
Résolution de la...
Son vidéo
Vidéo accélérée éteindre
éteindre
720P 120FPS
Loop Recording
Vidéo ralenti
4K 30FPS
Mode Ralenti
Sur l'écran de visualisation, appuyez deux
fois sur le bouton Mode pour entrer en
mode Ralenti. Dans ce mode, vous pouvez
appuyer sur le bouton de l'obturateur
pour enregistrer une vidéo au ralenti à la
résolution définie.
720P120FPS 14.4G
01/01/2024 10:09:23
TF
Mode Lecture
Sur l'écran de visualisation, appuyez 3 fois
sur le bouton Mode pour entrer en mode
Lecture. Dans ce mode, vous pouvez
utiliser les boutons Haut/Bas pour
sélectionner un fichier vidéo ou photo à
lire.
00001 /04372
01/01/2024 10:09:23
FR

9
Mode Réglages système
Après avoir accédé à l'écran des
paramètres généraux, appuyez sur la
touche Mode pour accéder au mode
Paramètres du système. Dans ce mode,
vous êtes libre de modifier les
paramètres du système.
Langue
Date-Heure
Format
Paramètres par dèfaut
Version du firmware
English
Mode Réglages photo
Après avoir accédé à l'écran de
visualisation vidéo, appuyez sur le bouton
Mode pour entrer en mode Réglages
photo. Dans ce mode, vous êtes libre de
modifier les réglages photo.
Mode Réglages généraux
Après avoir accédé à l'écran des réglages
photo, appuyez sur le bouton Mode pour
entrer en mode Réglages généraux. Dans
ce mode, vous êtes libre de modifier les
réglages généraux.
Réglage des pixels
Temporisateur
Automatique éteindre
éteindre
éteindreDéplacement d’une...
20M
Résolution de l’exposition
Équilibre des blancs
Mode de véhicule
Auto
Wifi Commutateur
Rotation de l’image
0
FR

10
Personnalisation de votre Vision 3
Paramètres vidéo
Lorsque vous êtes sur l'écran des paramètres vidéo, appuyez sur le bouton Bas
pour choisir un réglage parmi les options disponibles, puis appuyez sur le bouton
OK pour confirmer votre sélection et modifier le réglage. Pour revenir à l'écran de
prévisualisation, appuyez plusieurs fois sur le bouton Mode, puis appuyez sur OK.
1. Résolution vidéo
4K 30FPS/2.7K 30FPS/1080P 60FPS/1080P 30FPS/720P 120FPS/720P 60FPS/720P
30FPS (Par défaut : 4K 30FPS)
Cette caméra est capable d'enregistrer des vidéos jusqu'à 4K30fps. Plus la
résolution est élevée, plus la clarté et les détails sont importants, donc plus le fichier
est volumineux.
Remarque : Capturer des vidéos haute résolution ou haute fréquence dans des
températures chaudes et ambiantes peut entraîner une consommation accrue
d'énergie et un échauffement rapide de la caméra.
2. Enregistrement du son
Arrêt / Marche (Par défaut : Marche)
Activez ou désactivez l'enregistrement du son. Avec ce paramètre désactivé,
l'appareil photo enregistrera des vidéos sans audio.
3. Intervalle d’enregistrement
Arrêt/0.5s/1s/2s/5s /10s/30s/60s (Par défaut : Arrêt)
Définissez l'intervalle auquel l'appareil photo capture des images vidéo. Une fois
que vous avez terminé la configuration, revenez à l'écran de prévisualisation.
L'appareil photo entrera en mode time-lapse. Dans ce mode, l'appareil photo
capturera des images à l'intervalle prédéfini et les compilera de manière
transparente en une courte vidéo.
Remarque : Les vidéos time-lapse sont enregistrées sans audio.
4. Enregistrement en boucle
Arrêt/1min /3 min /5 min (Par défaut : Arrêt)
Définissez la durée des vidéos enregistrées en mode enregistrement en boucle. Par
exemple, si vous définissez la "Boucle d'enregistrement" sur "1 min", l'appareil photo
enregistrera et sauvegardera des vidéos toutes les minutes. Lorsque la mémoire est
FR

11
pleine, l'appareil photo supprimera automatiquement les vidéos les plus anciennes
pour continuer l'enregistrement. Une fois que vous avez terminé la configuration,
revenez à l'écran de prévisualisation. L'appareil photo entrera en mode
enregistrement en boucle.
5. Ralenti
720P 120FPS/1080P 60FPS (Par défaut : 720P 120FPS)
Définissez la résolution à laquelle l'appareil photo enregistre des vidéos en mode
Ralenti. Les séquences vidéo sembleront être au ralenti lors de la lecture.
Remarque : Les vidéos au ralenti sont enregistrées sans audio.
6. Stabilisation d'image
Arrêt / Marche (Par défaut : Arrêt)
La stabilisation d'image peut lisser efficacement les secousses de l'objectif, ce qui
donne des vidéos fluides et nettes. Cette fonction est idéale pour capturer des scènes
impliquant des activités comme le vélo, le patinage et une utilisation à main levée.
7. Micro externe
Arrêt / Marche (Par défaut : Arrêt)
Activez ou désactivez la fonction de micro externe. Avec cette fonction activée,
connectez un microphone externe compatible au port USB de la caméra pour
obtenir une meilleure qualité sonore.
Paramètres photo
Sur l'écran des paramètres photo, appuyez sur le bouton Bas pour choisir un réglage
parmi les options disponibles, puis appuyez sur le bouton OK pour confirmer votre
sélection et modifier le réglage.
1. Résolution photo
20M /16M / 12M / 8M / 5M / 2M (Par défaut : 20M)
Cette caméra est capable de capturer des photos de 20 MP. Plus la résolution est
élevée, plus la clarté et les détails sont importants, donc plus le fichier est volumineux.
2. Minuterie
Arrêt / 3s / 5s / 10s / 20s (Par défaut : Arrêt)
Définissez le temps de compte à rebours pour prendre une photo. L'appareil photo
lancera le compte à rebours prédéfini, puis activera automatiquement l'obturateur
pour prendre une photo. Après la configuration, revenez à l'écran de prévisualisa-
tion. L'appareil photo entrera en mode Minuterie.
FR

12
3. Photo automatique
Arrêt / 3s / 10s / 15s / 20s / 30s (Par défaut : Arrêt)
Spécifiez la fréquence à laquelle la photo est prise. Par exemple, si vous
sélectionnez l'option "3s", une photo sera prise automatiquement toutes les 3
secondes. Une fois la configuration terminée, revenez à l'écran de prévisualisation.
L'appareil photo entrera en mode photo automatique.
4. Mode rafale
Arrêt, 3P/s, 5P/s, 10P/s (Par défaut : Arrêt)
La rafale vous permet de spécifier le nombre de prises de vue consécutives par
seconde, ce qui est idéal pour capturer des activités rapides. Une fois la
configuration terminée, revenez à l'écran de prévisualisation. L'appareil photo
entrera en mode Rafale.
Paramètres généraux
Lorsque vous êtes sur l'écran des paramètres généraux, appuyez sur le bouton Bas
pour choisir un réglage parmi les options disponibles, puis appuyez sur le bouton
OK pour confirmer votre sélection et modifier le réglage.
1. Exposition
-3 / -2 / -1 / 0 / 1 / 2 / 3 (Par défaut : 0)
Ajustez la luminosité de vos photos et vidéos. Une valeur d'exposition plus élevée
crée une image plus lumineuse, tandis qu'une valeur plus basse donne une image
plus sombre.
2. Balance des blancs
Auto / Ensoleillé / Nuageux / Incandescent / Fluorescent (Réglage par défaut : Auto)
La balance des blancs ajuste la température de couleur de vos vidéos et photos,
assurant une précision des couleurs optimale dans des conditions d'éclairage
chaudes et froides.
3. Mode Wifi
Arrêt / Marche (Par défaut : Arrêt)
Choisissez d'activer le Wifi dans ce réglage.
Astuce : Vous pouvez également maintenir le bouton Wifi enfoncé pour activer le
Wifi en mode Vidéo ou Photo. La caméra entrera alors en mode Wifi et affichera les
informations Wifi.
FR

13
4. Rotation d'image
Arrêt / Marche (Par défaut : Arrêt)
Ce réglage détermine l'orientation de vos vidéos et photos, aidant à éviter les prises
de vue à l'envers.
Remarque : L'interface utilisateur sera à l'envers lorsque cette fonction est activée.
5. Mode conduite
Arrêt / Marche (Par défaut : Arrêt)
Avec le mode conduite activé, si vous connectez la caméra à l'allume-cigare de la
voiture et démarrez votre voiture, la caméra s'allumera automatiquement pour
commencer l'enregistrement vidéo et enregistrer le fichier vidéo à l'intervalle défini.
Elle enregistrera le fichier et s'éteindra automatiquement lorsque vous arrêterez
votre voiture. Lorsque la carte SD est pleine, la caméra supprimera automatique-
ment les vidéos les plus anciennes pour assurer un enregistrement continu.
6. Source lumineuse Fréquence
Auto / 50Hz / 60Hz (Par défaut : Auto))
Vous pouvez régler la fréquence de la source lumineuse pour éviter le phénomène
des "ondulations de l'eau" (ondes lumineuses) lors de prises de vue en intérieur.
7. Indicateur lumineux LED
Arrêt / Marche (Par défaut : Arrêt)
Activez ou désactivez ce réglage. Avec ce réglage activé, les voyants LED de la
caméra s'allumeront ou clignoteront en fonction de vos opérations, et vice versa.
8. Écran de veille auto
Arrêt / 10s / 20s / 30s (Par défaut : 30s)
L'économiseur d'écran automatique éteint l'écran LCD après une période
d'inactivité pour économiser la batterie. Pour rallumer l'écran, il suffit d'appuyer sur
n'importe quel bouton de la caméra.
9. Extinction auto
Arrêt/1 min/3 min/ 5 min (Par défaut : 3 min)
L'extinction automatique éteindra votre Vision 3 après une période d'inactivité pour
économiser la batterie.
10. Horodatage
Arrêt / Marche (Par défaut : Marche)
Avec ce paramètre activé, un cachet de temps sera ajouté à la vidéo ou à la photo.
FR

14
Paramètres système
Sur l'écran des paramètres système, appuyez sur le bouton Bas pour choisir un
réglage parmi les options disponibles, puis appuyez sur le bouton OK pour
confirmer votre sélection et modifier le réglage.
1. Language
简体中文, 繁體中文, English, 日本語, Deutsch, Français, Italiano, Español, Português,
Русский, 한국어 (Par défaut : English)
Vous pouvez choisir la langue du système pour votre caméra d'action Vision 3.
2.Date et heure
AA-MM-JJ, HH-MM-SS
Vous pouvez choisir la langue du système pour votre caméra d'action Vision 3.
3. Formater
Confirmer/Annuler (Par défaut : Annuler)
Pour préserver la bonne condition de votre carte mémoire, reformatez-la
régulièrement. Le reformatage efface tout votre contenu, assurez-vous donc de
sauvegarder vos photos et vidéos au préalable.
4. Réinitialisation d'usine
Confirmer/Annuler (Par défaut : Annuler)
Cette option réinitialise tous les paramètres à leurs valeurs par défaut.
5. Version du micrologiciel
Cette option vous permet de vérifier la marque, le modèle et la version du
micrologiciel de votre caméra.
FR

Connexion à l'application XDV
Vous pouvez contrôler votre appareil photo pour prendre des photos et des vidéos
en utilisant l'application sur votre téléphone. Pour ce faire, veuillez d'abord
télécharger et installer l'application XDV depuis l'App Store ou Google Play. Lorsque
votre appareil photo est connecté à l'application, vous pouvez le contrôler pour
prendre des photos ou modifier les paramètres de l'appareil. Vous pouvez
également prévisualiser en direct, lire, télécharger et éditer des vidéos via cette
application. Veuillez suivre les instructions ci-dessous pour connecter votre appareil
photo à l'application.
1. Allumez l'appareil photo, puis appuyez longuement sur le bouton Wifi pour
activer
le Wifi. L'appareil photo passera en mode Wifi et affichera les informations du
réseau Wifi.
2. Activez le Wifi de votre téléphone pour accéder aux paramètres Wifi. Trouvez le
nom SSID "Vision3_0e10" dans la liste des réseaux Wifi et appuyez dessus, puis
entrez le mot de passe 1234567890 pour vous connecter.
Astuce: Une fois que le Wifi de l'appareil photo est connecté, il peut afficher un
message "Pas de connexion Internet" ou "Sécurité faible" car le signal 4G de
votre téléphone est bloqué. Vous pouvez l'ignorer et continuer la connexion à
l'application.
3. Ouvrez l'application XDV sur votre téléphone ou tablette, puis appuyez à nouveau
sur le nom SSID du réseau Wifi.
4. Votre appareil photo se connectera à l'application en quelques secondes.
Remarque: Cet appareil photo n'est pas compatible avec les ordinateurs
MacBook ou les iPad.
15
FR

16
Lecture de votre contenu
Suppression de votre contenu sur Vision 3
1. Accédez au mode Lecture.
2. Appuyez sur les boutons Haut ou Bas pour faire défiler les fichiers vidéo ou photo.
3. Maintenez le bouton OK enfoncé pendant 3 secondes. L'écran affichera
"Supprimer ce fichier / Confirmer / Annuler".
4. Appuyez sur le bouton Haut suivi du bouton OK, et le fichier sélectionné sera
supprimé.
5. Pour quitter le mode Lecture, appuyez sur le bouton Mode.
Vous pouvez lire votre contenu sur l'appareil photo, votre ordinateur, votre
téléviseur, votre smartphone ou votre tablette. Vous pouvez également lire le
contenu en insérant la carte mémoire directement dans un périphérique tel qu'un
ordinateur ou un téléviseur compatible. Avec cette méthode, la résolution de
lecture dépend de la résolution du périphérique et de sa capacité à lire cette
résolution.
Visualisation des vidéos et des photos sur votre Vision 3
1. Allumez votre appareil photo, puis appuyez 3 fois sur le bouton Mode pour entrer
en mode Lecture.
2. Appuyez sur les boutons Haut ou Bas pour faire défiler les fichiers vidéo ou photo.
3. Après avoir sélectionné le fichier que vous souhaitez visualiser, appuyez sur le
bouton OK. Le fichier sera alors lu.
FR

17
Transfert de votre contenu
Transfert votre contenu vers un ordinateur
Pour lire vos vidéos et photos sur un ordinateur, vous devez d'abord transférer
ces fichiers vers l'ordinateur. Le transfert libère également de l'espace sur votre
carte mémoire pour de nouveaux contenus. Pour télécharger des fichiers vers un
ordinateur à l'aide d'un lecteur de carte (vendu séparément), veuillez insérer une
carte mémoire dans votre lecteur de carte, puis connecter le lecteur de carte à
l'ordinateur via un port USB. Vous pouvez ensuite transférer des fichiers vers votre
ordinateur ou supprimer des fichiers sélectionnés en utilisant l'explorateur de
fichiers.
Télécharger votre contenu sur un smartphone ou une tablette
1. Ouvrez l'application XDV et connectez-la à votre caméra.
2. Appuyez sur l'icône Album en bas de l'écran.
FR

18
Disponible:29.67G Le total:28.74G
Téléphone Dispositif
Available:29.67G Total:28.74G
Téléphone Dispositif
3. Appuyez sur "Appareil" en haut de l'écran pour afficher tous les fichiers vidéo et
photo.
4. Appuyez sur l'icône Sélectionner, puis sur l'icône Télécharger pour
sélectionner le fichier que vous souhaitez télécharger.
FR

19
Disponible:29.67G Le total:28.74G
Télécharger
Annuler
Remarque :
1. Veuillez ne pas modifier les paramètres Wifi ou vous déconnecter del'application
pendant le processus de téléchargement.
2. Si vous ne pouvez pas télécharger de vidéos ou de photos sur votre iPhone via
l'application, veuillez accéder à la page Paramètres de votre téléphone
Confidentialité Photos, chercher " XDV " et sélectionner " Toutes les photos ".
3. Vous ne pouvez pas télécharger de vidéos 4K ou 2,7K sur un iPhone ou un iPad
via l'application XDV. Veuillez transférer ces vidéos via un lecteur de carte.
5. Appuyez sur "Confirmer" dans le coin inférieur gauche et attendez la fin du
processus de téléchargement. Le fichier sera enregistré dans l'album de votre
téléphone ou de votre tablette.
Ajuster le niveau de zoom
La fonction de zoom peut être utilisée pour ajuster la proximité ou l'éloignement du
sujet dans votre photo. Le réglage par défaut est sans zoom. La fonction de zoom
est disponible en mode Vidéo et Photo. Cette caméra prend en charge un zoom
allant jusqu'à 4X. Veuillez suivre les étapes ci-dessous pour zoomer.
1. Allumez la caméra d'action Vision 3.
2. Accédez au mode Vidéo ou Photo.
3. Appuyez sur le bouton Haut ou Bas pour ajuster le niveau de zoom.
FR

20
Entretien de votre appareil photo
Veuillez suivre ces conseils pour obtenir les meilleures performances de votre
appareil photo:
1. Pour une meilleure performance audio, secouez l'appareil photo ou soufflez sur
le microphone pour enlever la poussière ou les cendres avant utilisation.
2. Pour nettoyer l'objectif, essuyez-le avec un chiffon doux et sans peluches.
N'utilisez rien d'autre pour nettoyer l'objectif.
3. Ne touchez pas directement l'objectif frontal avec vos doigts.
4. Éloignez l'appareil photo des chutes et des chocs qui pourraient endommager
les pièces à l'intérieur.
5. Gardez l'appareil photo loin des températures élevées et du soleil intense pour
éviter les dommages.
Optimisation de la durée de vie de la batterie
Si la batterie atteint 0 % pendant l'enregistrement, l'appareil photo sauvegardera le
fichier et s'éteindra automatiquement. Pour maximiser la durée de vie de la
batterie, veuillez suivre ces conseils dans la mesure du possible:
• Éteignez la connexion sans fil.
• Enregistrez des vidéos à des fréquences d'images et des résolutions plus basses.
• Utilisez le réglage d'économiseur d'écran automatique.
Réinitialisation de votre carte mémoire
Pour conserver votre carte mémoire en bon état, veuillez la réinitialiser
régulièrement. La réinitialisation efface tout le contenu, veillez donc d'abord à
transférer vos photos et vidéos. Veuillez suivre les étapes ci-dessous pour formater
la carte.
1.Allumez la caméra d'action Vision 3.
2. Accédez à l'écran des paramètres système.
3. Appuyez sur le bouton Bas pour trouver l'option "Format".
4. Appuyez sur le bouton OK. L'écran affichera "Formater la carte mémoire ?
Confirmer / Annuler".
5. Appuyez sur le bouton Haut suivi du bouton OK. Votre carte mémoire sera
formatée avec succès.
FR

21
Manipulation et stockage de la batterie
• Si vous stockez l'appareil pendant de longues périodes, maintenez une charge de
batterie de 50 à 60 %. Chargez-la tous les 3 mois et déchargez-la tous les 6 mois.
• Ne stockez pas la batterie avec des objets métalliques tels que des pièces de
monnaie, des clés ou des colliers. Si les bornes de la batterie entrent en contact
avec des objets métalliques, un court-circuit peut provoquer un incendie.
• Stockez la batterie dans des endroits secs, à l'abri des dommages physiques
potentiels causés par une pression ou une collision.
• Évitez d'utiliser ou de stocker la batterie à des températures élevées, telles que
sous la lumière directe du soleil ou dans un compartiment chaud. La batterie
chauffera, dysfonctionnera ou aura une durée de vie réduite dans ces conditions.
• Évitez d'utiliser ou de stocker la batterie dans des environnements à basse
température, car cela réduira la durée de vie de la batterie ou pourrait entraîner
un dysfonctionnement.
• Évitez les environnements présentant des champs statiques ou magnétiques
puissants ; ceux-ci peuvent compromettre l'unité de protection de la batterie et
représenter des risques pour la sécurité.
• Si la batterie dégage une odeur, surchauffe, change de couleur, se déforme ou
présente des anomalies, cessez immédiatement de l'utiliser et retirez-la de
l'appareil photo ou du chargeur de batterie, qu'elle soit utilisée, chargée ou
stockée.
• Isoler en toute sécurité les électrodes usagées pour éviter tout danger potentiel.
FR

22
Télécommande
Bouton photo
Bouton vidéo
Remarque : La télécommande est uniquement étanche aux éclaboussures.
Lorsque l'appareil photo est allumé, il est automatiquement connecté à la
télécommande dans un rayon de 10 mètres. Vous pouvez contrôler l'appareil pour
prendre des photos ou enregistrer des vidéos à l'aide de la télécommande.
Vidéo
Pour enregistrer une vidéo, assurez-vous d'abord que l'appareil est en mode vidéo,
puis appuyez sur le bouton Vidéo. L'indicateur de fonctionnement de l'appareil
photo clignote pendant l'enregistrement vidéo. Pour arrêter l'enregistrement,
appuyez à nouveau sur la touche Vidéo.
Photo
Pour prendre une photo, assurez-vous d'abord que l'appareil est en mode Photo,
puis appuyez sur le bouton Photo. L'appareil photo émet un son d'obturateur
indiquant que la prise de vue est terminée.
FR

23
Remplacement de la pile CR2032 de la télécommande
1. À l'aide d'un tournevis, retirez les 4 vis situées sur le couvercle arrière de la
télécommande, ce qui vous permettra de l'ouvrir.
2. Retirez les 4 autres vis de la carte de circuit imprimé de la télécommande.
3. Soulevez le circuit imprimé et faites glisser la batterie, comme indiqué ci-dessous.
Remarque : Évitez de faire tourner le circuit imprimé pour ne pas inverser les boutons
de la télécommande.
FR

24
6. Réinstallez toutes les 4 vis dans le couvercle.
4. Installez la nouvelle batterie en orientant le pôle "+" vers le haut.
5. Remettre les 4 vis en place sur la carte de circuit imprimé.
Vous pouvez attacher votre caméra à un casque, à un guidon et à bien d'autres choses
encore pour vous amuser encore plus.
Remarque : avant de plonger, assurez-vous que le couvercle de la clé USB est bien
fermé pour éviter qu'il ne soit imbibé d'eau.
Montage de l'appareil photo
FR

25
FR

26
Pour tout problème avec les produits AKASO, n'hésitez pas à nous contacter, nous
vous répondrons dans les 24 heures.
Adresse E-mail: [email protected]
Site web officiel: www.dragontouch.com
Contactez nous
FR

V5.1
VISION 3
F O T O C A M E R A D ' A Z I O N E
MANUALE UTENTE

1
CONTENUTI
Contenuti-------------------------------------------------------------------------------------------------- 01
Cosa c'è nella scatola --------------------------------------------------------------------------------- 02
La tua Vision 3 ------------------------------------------------------------------------------------------- 03
Come iniziare -------------------------------------------------------------------------------------------- 05
Panoramica delle modalità ------------------------------------------------------------------------ 06
Personalizza la tua Vision 3 ------------------------------------------------------------------------ 09
Connessione all'app XDV ---------------------------------------------------------------------------- 14
Riproduzione dei tuoi contenuti ----------------------------------------------------------------- 15
Eliminazione dei contenuti sulla Vision 3 ----------------------------------------------------- 15
Trasferimento dei contenuti ---------------------------------------------------------------------- 15
Regolazione del livello di zoom ------------------------------------------------------------------- 18
Riformattare la scheda di memoria ------------------------------------------------------------- 18
Mantenimento della tua fotocamera ----------------------------------------------------------- 18
Massimizzazione della durata della batteria------------------------------------------------- 19
Conservazione e utilizzo della batteria--------------------------------------------------------- 19
Telecomando--------------------------------------------------------------------------------------------- 20
Montaggio della tua fotocamera ----------------------------------------------------------------- 22
Contattaci ------------------------------------------------------------------------------------------------- 24
IT

2
Custodia
Impermeabile x 1
Caricabatterie
x 1
Batterie
x 2
USB Cavo
x 1
Telecomando
x 1
Cinghia del
Telecomando x 1
Supporto C
x 1
Supporto a Sgancio
x 1
J-Gancio Supporto
x 1
Supporto E
x 1
Supporto D
x 1
Supporto Casco 2
x 1
Supporto A
x 1
Supporto H
x 1
Supporto Casco 1
x 1
Supporto F
x 1
Bende
x 4
Pastoie
x 5
Panno per Lenti
x 1
Nastro Adesivo
Biadesivo x 2
Guida Rapida
x 1
Clip 1
x 1
Backdoor
Protettivo x 1
Clip 2
x 1
Cosa c'è nella scatola
IT

3
Pulsante Otturatore / OK
Indicatore Wifi
Pulsante di Accensione / Modalità / Uscita
Porta USB / Porta Mic Esterno
Slot per Scheda di Memoria
Porta Micro HDMI
Lenti
1
2
3
4
5
7
6
4
7
5
6
1
3
2
La tua Vision 3
IT
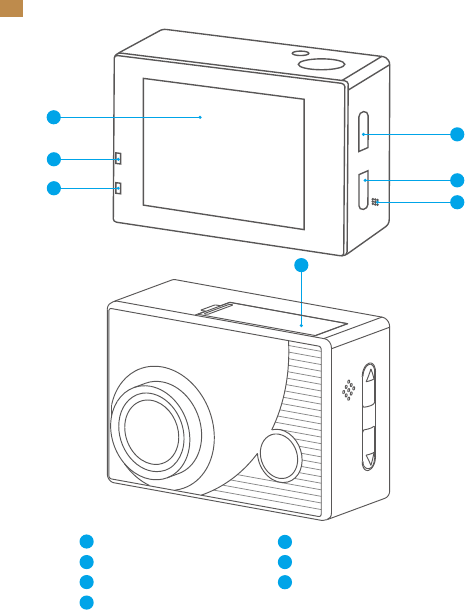
4
Nota: La camera non registrerà il suono quando si trova nella custodia
impermeabile.
14
8
11
12
13
9
10
Schermo Display
Indicatore di Carica
Indicatore di Funzionamento
Pulsante Su / Wifi
Pulsante Giù
Altoparlante
Coperchio Della Batteria
8
9
11
12
13
14
10
IT

5
Come iniziare
Benvenuti alla vostra nuova action camera Vision 3. Per catturare video e foto, avrete
bisogno di una scheda di memoria (venduta separatamente).
Utilizzo della Scheda di Memoria
Utilizzare schede di memoria di marca che soddisfino i seguenti requisiti:
• Classe 10 o classificazione UHS-I
• Capacità fino a 128GB (FAT32)
Nota:
1. Prima di utilizzare questa fotocamera, formattate la scheda di memoria per prima
cosa. Per mantenere la scheda di memoria in buone condizioni, riformattatela
regolarmente. La formattazione cancella tutti i dati, quindi assicuratevi di trasferire
prima le vostre foto e video.
2. La scheda di memoria formattata in formato FAT32 smetterà di registrare quando
lo spazio di archiviazione di ogni file supererà i 4GB e inizierà nuovamente a
registrare in un nuovo file.
3. L'utilizzo di una scheda di memoria con capacità superiore a quella richiesta può
causare complicazioni come il mancato riconoscimento della scheda. Inoltre,
potrebbe provocare malfunzionamenti della fotocamera, inclusa l'inesperienza o il
fallimento del firmware.
Accensione e Spegnimento
Per accendere:
Premere e tenere premuto il pulsante di accensione per 3 secondi. Sentirai un
segnale acustico e vedrai accendersi l'indicatore di funzionamento. Una volta che le
informazioni appaiono sullo schermo, saprai che la tua fotocamera è accesa.
Per spegnere:
Premere e tenere premuto il pulsante di accensione per 3 secondi. Sentirai un
segnale acustico e vedrai spegnersi l'indicatore di funzionamento. Una volta che lo
schermo si oscura, saprai che la tua fotocamera è spenta.
Accendere o Spegnere il Wifi
Per accendere: Sull'anteprima schermo, premi e tieni premuto il pulsante Wifi per
accendere il Wifi. In alternativa, entra nei settaggi di sistema della fotocamera per
abilitare il Wifi.
IT

6
Per spegnere: Sulla schermata Wifi, premi il pulsante Wifi.
Cambiare Modalità
Per cambiare: Sull'anteprima schermo, premi il pulsante Modalità per cambiare
modalità.
Per uscire: Premi nuovamente il pulsante Modalità per uscire dalla modalità
corrente.
Utilizzo del Pulsante di Scatto
In modalità Foto o Video, premi il pulsante di Scatto per catturare foto o avviare la
registrazione video. Per interrompere la registrazione in modalità Video, premi di
nuovo il pulsante di Scatto.
Caricare la Fotocamera
Trova il porto di alimentazione USB e collega la fotocamera a un adattatore USB o
computer utilizzando il cavo USB. Il LED di ricarica lampeggerà in rosso durante la
ricarica e si spegnerà quando sarà completamente carico. Una volta completamente
carico, scollega il cavo.
Suggerimento: La fotocamera può registrare fino a 70 minuti in 4K quando è
completamente carica.
Panoramica delle modalità
Ci sono 8 modalità di questa fotocamera: Video, Foto, Rallentatore, Riproduzione,
Impostazioni video, Impostazioni foto, Impostazioni generali e Impostazioni di sistema.
Quando sei sulla schermata di anteprima, premi il pulsante Modalità per passare alle
modalità.
4K30FPS
01/01/2024 10:09:23
TF
Modalità Video
La fotocamera è in modalità Video per
impostazione predefinita quando viene
accesa. In Modalità Video, premi il
pulsante di scatto per avviare la
registrazione. Per interrompere la
registrazione, basta premere nuovamente
il pulsante di scatto.
IT

7
Modalità Impostazioni video
Sulla schermata di anteprima, premi
ripetutamente il pulsante Modalità fino a
visualizzare un'icona dell'ingranaggio sullo
schermo, quindi premi il pulsante OK per
entrare nella Modalità Impostazioni Video.
In questa modalità, sei libero di
modificare le impostazioni video.
Risoluzione Video
Registrazione Suono
Timelapse Spento
Spento
720P 120FPS
Registrazione in loop
Rallentatore
4K 30FPS
Modalità Foto
Sulla schermata di anteprima, premi il
pulsante Modalità una volta per entrare
nella Modalità Foto. In questa modalità,
premi il pulsante di scatto per scattare
una foto.
Modalità Rallentatore
Sulla schermata di anteprima, premi il
pulsante Modalità due volte per entrare
nella Modalità Rallentatore. In questa
modalità, puoi premere il pulsante di
scatto per registrare un video rallentatore
alla risoluzione impostata.
Modalità Riproduzione
Sulla schermata di anteprima, premi il
pulsante Modalità 3 volte per entrare
nella Modalità Riproduzione. In questa
modalità, puoi premere i pulsanti Su/Giù
per selezionare un file video o foto da
riprodurre.
16M 4373
01/01/2024 10:09:23
TF
720P120FPS 14.4G
01/01/2024 10:09:23
TF
00001 /04372
01/10/2023 10:11:23
IT

8
Modalità Impostazioni di sistema
Dopo aver visualizzato lo schermo delle
impostazioni generali, premi il pulsante
Modalità per entrare nella Modalità
Impostazioni di Sistema. In questa
modalità, sei libero di modificare le
impostazioni di sistema.
Lingua
Data / Ora
Formato
Impostazioni predefinite
Versione firmware
Italiano
Modalità Impostazioni foto
Dopo aver visualizzato lo schermo del
video, premi il pulsante Modalità per
entrare nella Modalità Impostazioni Foto.
In questa modalità, sei libero di
modificare le impostazioni foto.
Modalità Impostazioni generali
Dopo aver visualizzato lo schermo delle
impostazioni foto, premi il pulsante
Modalità per entrare nella Modalità
Impostazioni Generali. In questa modalità,
sei libero di modificare le impostazioni
generali.
Risoluzione foto
Tempistica
Automatica Spento
Spento
Spento
Traccia in movimento
20M
Esposizione
Bilanciamento del ...
Modalità Wifi
Auto
Rotazione Immagine
Modalità guida
0
IT

9
Personalizza la tua Vision 3
Impostazioni video
Quando sei nella schermata delle impostazioni video, premi il pulsante Giù per
scegliere un'impostazione dalle opzioni disponibili, quindi premi il pulsante OK per
confermare la tua selezione e cambiare l'impostazione. Per tornare alla schermata
di anteprima, premi il pulsante Modalità più volte e quindi premi il pulsante OK.
1. Risoluzione Video
4K 30FPS/2.7K 30FPS/1080P 60FPS/1080P 30FPS/720P 120FPS/720P 60FPS/720P
30FPS (Impostazione predefinita: 4K 30FPS)
Questa fotocamera è in grado di registrare video fino a 4K30fps. Maggiore è la
risoluzione, maggiore sarà la chiarezza e il dettaglio, e di conseguenza maggiore
sarà la dimensione del file.
Nota: La cattura di video ad alta risoluzione o ad alta frequenza in temperature calde e
ambienti può causare un maggiore consumo di energia e un rapido surriscaldamento
della fotocamera.
2. Registrazione suono
Spento / Acceso (Impostazione predefinita: Acceso)
Attiva o disattiva la "Registrazione audio". Con questa impostazione disattivata, la
fotocamera registrerà video senza audio.
3. Time-lapse
Spento/0.5s/1s/2s/5s /10s/30s/60s (Impostazione predefinita: Spento)
Imposta l'intervallo con cui la fotocamera cattura i fotogrammi del video. Una volta
completata la configurazione, torna alla schermata di anteprima. La fotocamera
entrerà in modalità Time-lapse. In questa modalità, la fotocamera catturerà i
fotogrammi all'intervallo preimpostato e li compilerà senza soluzione di continuità in
un breve video.
Nota: I video time-lapse sono registrati senza audio.
IT

10
4. Registrazione in loop
Spento/1min /3 min /5 min (Impostazione predefinita: Spento)
Imposta la durata dei video catturati in modalità Registrazione in loop. Ad esempio,
se imposti "Registrazione in loop" su "1 min", la fotocamera registrerà e salverà
video ogni minuto. Quando la memoria è piena, la fotocamera cancellerà
automaticamente i video più vecchi per continuare la registrazione. Una volta
completata la configurazione, torna alla schermata di anteprima. La fotocamera
entrerà in modalità Registrazione in loop.
5. Rallentatore
720P 120FPS/1080P 60FPS (Impostazione predefinita: 720P 120FPS)
Imposta la risoluzione con cui la fotocamera registra video in modalità Slow Motion.
Le riprese video sembreranno rallentate durante la riproduzione.
Nota: I video rallentatore sono registrati senza audio.
6. Stabilizzazione immagine
La stabilizzazione dell'immagine può lisciare efficientemente le vibrazioni della lente,
risultando in video fluidi e cristallini. Questa funzione è ideale per catturare scene
che coinvolgono attività come la guida, lo skating e l'uso a mano libera.
7. Microfono esterno
Spento / Acceso (Impostazione predefinita: Acceso)
Attiva o disattiva la funzione del microfono esterno. Con questa funzione abilitata,
collega un microfono esterno compatibile alla porta USB della fotocamera per
ottenere una migliore qualità del suono.
Impostazioni foto
Quando sei sulla schermata delle impostazioni foto, premi il pulsante Giù per
scegliere una impostazione tra le opzioni disponibili, quindi premi il pulsante OK per
confermare la tua selezione e cambiare l'impostazione.
1. Risoluzione foto
20M /16M / 12M / 8M / 5M / 2M (Impostazione predefinita: 20M)
Questa fotocamera è in grado di catturare foto da 20MP. Maggiore è la risoluzione,
maggiore sarà la chiarezza e il dettaglio, e di conseguenza maggiore sarà la
dimensione del file.
IT

11
2. Fotografia temporizzata
Spento / 3s / 5s / 10s / 20s (Impostazione predefinita: Spento)
Imposta il tempo di conto alla rovescia per scattare una foto. La fotocamera avvierà
il conto alla rovescia preimpostato, quindi attiverà automaticamente l'otturatore per
scattare una foto. Dopo aver configurato, torna alla schermata di anteprima. La
fotocamera entrerà in modalità Autoscatto.
3. Autoscatto
Spento / 3s / 10s / 15s / 20s / 30s (Impostazione predefinita: Spento)
Specifica la frequenza con cui viene scattata la foto. Ad esempio, se selezioni
l'opzione "3s", verrà scattata automaticamente una foto ogni 3 secondi. Una volta
completata la configurazione, torna alla schermata di anteprima. La fotocamera
entrerà in modalità Autoscatto.
4. Raffica
Spento, 3P/s, 5P/s, 10P/s (Impostazione predefinita: Spento)
La modalità Raffica ti permette di specificare il numero di scatti consecutivi al
secondo, rendendola ideale per catturare attività veloci. Una volta completata la
configurazione, torna alla schermata di anteprima. La fotocamera entrerà in
modalità Raffica.
Impostazioni generali
Sulla schermata delle impostazioni generali, premi il pulsante Giù per scegliere
un'impostazione tra le opzioni disponibili, quindi premi il pulsante OK per
confermare la tua selezione e cambiare l'impostazione.
1. Esposizione
-3 / -2 / -1 / 0 / 1 / 2 / 3 (Impostazione predefinita: 0)
Regola la luminosità delle tue foto e video. Un valore di esposizione più alto crea
un'immagine più luminosa, mentre un valore più basso produce un'immagine più
scura.
2. Bilanciamento del bianco
Auto / Soleggiato / Nuvoloso / Incandescente / Fluorescente (Impostazione predefinita:
Auto)
Il bilanciamento del bianco regola la temperatura del colore dei tuoi video e delle tue
foto, garantendo una precisione cromatica ottimale sia in condizioni di illuminazione
calda che fredda.
IT

12
3. Wifi
Spento / Acceso (Impostazione predefinita: Spento)
Scegli di abilitare il Wifi in questa impostazione.
Nota: Puoi anche premere e tenere premuto il pulsante Wifi per attivare il Wifi in
Modalità Video o Foto. La fotocamera entrerà quindi in modalità Wifi e mostrerà le
informazioni sul Wifi.
4. Rotazione immagine
Spento / Acceso (Impostazione predefinita: Spento)
Questa impostazione determina l'orientamento dei tuoi video e delle tue foto,
aiutando a evitare riprese capovolte.
Nota: L'interfaccia utente sarà capovolta quando questa funzione è abilitata
5. Modalità guida
Spento / Acceso (Impostazione predefinita: Spento)
Con la Modalità guida abilitata, se colleghi la fotocamera all'accendisigari dell'auto e
avvii la tua auto, la fotocamera si accenderà automaticamente per iniziare la
registrazione video e salvare il file video all'intervallo impostato. Salverà il file e si
spegnerà automaticamente quando fermerai la tua auto. Quando la scheda SD è
piena, la fotocamera cancellerà automaticamente i video più vecchi per garantire
una registrazione continua.
6. Frequenza della sorgente luminosa
Auto / 50Hz / 60Hz (Impostazione predefinita: Auto)
Puoi impostare la frequenza della sorgente luminosa per evitare il fenomeno delle
"onde d'acqua" (onde luminose) durante le riprese in interni.
7. Indicatore luminoso LED
Spento / Acceso (Impostazione predefinita: Spento)
Attiva o disattiva questa impostazione. Con questa impostazione abilitata, i LED
indicatori della fotocamera si illumineranno o lampeggeranno in base alle tue
operazioni, e viceversa.
8. Salvaschermo auto
Spento/ 10s / 20s / 30s (Impostazione predefinita: 30s)
Lo Screensaver Automatico spegne il display LCD dopo un periodo di inattività per
risparmiare la batteria. Per riaccendere il display, basta premere un qualsiasi
pulsante della fotocamera.
IT

13
9. Auto spegnimento
Spento/1 min/3 min/ 5 min (Impostazione predefinita: 3 min)
Lo Spegnimento Automatico spegnerà la tua Vision 3 dopo un periodo di inattività
per risparmiare la batteria.
10. Filigrana della data
Spento / Acceso (Impostazione predefinita: Acceso)
Con questa impostazione abilitata, verrà aggiunto un timbro temporale al video o
alla foto.
Impostazioni di sistema
Sulla schermata delle impostazioni di sistema, premi il pulsante Giù per scegliere
un'impostazione tra le opzioni disponibili, quindi premi il pulsante OK per
confermare la tua selezione e cambiare l'impostazione.
1. Lingua
简体中文, 繁體中文, English, 日本語, Deutsch, Français, Italiano, Español, Português,
Русский, 한국어 (Impostazione predefinita: English)
Puoi scegliere la lingua di sistema per la tua action camera Vision 3.
2. Data / Ora
YY-MM-DD, HH-MM-SS
Imposta manualmente la data e l'ora della fotocamera secondo il tuo fuso orario locale.
La data e l'ora verranno anche aggiornate automaticamente quando connetti la
fotocamera all'app XDV.
3. Formato
Conferma / Annulla (Impostazione predefinita: Annulla)
Per mantenere la tua scheda di memoria in buone condizioni, riformattala
regolarmente. La formattazione cancella tutto il contenuto, quindi assicurati di
spostare prima le tue foto e i tuoi video.
4. Reset di fabbrica
Conferma / Annulla (Impostazione predefinita: Annulla)
Questa opzione ripristina tutte le impostazioni ai valori predefiniti.
5. Versione Firmware
Questa opzione ti permette di verificare il marchio, il modello e la versione del
firmware della tua fotocamera.
IT

Connessione all'app XDV
Puoi controllare la tua fotocamera per scattare foto e video utilizzando
l'applicazione sul telefono. Per farlo, scarica e installa l'app XDV prima dallo store
di App o Google Play. Quando la tua fotocamera è collegata all'app, puoi controllarla
per scattare foto, cambiare le impostazioni della fotocamera, visualizzare in
anteprima in tempo reale, riprodurre, scaricare ed elaborare i video tramite questa
app. Segui le istruzioni seguenti per connettere la tua fotocamera all'app:
1. Accendi la fotocamera, quindi premi e tieni premuto il pulsante Wifi per attivare
il Wifi. La fotocamera entrerà in modalità Wi-Fi e visualizzerà le informazioni sulla
rete Wifi.
2. Attiva il Wifi del tuo telefono per accedere alla pagina delle impostazioni Wifi,
individua l'SSID Wifi denominato "Vision3_0e10" nell'elenco e toccalo, quindi
inserisci la password 1234567890 per la connessione.
Suggerimento: Una volta collegato il Wifi della fotocamera, potresti ricevere un
avviso di "Nessuna connessione Internet" o "Sicurezza debole" poiché il segnale
4G del tuo telefono è bloccato. Puoi ignorarlo e continuare la connessione all'app.
3. Apri l'app XDV sul tuo telefono o tablet e tocca nuovamente l'SSID Wifi.
4. La tua fotocamera sarà collegata all'app in pochi secondi.
Nota: Questa fotocamera non supporta MacBook o iPad.
IT
14
IT

15
Riproduzione dei tuoi contenuti
Eliminazione dei contenuti sulla Vision 3
1.Entra in modalità Riproduzione.
2. Premi il pulsante Su o Giù per scorrere i file video o foto.
3. Tieni premuto il pulsante OK per 3 secondi. Lo schermo mostrerà "Elimina questo
file / Conferma / Annulla".
4. Premi il pulsante Su seguito dal pulsante OK e il file selezionato verrà eliminato.
5. Per uscire dalla modalità Riproduzione, premi il pulsante di modalità.
Trasferimento dei contenuti
Trasferimento dei contenuti su un computer
Per riprodurre video e foto su un computer, devi prima trasferire questi file sul
computer. Il trasferimento libera anche spazio sulla scheda di memoria per nuovi
contenuti. Per scaricare i file su un computer utilizzando un lettore di schede
(venduto separatamente), inserisci una scheda di memoria nel tuo lettore di
schede, quindi collega il lettore di schede al computer tramite una porta USB. Puoi
quindi trasferire i file sul tuo computer o eliminare file selezionati utilizzando
l'esplora file.
Puoi riprodurre i tuoi contenuti sulla fotocamera, sul computer, sulla TV, sullo
smartphone o sul tablet. Puoi anche riprodurre i contenuti inserendo direttamente
la scheda di memoria in un dispositivo come un computer o una TV compatibile.
Con questo metodo, la risoluzione della riproduzione dipende dalla risoluzione del
dispositivo e dalla sua capacità di riprodurre quella risoluzione.
Visualizzazione di video e foto sulla Vision 3
1. Accendi la fotocamera, quindi premi il pulsante di modalità 3 volte per entrare in
modalità Riproduzione.
2. Premi il pulsante Su o Giù per scorrere i file video o foto.
3. Dopo aver selezionato il file che desideri visualizzare, premi il pulsante OK. Il file
verrà riprodotto.
IT

15
Disponibile:29.67G Totale:28.74G
telefono dispositivo
Download dei tuoi contenuti su uno smartphone o tablet
1. Apri l'app XDV e collegala alla tua fotocamera.
2. Tocca l'icona Album nella parte inferiore dello schermo.
3. Tocca "Dispositivo" in alto dello schermo per visualizzare tutti i file video e foto.
16
IT

17
Available:29.67G Total:28.74G
telefono
dispositivo
Disponibile:29.67G Totale:28.74G
Scarica
Annullare
Nota:
1. Si prega di non modificare le impostazioni Wifi o disconnettersi dall'app durante il
progresso del download.
2. Se non riesci a scaricare video o foto sul tuo iPhone tramite l'app, per favore vai
nella pagina Impostazioni del tuo telefono Privacy Foto, cerca "XDV" e
seleziona "Tutte le foto".
3. Non puoi scaricare video in 4K o 2.7K su un iPhone o iPad tramite l'app XDV. Per
favore trasferisci questi video tramite un lettore di schede.
4. Tocca l'icona Seleziona seguita dall'icona Scarica per selezionare il file che
desideri scaricare.
5. Tocca "Conferma" nell'angolo in basso a sinistra e attendi il completamento del
processo di download. Il file verrà salvato nell'album del tuo telefono o tablet.
IT

18
Mantenimento della tua fotocamera
Segui queste linee guida per ottenere le migliori prestazioni dalla tua fotocamera:
1.Per una migliore qualità audio, scuoti la fotocamera o soffia sul microfono per
rimuovere polvere o cenere prima dell'uso.
2. Per pulire l'obiettivo, strofinalo con un panno morbido privo di pelucchi. Non
pulire l'obiettivo con altro materiale.
3. Non toccare direttamente l'obiettivo frontale con le dita.
4. Mantieni la fotocamera al riparo da cadute e urti che potrebbero danneggiare le
parti interne.
5. Tieni la fotocamera lontana da alte temperature e forte luce solare per evitare
danni.
Regolazione del livello di zoom
La funzione di Zoom ti consente di regolare la prossimità del soggetto nel tuo
filmato. La action camera Vision 3 supporta fino a 4X di zoom. La funzione di zoom è
disponibile solo in Modalità Video e Foto. Segui i passaggi seguenti per ingrandire o
ridurre.
1. Accendi la fotocamera d'azione Vision 3.
2. Entra in modalità Video o Foto.
3. Premi il pulsante Su o Giù per regolare il livello di zoom.
Riformattare la scheda di memoria
Per mantenere la tua scheda di memoria in buone condizioni, ti preghiamo di
riformattarla regolarmente. La riformattazione cancella tutti i tuoi contenuti, quindi
assicurati di trasferire prima le tue foto e video. Segui i passaggi seguenti per
formattare la scheda.
1.Accendi la fotocamera d'azione Vision 3.
2. Entra nella schermata delle impostazioni di sistema.
3. Premi il pulsante Giù per trovare l'opzione "Formatta".
4. Premi il pulsante OK. Lo schermo mostrerà "Formattare la scheda di memoria?
Conferma/Annulla".
5. Premi il pulsante Su seguito dal pulsante OK. La tua scheda di memoria verrà
formattata con successo.
IT

19
Massimizzazione della durata della batteria
Se la carica della batteria raggiunge lo 0% durante la registrazione, la fotocamera
salverà il file e si spegnerà automaticamente. Per massimizzare la durata della
batteria, segui queste linee guida quando possibile:
• Spegni la connessione wireless.
• Registra video a frequenze di fotogrammi e risoluzioni inferiori.
• Utilizza l'impostazione del salvabildi automatico.
Conservazione e utilizzo della batteria
• Se la conservi per periodi prolungati, mantieni una carica della batteria del 50-60%.
Ricaricala ogni 3 mesi e scarica completamente la batteria ogni 6 mesi.
• Non conservare la batteria con oggetti metallici come monete, chiavi o collane. Se i
terminali della batteria entrano in contatto con oggetti metallici, potrebbe
verificarsi un cortocircuito che potrebbe causare incendi.
• Conserva la batteria in zone asciutte, al sicuro da eventuali danni fisici causati dalla
compressione o collisione.
• Evita di utilizzare o conservare la batteria a temperature elevate, come alla luce
diretta del sole o in vani caldi. In queste condizioni, la batteria si surriscalderà,
funzionerà male o avrà una durata ridotta.
• Evita di utilizzare o conservare la batteria in ambienti a basse temperature, poiché
ciò ridurrà la durata della batteria o potrebbe causarne il malfunzionamento.
• Evita ambienti con campi statici o magnetici intensi; questi possono compromet-
tere l'unità di protezione della batteria, creando rischi per la sicurezza.
• Se la batteria emette odori, si surriscalda, cambia colore, si deforma o mostra
anomalie, smetti di usarla e rimuovila immediatamente dalla fotocamera o dal
caricabatterie, che sia in uso, in carica o conservata.
• Isola in modo sicuro gli elettrodi usati per prevenire potenziali pericoli.
IT

20
Telecomando
Pulsante foto
Pulsante video
Nota: Il telecomando è resistente agli spruzzi.
Quando la fotocamera è accesa, verrà automaticamente collegata al telecomando
entro 10 metri di distanza. Puoi controllare la fotocamera per scattare foto o
registrare video utilizzando il telecomando.
Video
Per registrare un video, assicurati prima che la fotocamera sia in modalità Video,
quindi premi il pulsante Video. L'indicatore di funzionamento della fotocamera
lampeggerà durante la registrazione video. Per interrompere la registrazione, premi
nuovamente il pulsante Video.
Photo
Per catturare una foto, assicurati prima che la fotocamera sia in modalità Foto,
quindi premi il pulsante Foto. La fotocamera emetterà un suono dell'otturatore che
indica il completamento dello scatto.
IT

21
Sostituzione della batteria CR2032 del telecomando
1. Usa un cacciavite per rimuovere le 4 viti dal coperchio posteriore del telecomando,
consentendoti di aprirlo.
2. Rimuovi altre 4 viti dalla scheda del circuito del telecomando.
3. Solleva la scheda del circuito e fai scorrere via la batteria, come mostrato di seguito.
Nota: Evita di ruotare la scheda del circuito per evitare di invertire i pulsanti del
telecomando.
IT

22
6. Reinstalla tutte e 4 le viti nel coperchio.
4. Installa la nuova batteria, mantenendo il polo "+" rivolto verso l'alto.
5. Reinstalla tutte e 4 le viti sulla scheda del circuito.
Puoi fissare la tua fotocamera su caschi, manubri e altro ancora per sbloccare più
divertimento.
Nota: Prima di immergerti, assicurati che il coperchio USB sia chiuso saldamente per
evitare che si bagni.
Montaggio della tua fotocamera
IT

23
IT

24
Per qualsiasi problema con i prodotti di DragonTouch, non esitate a contattarci,
risponderemo entro 24 ore.
Indirizzo email: [email protected]
Sito ufficiale: www.dragontouch.com
Contattaci
IT

V5.1
VISION 3
01 02 03 04
05 06 07 08 09 10
11 12 13 14 15 16
17 18 19 20 21 22
23 24 25

目次
01 02 03 04
05 06 07 08 09 10
11 12 13 14 15 16
17 18 19 20 21 22
23 24 25

パッケージの内容
01 02 03 04
05 06 07 08 09 10
11 12 13 14 15 16
17 18 19 20 21 22
23 24 25

あなたの Vision �
1
3
4
5
6
7
2
4
7
5
6
1
3
2
01 02 03 04
05 06 07 08 09 10
11 12 13 14 15 16
17 18 19 20 21 22
23 24 25

8
10
11
9
12
14
13
14
8
11
12
13
9
10
01 02 03 04
05 06 07 08 09 10
11 12 13 14 15 16
17 18 19 20 21 22
23 24 25

はじめに
01 02 03 04
05 06 07 08 09 10
11 12 13 14 15 16
17 18 19 20 21 22
23 24 25

01 02 03 04
05 06 07 08 09 10
11 12 13 14 15 16
17 18 19 20 21 22
23 24 25

モードの概要
4K30FPS 119.1G
01/01/2024 10:09:23
TF
20M
119.1G
01/01/2024 10:09:23
TF
720P120FPS
119.1G
01/01/2024 10:09:23
TF
01 02 03 04
05
06 07 08 09 10
11 12 13 14 15 16
17 18 19 20 21 22
23 24 25

00001 /04372
01/10/2023 10:11:23
0
01 02 03 04
05 06
07 08 09 10
11 12 13 14 15 16
17 18 19 20 21 22
23 24 25

0
01 02 03 04
05 06 07
08 09 10
11 12 13 14 15 16
17 18 19 20 21 22
23 24 25

Vision �をカスタマイズする
ビデオ設定
01 02 03 04
05 06 07 08
09 10
11 12 13 14 15 16
17 18 19 20 21 22
23 24 25

01 02 03 04
05 06 07 08 09
10
11 12 13 14 15 16
17 18 19 20 21 22
23 24 25

写真設定
01 02 03 04
05 06 07 08 09 10
11 12 13 14 15 16
17 18 19 20 21 22
23 24 25

一般設定
01 02 03 04
05 06 07 08 09 10
11
12 13 14 15 16
17 18 19 20 21 22
23 24 25

01 02 03 04
05 06 07 08 09 10
11 12
13 14 15 16
17 18 19 20 21 22
23 24 25

システム設 定
简体中文/繁體中文/English//Deutsch/Français/Italiano/Español/Português
/Русский/한국어 ( English)
01 02 03 04
05 06 07 08 09 10
11 12 13
14 15 16
17 18 19 20 21 22
23 24 25

XDVアプリへの接続
01 02 03 04
05 06 07 08 09 10
11 12 13 14
15 16
17 18 19 20 21 22
23 24 25

コンテンツの再生
01 02 03 04
05 06 07 08 09 10
11 12 13 14 15
16
17 18 19 20 21 22
23 24 25

データの転送
01 02 03 04
05 06 07 08 09 10
11 12 13 14 15 16
17 18 19 20 21 22
23 24 25

ズームレベルの調整
01 02 03 04
05 06 07 08 09 10
11 12 13 14 15 16
17
18 19 20 21 22
23 24 25

カメラのメンテナンス
01 02 03 04
05 06 07 08 09 10
11 12 13 14 15 16
17 18
19 20 21 22
23 24 25

バッテリー寿命の最大化
01 02 03 04
05 06 07 08 09 10
11 12 13 14 15 16
17 18 19
20 21 22
23 24 25

バッテリーの取り扱いと保存
01 02 03 04
05 06 07 08 09 10
11 12 13 14 15 16
17 18 19 20
21 22
23 24 25

リモート
01 02 03 04
05 06 07 08 09 10
11 12 13 14 15 16
17 18 19 20 21
22
23 24 25

01 02 03 04
05 06 07 08 09 10
11 12 13 14 15 16
17 18 19 20 21 22
23 24 25

01 02 03 04
05 06 07 08 09 10
11 12 13 14 15 16
17 18 19 20 21 22
23
24 25

カメラの取り付け方法
01 02 03 04
05 06 07 08 09 10
11 12 13 14 15 16
17 18 19 20 21 22
23 24
25

01 02 03 04
05 06 07 08 09 10
11 12 13 14 15 16
17 18 19 20 21 22
23 24 25
26

お問い合わせ
[email protected] www.dragontouch.com
01 02 03 04
05 06 07 08 09 10
11 12 13 14 15 16
17 18 19 20 21 22
23 24 25
27
