
IP Address and Pre-configuration Information
Ethernet Connectivity: Connect your workstation or device to the Digi Connect
WAN via one of these methods:
• Direct from workstation to Digi Connect WAN via an Ethernet crossover
cable.
• Via network hub or switch using a straight-thru Ethernet cable.
Ethernet Port IP Addressing: Follow the Quick Start Guide and assign the Digi
Connect WAN an IP Address. In most cases a static IP address is desired.
DHCP Sever: The Digi Connect WAN/VPN includes a DHCP server and can
provide IP address configuration to remote devices and/or workstations. DHCP
server is on by default and is configured to provide workstation IP addresses starting
at 192.168.1.100.
Static IP Addresses: If static IP addresses are used, disable the Digi Connect
WAN DHCP server via Configure>Network>DHCP Server Settings and follow
these directions:
1. In order to properly communicate via the Digi Connect WAN, your
workstation should be in the same subnet as the Digi Connect WAN. The
simplest way to accomplish this is to use the Digi Connect WAN’s DHCP
server. If you are using the DHCP server, and the Digi device is at IP address
192.168.1.1, you should configure your workstation to be something like:
• IP address: 192.168.1.2
• Subnet mask: 255.255.255.0
• Default gateway: 192.168.1.1 (i.e. the IP address of Digi Connect
WAN)
2. As shown above, any device using the Digi Connect WAN as a gateway
via the cellular wireless network must have its default gateway configured to
the Digi Connect WAN’s Ethernet port IP address.
3. DNS Server IP addresses: If you plan to “browse” the Internet or make
other outbound connections that utilize DNS names (e.g., www.digi.com ),
the carrier’s DNS server IP addresses should be entered into the
workstation’s IP configuration. DNS info can be confirmed once the Digi
Connect WAN has connected to the cellular network using the Digi Connect
WAN Web UI via Administration>System Info>Mobile.

Changing the Digi Connect IP Address: The Digi Connect WAN IP address
settings can be changed using the built-in Web UI or via command line.
• Via Command Line: Use either the console port and a terminal emulation
program or telnet to the Digi Connect WAN’s IP address. Use the “set net”
command similar to:
set net ip=172.16.5.88 mask=255.255.0.0 gateway=172.16.5.88
Type set net with no parameters to verify the settings. Reboot the Digi
Connect WAN by either re-powering or via the boot action=reset
command.
• Via Web UI: Point your browser to the Digi Connect WAN’s Ethernet port IP
address, select Configuration>Network and enter the desired settings, as shown
below.
Press Apply, and then reboot the Digi Connect WAN for changes to take
effect. You will lose connectivity to the unit until you reconfigure your
workstation to be in the same subnet as the Digi Connect WAN; or use
DHCP.
Modem Provisioning
In order to communicate on a CDMA wireless network, the Digi Connect WAN
must be provisioned for use on the wireless network. Follow the steps below to
configure the Digi Connect WAN for the Sprint network. These instructions assume
that the modem’s ESN has already been given to your wireless data plan provider for
registration, and that you have received a Device Activation information sheet.
Connecting the Digi Connect WAN
1. Attach the antenna to the Digi Connect WAN. Place the Digi Connect
WAN and/or antenna in a location that will ensure the best signal.
Page 2 of 8 Digi Connect WAN for iMotient/Sprint

2. Connect the Digi Connect WAN Ethernet port to your workstation or
device in the method mentioned above.
3. Apply power to the Digi Connect WAN. After a few minutes observe the
following:
a. The green Ethernet link LED located on the Ethernet port should be
on. If not, make sure you are using the proper cable.
b. Signal Strength LEDs on top of unit should show 2-4 LEDs. If not,
try repositioning the antenna and unit if necessary. Do not extend the
antenna cable. Instead, reposition the Digi Connect WAN unit itself
via longer Ethernet cable connection.
c. Activity LED will be on solid for a few moments then go off.
d. The Wireless Link LED on top of unit should go on solid once the
APN type is properly configured. If not, verify the provisioning
information via Configuration > Mobile.
e. Make sure it is set for the correct Service Provider. The proper
selection in the Service Provider box is “Sprint PCS.” Then, you must
click the link to proceed to the next set of provisioning screens.
4. When you proceed, a configuration window will pop up. This is where you
Page 3 of 8 Digi Connect WAN for iMotient/Sprint

will enter the rest of the provisioning information. On the first screen, select
“Automatically provision the mobile device using a network-initiated
session.” Then, select Next.
5. On the next screen, enter the following information. You will need to refer
to the registration and provisioning information supplied by wireless data
plan provider.
o Service Programming Code (MSL): Supplied by wireless data plan
provider
Note: In the case of the Digi Connect WAN, this number will always be
“000000.”)
o Mobile Directory Number: Supplied by wireless data plan provider.
o MSID (IMSI_MS): Supplied by wireless data plan provider.
o Select Next.
Page 4 of 8 Digi Connect WAN for iMotient/Sprint
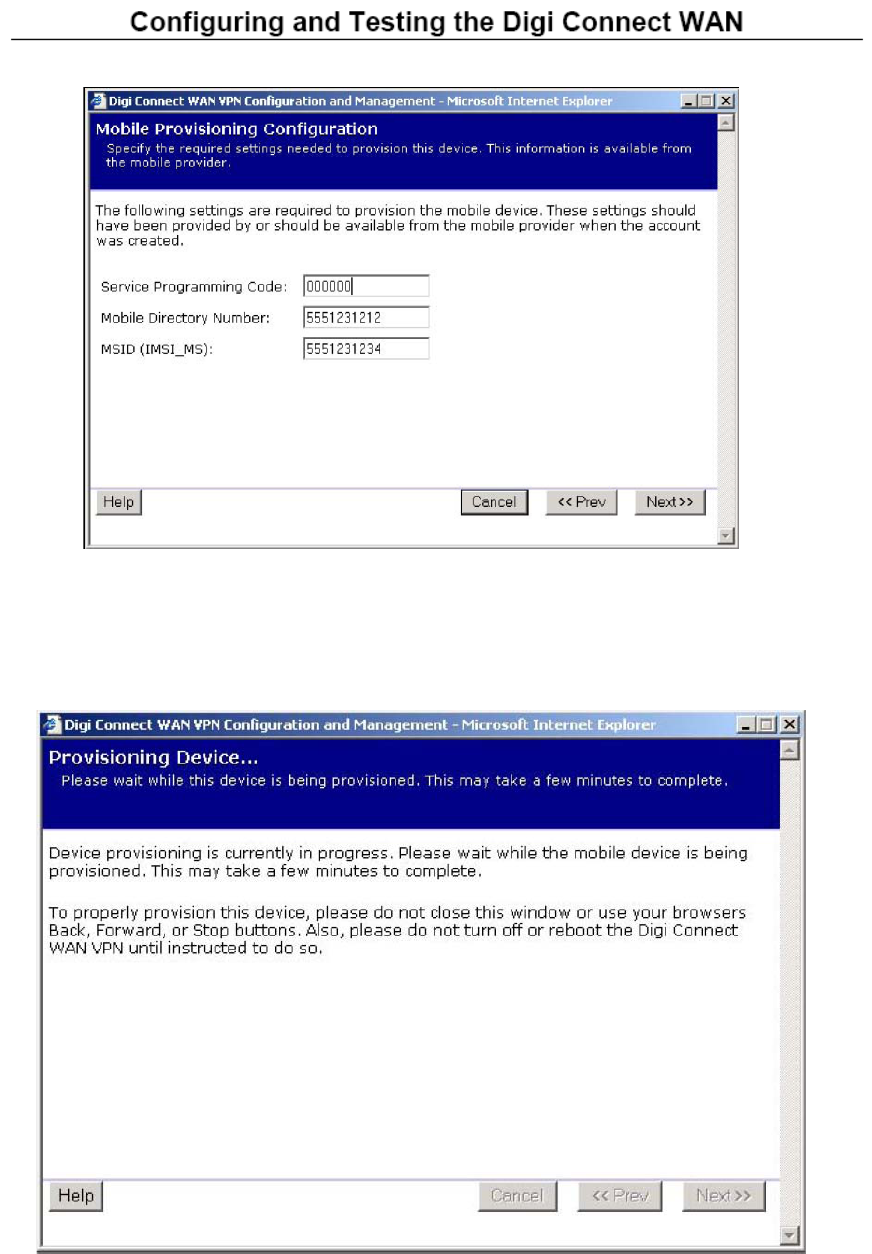
7. The device will now have its provisioning information written to its
memory. Do not close this next window, or turn off the Digi Connect WAN
while this is occurring. The dialog box will indicate when the process is
finished.
8. Once the device has indicated that provisioning is finished, click the Finish
button, and then Reboot the device.
Page 5 of 8 Digi Connect WAN for iMotient/Sprint

9. After the device restarts, and once the mobile link LED is on solid (which
may take a few minutes), verify the mobile IP address from the Digi Connect
WAN home page, via Management>Connections, or via
Administration>System Information>Mobile, as shown below.
The Digi Connect WAN should now be ready to use.
Page 6 of 8 Digi Connect WAN for iMotient/Sprint

Testing the Digi Connect from a Workstation
Once the Digi Connect WAN is connected to the cellular network and is accessible
from network devices connected to its Ethernet port, you can do some simple tests to
verify communications through the device.
A simple test is to connect out through the Digi Connect WAN to an Internet website
like www.digi.com . Make sure your workstation’s IP config is to use the Digi
Connect WAN’s Ethernet port IP as the default gateway and use the wireless
provider’s DNS server IP addresses (found via Administration > System Info >
Mobile).
Inbound connections require additional configuration to test. First, not all APN types
allow incoming connections. Second, the Digi Connect WAN uses NAT (Network
Address Translation)* to route traffic from the Public IP address on the cellular
interface to the Ethernet port’s private IP network. NAT provides two main benefits:
Security: NAT hides the private IP addresses of the devices on the Digi
Connect WAN’s Ethernet network.
IP Address Availability: IP addresses are in short supply and cost money.
The Digi Connect WAN need be provided only one IP address from the
wireless carrier.
Port forwarding* entries are required to pass incoming traffic through the Digi
Connect WAN to a device or workstation connected to the Digi Connect WAN’s
Ethernet port.
* Note that the Digi Connect Remote Gateway (RG) does not support NAT or port forwarding.
Refer to the Digi Connect WAN application guide on mobile terminated connections
for details on setting up in-bound connections.
A simple test to verify the Digi Connect WAN is on the wireless network and is
Page 7 of 8 Digi Connect WAN for iMotient/Sprint

accessible is to ping the mobile IP address from an Internet connected workstation.
From the example above where the mobile IP address is 166.213.229.218: ping
166.213.229.218
If the request times out, try adding a “-w 5000” or “-w 10000” to the ping command:
ping -w 5000 166.213.229.218
Other application scenario examples, such as using the Digi Connect WAN for a
backup wireless WAN connection, are available from Digi International.
Finishing Up and Getting Assistance
Please register your Digi Connect WAN at
http://www.digi.com/support/customer%20services/warranty.jsp .
If you have any questions or need assistance, please contact your Digi Connect
WAN vendor or Digi International at 952-912-3444, or Digi technical support at
http://www.digi.com/support/eservice/eservicelogin.jsp .
Page 8 of 8 Digi Connect WAN for iMotient/Sprint
