
OPTO 22 • 800-321-6786 • 1-951-695-3000 • www.opto22.com • sales@opto22.com
© 2012–2017 Opto 22. All rights reserved. Dimensions and specifications are subject to change. Brand or product names used herein are trademarks or registered trademarks of their respective companies or organizations.
PAGE 1
OPTOTUTORIAL
Form 2229-170824
USING THE SNAP PAC REST API WITH EXCEL
A great advantage to getting data from a PAC controller into a Microsoft® Excel® worksheet is that you can use
Excel’s features to analyze the data.
This tutorial walks you from the beginning—setting up the Web server in a SNAP PAC controller—all the way
through creating an Excel worksheet with Visual Basic® for Applications (VBA) macros that:
• Read and write to input and output points
• Parse JSON text strings
• Check for input and return errors
• Collect data on an automated interval and display it in an Excel chart
What you need
This tutorial is based on the hardware and software that comes with a SNAP PAC Learning Center (part
number SNAP-PACLC).
If you don’t have a Learning Center but you’re comfortable using PAC Manager™ and PAC Control™, you can
modify the instructions to work with your own Opto 22 devices.

PAGE 2
OPTO 22 • 800-321-6786 • 1-951-695-3000 • www.opto22.com • [email protected]
© 2012–2017 Opto 22. All rights reserved. Dimensions and specifications are subject to change. Brand or product names used herein are trademarks or registered trademarks of their respective companies or organizations.
Form 2229-170824
Using the SNAP PAC REST API with Excel
You’ll need:
• Microsoft Excel 2007 (or higher) and a basic understanding of how to create, open, and close
worksheets, select cells, and resize columns
• A SNAP PAC Learning Center (or your own SNAP PAC R- or S-series controller and I/O modules)
• PAC Project™ Basic (included with the Learning Center and also available to download for free from the
Opto 22 website) and a good understanding of PAC Manager and PAC Control
• The files in this tutorial’s download file (also available for download from the Opto 22 website)
Summary of topics
To set up the SNAP PAC REST API in your PAC controller, start here:
• Enable Web server feature in a PAC . . . . . . . . . . . . . . . . . . . . . . . . . . . . . . . . . . . . . . . . . . . . . . . . . . . . . . . page 2
• Create API admin user and authentication keys . . . . . . . . . . . . . . . . . . . . . . . . . . . . . . . . . . . . . . . . . . . page 4
If you just want to learn how to get and use I/O data in Excel, start here:
• Test the REST API . . . . . . . . . . . . . . . . . . . . . . . . . . . . . . . . . . . . . . . . . . . . . . . . . . . . . . . . . . . . . . . . . . . . . . . . page 5
• Read PAC data from a sample Excel worksheet using the tutorial’s sample strategy
(Convenience Store.idb) . . . . . . . . . . . . . . . . . . . . . . . . . . . . . . . . . . . . . . . . . . . . . . . . . . . . . . . . . . . . . . . . . page 8
• Activity: Build a macro-enabled worksheet . . . . . . . . . . . . . . . . . . . . . . . . . . . . . . . . . . . . . . . . . . . . . . . page 9
ENABLE WEB SERVER FEATURE
If you’ve already enabled the Web Server feature in your SNAP PAC controller and created API administrator
credentials and authentication keys, skip to “Test the REST API” on page 5.
Otherwise, follow these steps:
1. Open PAC Manager, and then click Tools > Inspect.
2. In the Inspect Opto 22 Device window, enter the controller’s name or IP address, and then click
Communications > Network Security.
3. In the Value column under WEB SERVER:
a. For TCP Listen Port, type: 80
b. For HTTPS, select: Disabled
Note: Since HTTP is easier to set up, this tutorial will use HTTP.
In production environments, we strongly recommend HTTPS for secure, encrypted access to
your controller.
Files included in the Tutorial Zip Description
Convenience Store Strategy.zip
Strategy used in the tutorial exercises.
Not needed if you plan to modify the tutorial activity to work
with your own strategy and I/O modules.
Convenience_Store_Solution.xlsm Solution code for the tutorial activity.
JsonConverter.bas An open-source third-party tool that parses JSON strings.
Opto22_ReadingWritingSamples.xlsm
A workbook containing sample worksheets that use the
SNAP PAC REST API and the groov API to read and write
data in a SNAP PAC R-series or S-series controller.

PAGE 3
OPTO 22 • www.opto22.com SALES • [email protected] SUPPORT • [email protected]
43044 Business Park Dr. Temecula, CA 92590-3614 800-321-6786 • 1-951-695-3000 800-835-6786 • 1-951-695-3080
© 2010–2017 Opto 22. All rights reserved. Dimensions and specifications are subject to change. Brand or product names used herein are trademarks or registered trademarks of their respective companies or organizations.
Form 2229-170824
Using the SNAP PAC REST API with Excel
4. Click Apply to save the changes to volatile memory.
5. To ensure the changes remain after cycling power, write the settings to Flash memory:
a. Click Status Write, and select Store configuration to flash.
b. Then, click Send Command.
6. Then, select Restart Device from powerup, and click Send Command.

PAGE 4
OPTO 22 • 800-321-6786 • 1-951-695-3000 • www.opto22.com • [email protected]
© 2012–2017 Opto 22. All rights reserved. Dimensions and specifications are subject to change. Brand or product names used herein are trademarks or registered trademarks of their respective companies or organizations.
Form 2229-170824
Using the SNAP PAC REST API with Excel
CREATE API ADMIN USER AND AUTHENTICATION KEYS
The SNAP PAC REST API has a default admin account which must be changed before deploying your PAC as a
Web server. Remember your admin user name and password, because there’s no password recovery
other than to reinstall your PAC’s firmware.
IMPORTANT: In all command examples, replace 10.20.30.40 with your PAC’s IP address. Also, replace http with
https if your PAC is configured for HTTP over SSL. For the entire list of SNAP PAC REST API commands, see
http://developer.opto22.com/static/generated/pac-rest-api/swagger-ui/index.html.
1. Create admin user
To set up the API admin in your PAC:
1. Open a browser (such as Chrome, Firefox, Internet Explorer, or Edge), and in the address field, enter the
following SNAP PAC API command:
http://10.20.30.40/admin/creds
NOTE: If your browser displays a security certificate warning (such as “Invalid Certificate”), ignore the warning
and continue to the website. You may need to change your browser’s security options to add your PAC to the list
of trusted websites.
2. When prompted for a user name and password, provide the default credentials:
User Name: admin
Password: password
3. On the Administrative Credentials webpage, type a new user name and password, and then click
Submit.
– User names and passwords are case-sensitive.
– User name maximum length is 128 characters.
– Password maximum length is 128 characters.
– User name cannot be “admin”; password cannot be “password”.
2. Create authentication keys
To authenticate login requests, the SNAP PAC REST API uses an authentication key and value in HTTP
Authorization request header.
When logging into the REST API, you enter a key for the user name and a value for the password.

OPTO 22 • 800-321-6786 • 1-951-695-3000 • www.opto22.com • sales@opto22.com
© 2017 Opto 22. All rights reserved. Dimensions and specifications are subject to change. Brand or product names used herein are trademarks or registered trademarks of their respective companies or organizations.
PAGE 5
Form 2229-170824
Using the SNAP PAC REST API with Excel
To configure authentication keys:
1. In a browser’s address field, enter the following command:
http://10.20.30.40/admin/keys
2. When prompted for a user name and password, enter the API admin credentials you just created.
3. On the Authentication Key Management webpage:
a. Type a key in the ID field and a value in the Value field.
When logging in to the API, you enter:
–The key for the user name
–The value for the password
To keep the data in your controller secure, you should create keys and values that are hard to guess.
But for this tutorial, you can enter something simple (like
rw ) for both the key and the value.
b. Make sure Read-Write is selected and Enabled is checked, and then click Submit.
TEST THE REST API
IMPORTANT: In all command examples, replace 10.20.30.40 with your PAC’s IP address. Also, replace http with https
if your PAC is configured for HTTP over SSL. For the entire list of SNAP PAC REST API commands, see
http://developer.opto22.com/static/generated/pac-rest-api/swagger-ui/index.html.
1. Access the PAC Web Server
The simplest way to connect to a PAC through the SNAP PAC REST API is to use a browser. If the browser
connection works, then you also should be able to connect using Excel.
1. In a browser’s address field, enter the following command:
http://10.20.30.40/api/v1/device
2. When prompted, enter the authentication key and value you just configured.

PAGE 6
OPTO 22 • 800-321-6786 • 1-951-695-3000 • www.opto22.com • [email protected]
© 2012–2017 Opto 22. All rights reserved. Dimensions and specifications are subject to change. Brand or product names used herein are trademarks or registered trademarks of their respective companies or organizations.
Form 2229-170824
Using the SNAP PAC REST API with Excel
A response like this indicates the connection is working.
2. Configure an analog output point
In this step, you’ll use PAC Control to configure a point on a SNAP-AOV-27 analog output module. In the
SNAP PAC Learning Center, the point is connected to a heating element within a temperature probe. The
heater is used in this tutorial to demonstrate reading an analog point using the SNAP PAC REST API.
If you don’t have a Learning Center but you’re comfortable using PAC Manager and PAC Control, you can
configure the Learning Center’s strategy to work with your own Opto 22 I/O modules.
1. If you haven’t already done so, unzip the Convenience Store Strategy.zip file (included in the tutorial,
2229_OptoTutorial_SNAP_PAC_Excel.zip).
2. Open PAC Control, and then open Convenience Store.idb.
3. Expand the I/O Units folder, then expand SNAP_PAC_io, and then double-click the Points folder.
4. Expand Module [02] SNAP-AOV-27, and then double-click point 1 Heater to open the Edit Analog Point
dialog box. Make sure the point’s values are the same as these:
a. Name: Heater
b. Scaling > Scaled: Units: VDC
c. Scaling > Scaled: Lower: -100
d. Scaling > Scaled: Upper: 100
e. Enable communication: Checked

OPTO 22 • 800-321-6786 • 1-951-695-3000 • www.opto22.com • sales@opto22.com
© 2017 Opto 22. All rights reserved. Dimensions and specifications are subject to change. Brand or product names used herein are trademarks or registered trademarks of their respective companies or organizations.
PAGE 7
Form 2229-170824
Using the SNAP PAC REST API with Excel
5. Click OK to save the settings and close the dialog box.
6. Click Close to close the Configure I/O Points dialog box.
7. Configure your PAC as the active control engine (Configure > Control Engines), and then download and
run the strategy. (Click Mode > Debug, and then click Run Strategy .)
3. Test the Web server’s connection
To confirm that your strategy is running and you can get data from the Heater point:
1. In a browser’s address field, enter the following command:
http://10.20.30.40/api/v1/device/strategy
2. If prompted for user name and password, enter an authentication key and value for your PAC. (If you
don’t have an authentication key or value, see “2. Create authentication keys” on page 4).
3. If your strategy is running, you’ll see 1 or higher for the number of charts running.
If your strategy isn’t running, the runningCharts value is 0 (zero). Start your strategy in PAC Control and
then try sending the
/device/strategy command again.
4. To confirm that you can communicate with the Heater point, enter the following command:
http://10.20.30.40/api/v1/device/strategy/ios/analogOutputs/Heater/eu
You should get a message like this:
{"value":0.00000000e+00}
Good! You’ve verified that you can connect to your PAC and the strategy is running.

PAGE 8
OPTO 22 • 800-321-6786 • 1-951-695-3000 • www.opto22.com • [email protected]
© 2012–2017 Opto 22. All rights reserved. Dimensions and specifications are subject to change. Brand or product names used herein are trademarks or registered trademarks of their respective companies or organizations.
Form 2229-170824
Using the SNAP PAC REST API with Excel
READ PAC DATA FROM A SAMPLE EXCEL WORKSHEET
Before you create your own workbook, take a few minutes to try out Opto22_ReadingWritingSamples.xlsm, an
Excel macro-enabled workbook included in this tutorial’s zip file. It contains Visual Basic for Applications (VBA)
procedures that read and write to I/O points, variables, and tables in a SNAP PAC controller.:
Because the worksheets display the API command (URL) as you build a request, you can use the workbook as
a development tool to build API commands for your own code.
To use the Reading worksheet:
1. If you haven’t already done so, download 2229_OptoTutorial_SNAP_PAC_Excel.zip (available for free
from the Opto 22 website), and then unzip it.
2. Open Opto22_ReadingWritingSamples.xlsm.
This tutorial uses Excel 2010. The instructions and images in this document may vary if you’re using a different
version of Excel.
3. If prompted, click Enable Editing, and click Enable Content.
4. On the Reading tab:
a. In steps 1, 2, and 3, enter your PAC’s IP address or host name and authentication key and value (user
credentials).
b. In step 4 (cell B6), select ios.
c. In step 5 (cell B7), select analogOutputs.
NOTE: If you get a Microsoft “The certificate authority is invalid or incorrect” system error, it means your PAC is
set up with HTTPS, but you haven’t installed the SSL certificate at the operating system level. If this happens, you
need to import your SSL certificate into your local computer’s Trusted Root Certification Authorities store. For
details, see Microsoft TechNet Manager Trusted Root Certificates (
https://technet.microsoft.com/en-us/library/
cc754841(v=ws.11).aspx
).
The value in cell C10 is populated with the command that Excel sent to your PAC Web server (the
host name in cell B2). The returned tagnames and values are displayed in cells C12:D13.
Worksheet name Description
Reading
Reads values from points, variables, and tables in a PAC strategy.
Writing
Writes values to specific points, variables, and tables.
Charting
Uses Excel charts to plot data trends over time.
Sample
Reads, writes, and charts data in on the Learning Center’s strategy.
Readdatastore
Reads tags and data in a groov Data Store.
Writedatastore
Writes to tags and data in a groov Data Store.

OPTO 22 • 800-321-6786 • 1-951-695-3000 • www.opto22.com • sales@opto22.com
© 2017 Opto 22. All rights reserved. Dimensions and specifications are subject to change. Brand or product names used herein are trademarks or registered trademarks of their respective companies or organizations.
PAGE 9
Form 2229-170824
Using the SNAP PAC REST API with Excel
A—The target PAC Web server’s hostname or IP address (B2) and authentication key and value (B3 and B4).
B—Category of data to read:
ios = input and output points
vars = variables
tables = table variables
C—Select the type of data to read. Values in the list are based on the category selected in cell B6:
D—When you select a data type in C, a macro in Excel gets the tagnames configured in the PAC’s strategy.
Select an option from the list to read its value.
E—If you select a table variable in D, enter the index you want. To get all values, leave cell B9 blank.
F—Cell C10 contains a complete REST API command. It is automatically generated, based on the values
selected in the worksheet. You can also manually enter a command in cell C10.
G—Submit URL as written. If you manually entered a command in F, click this button to send the request.
H—The response from the last command sent, in the format of a JSON string.
I—The tagnames and values returned from the command in F. A macro in the workbook parses the returned
data and copies it into columns C and D.
J—Re-send. Click to resend the command in F.
K—Clear values. Click to clear the values returned from the sent command.
5. To finish the activity:
a. Enter your PAC’s hostname and authentication key and value in A.
b. In B, C, and D, select values to get data for:
– Analog Inputs
– Digital Inputs
– Digital Outputs
c. Watch the commands and values as they change in F and I.
Remember you can use this worksheet whenever you need to verify a command you are trying to build.
ACTIVITY: BUILD A MACRO-ENABLED WORKSHEET
In this activity, you use Excel and VBA to create a worksheet that:
• Reads and writes to input and output points
• Parses JSON text strings
• Checks for input and returns errors
• Collects data on an automated interval and displays it in an Excel chart
The solution code for this activity is in Convenience_Store_Solution.xlsm (included in this tutorial’s zip file).
ios vars tables
analogInputs strings strings
analogOutputs int32s int32s
digitalInputs int64s int64s
digitalOutputs floats floats
upTimers
downTimers

PAGE 10
OPTO 22 • 800-321-6786 • 1-951-695-3000 • www.opto22.com • [email protected]
© 2012–2017 Opto 22. All rights reserved. Dimensions and specifications are subject to change. Brand or product names used herein are trademarks or registered trademarks of their respective companies or organizations.
Form 2229-170824
Using the SNAP PAC REST API with Excel
Programming Architecture
In this activity, you’ll modularize your code so that each procedure performs a single task. Even though it takes
a little more effort to create separate procedures (rather than to put all the code into one procedure), it’s easier
to maintain, extend, and reuse modularized code.
Buttons in Excel invoke macros that pass data to a function that makes the HTTP request. The advantages of
having a common function to handle the HTTP request include:
• Reusability. If you change the PAC IP address, authentication key and value (user credentials), or switch
from HTTP to HTTPS, you need to update only one section of code.
• Maintainability. You can easily add new functionality to the worksheet.
This diagram provides an overview of the worksheet and the Visual Basic procedures.
A—A button click invokes a macro.
B—The macro passes part of an API command to the ReadPAC function.
C—ReadPAC creates an Authorization header, builds the complete API command, and makes the call.
D—the JsonConverter parses the returned string.
E—The calling macro writes the data to the worksheet.
A
B
C
D
E

OPTO 22 • 800-321-6786 • 1-951-695-3000 • www.opto22.com • sales@opto22.com
© 2017 Opto 22. All rights reserved. Dimensions and specifications are subject to change. Brand or product names used herein are trademarks or registered trademarks of their respective companies or organizations.
PAGE 11
Form 2229-170824
Using the SNAP PAC REST API with Excel
What to do when your program looks stuck
If Excel or the Visual Basic Editor is unresponsive when you’re writing or testing your code, these answers may
help you troubleshoot the problem:
• Q: Is there an open Excel or Visual Basic message window (perhaps hidden behind the active window)?
A: Close all messages before continuing your task.
• Q: Are you in the middle of editing a cell in Excel?
A: This can prevent you from typing in Visual Basic. Return to Excel and click outside of the editing field.
• Q: Is Visual Basic trying to finish a macro or a function?
A: At the top of the Visual Basic Editor are buttons for Run, Pause, and Stop. Click the Stop button.
1. Create a new workbook
In this step, you create a macro-enabled worksheet with four buttons that later will invoke macros.
1. In Excel, click File > New > Blank Workbook.
2. Save the workbook as an Excel Macro-Enabled Workbook (File > Save As > Save as type > *.xlsm).
NOTE: To use VBA, the workbook must be macro-enabled.
3. Rename Sheet 1 to Store.
You’ll refer to the worksheet by the name “Store” in your VBA code. When you’re coding in different
worksheets, naming them makes them easier to remember.
4. Resize columns A through E to about 150 pixels each.

PAGE 12
OPTO 22 • 800-321-6786 • 1-951-695-3000 • www.opto22.com • [email protected]
© 2012–2017 Opto 22. All rights reserved. Dimensions and specifications are subject to change. Brand or product names used herein are trademarks or registered trademarks of their respective companies or organizations.
Form 2229-170824
Using the SNAP PAC REST API with Excel
5. If you see the Developer tab in Excel’s menu bar, go to step 6.
If you don’t see the Developer tab:
a. Click File > Options.
As you drag the boundary cursor,
indicators shows the width

OPTO 22 • 800-321-6786 • 1-951-695-3000 • www.opto22.com • sales@opto22.com
© 2017 Opto 22. All rights reserved. Dimensions and specifications are subject to change. Brand or product names used herein are trademarks or registered trademarks of their respective companies or organizations.
PAGE 13
Form 2229-170824
Using the SNAP PAC REST API with Excel
b. The Excel Options window opens. Click Customize Ribbon, and then select Developer from the list
of Main Tabs. Then click OK to close the window.
6. On the Developer tab, click Insert to see the Controls group.
7. Under Form Controls, click the Button control, and then click cell B2. When the Assign Macro dialog box
opens, click Cancel. (You’ll assign a macro to the button later.)
8. Resize the button to fill the cell and then change the button’s label to Read Digital Inputs. Click
anywhere in the worksheet to save the change.
9. Repeat step 6 through step 8 to create three more buttons:
Put Read Digital Outputs in cell D2.
Put Read Analog Inputs in cell B9.
Put Read Analog Outputs in cell D9.
Controls group
Button
control

PAGE 14
OPTO 22 • 800-321-6786 • 1-951-695-3000 • www.opto22.com • [email protected]
© 2012–2017 Opto 22. All rights reserved. Dimensions and specifications are subject to change. Brand or product names used herein are trademarks or registered trademarks of their respective companies or organizations.
Form 2229-170824
Using the SNAP PAC REST API with Excel
When you’re done, the worksheet should look something like this:
2. Create the ReadDigitalInput macro
Next, you’ll use the Visual Basic Editor to create a macro for the Read Digital Inputs button.
1. On the Developer tab, click the Visual Basic icon .
The Visual Basic Editor displays the workbook’s programming resources in a tree-like structure. If you
have two workbooks open, you’ll see two trees of programming objects.
2. Double-click Sheet1(Store) to open its Code window, and then type the code below.
NOTE: Strings are enclosed in straight quotes ( " "); do not use curly quotes (“ ”).
As you type, the Visual Basic Editor displays the names of functions and objects, and provides other
prompts to help you complete your statements. It also cites syntax errors as soon as you press Enter.
A—Sub indicates the beginning of a macro (also known as a subroutine).
Sub is followed by a space and the macro’s name (alphanumeric without special characters).
Project tree
Double-click an object to
open its Code window
Click the Excel icon
to return to the
workbook
Sub ReadDigitalInput()
Dim ws As Worksheet: Set ws = Worksheets("Store")
Dim strResp As String
MsgBox ("ReadDigitalInput called")
End Sub
A
B
D
C
OPTO 22 • 800-321-6786 • 1-951-695-3000 • www.opto22.com • sales@opto22.com
© 2017 Opto 22. All rights reserved. Dimensions and specifications are subject to change. Brand or product names used herein are trademarks or registered trademarks of their respective companies or organizations.
PAGE 15
Form 2229-170824
Using the SNAP PAC REST API with Excel
The parentheses make this statement a callable piece of code.
Note that End Sub was added automatically when you finished typing the first line.
B—Dim declares a new variable, and Set assigns a reference to an object.
Worksheets calls a function to represent the objects on a worksheet.
This statement declares the variable ws as an Excel worksheet object that refers to the worksheet named
Store. (Note the text in quotes must exactly match the name you assigned to the worksheet.) Using the
ws object, you can read and write to the properties of all buttons and fields on the named worksheet.
You’ll see this later when you write data to the worksheet.
C— This statement declares a new variable, strResp, as a string data type. You’ll use it later to hold the
response from a call.
D—MsgBox is a function that displays its argument in a message box with an OK button. (The argument
is the value enclosed in parentheses.) This particular MsgBox is for testing purposes; if you see it when
you run your code, it means the code was executed successfully.
3. Click Save to save your VBA project.
3. Assign the macro to the Read Digital Inputs button
1. Switch back to the Store worksheet. You can quickly switch either by clicking the Excel icon in the Visual
Basic Editor toolbar, or by pressing Alt+F11.
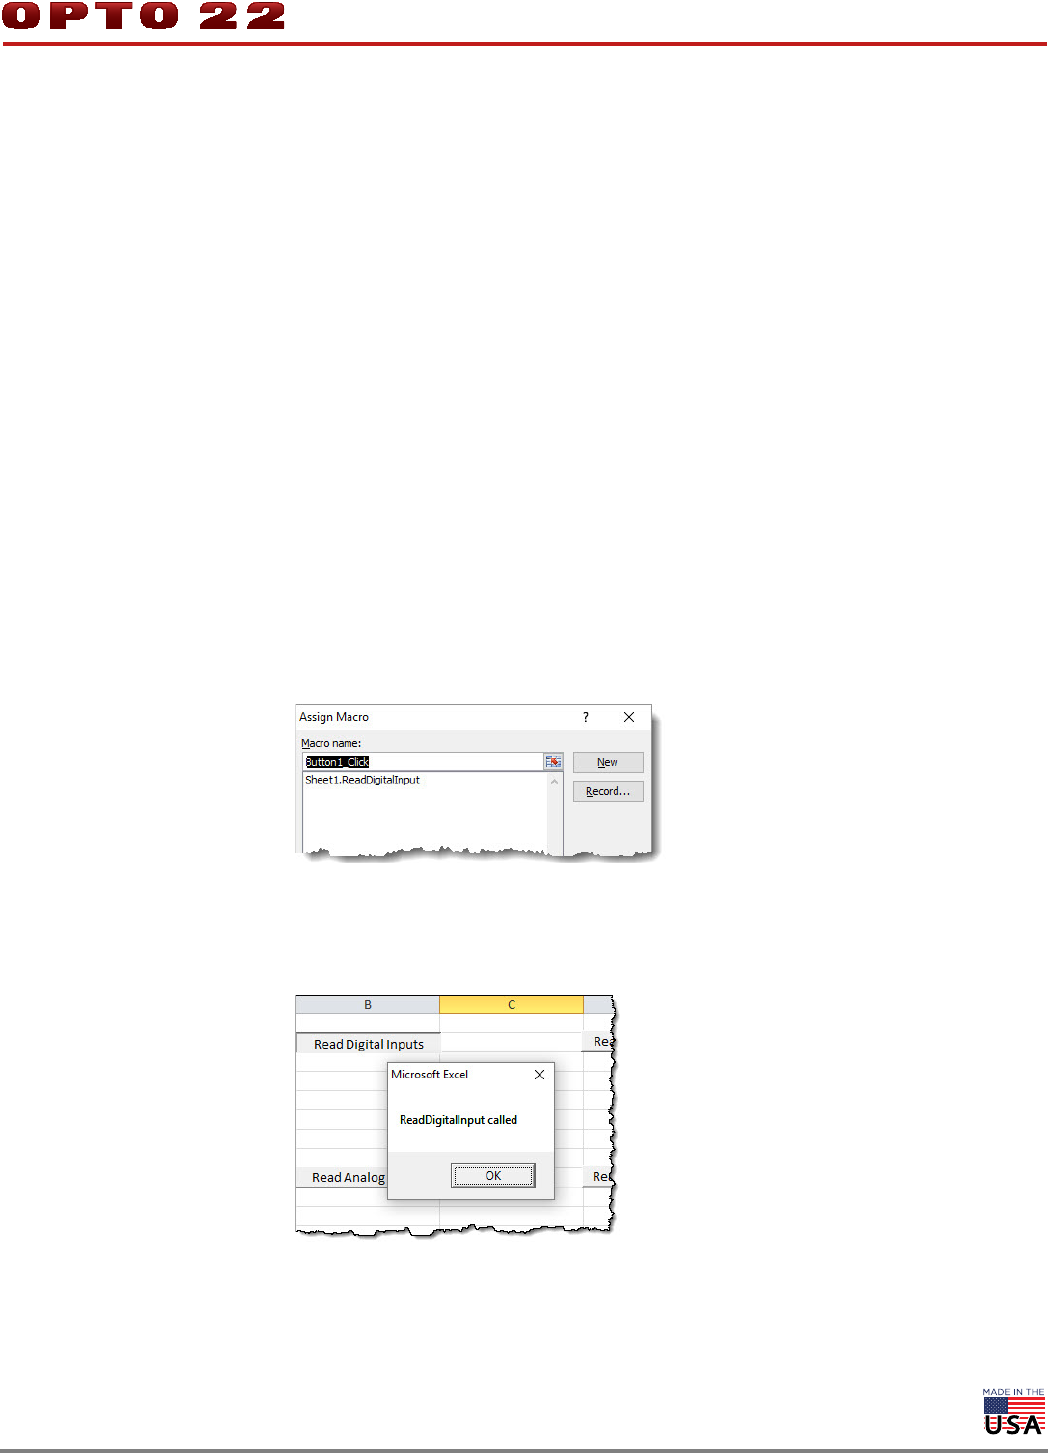
2. Right-click the Read Digital Inputs button, and from the pop-up menu, click Assign Macro.
The Assign Macro dialog box lists all macros in all open workbooks. If necessary, scroll down to find the macro
you want. You can also close open workbooks to reduce the number of macros to choose from.
3. Click Sheet1.ReadDigitalInput to select it, and then click OK.
4. Click anywhere in the worksheet to unselect the button, and then click the button to test it. If the macro
works, you’ll see your MsgBox text:
5. Click OK to close the message box.
Note that the Visual Basic Editor can’t execute code when a message box is open.

PAGE 16
OPTO 22 • 800-321-6786 • 1-951-695-3000 • www.opto22.com • [email protected]
© 2012–2017 Opto 22. All rights reserved. Dimensions and specifications are subject to change. Brand or product names used herein are trademarks or registered trademarks of their respective companies or organizations.
Form 2229-170824
Using the SNAP PAC REST API with Excel
4. Create the ReadPAC function
Next, you’ll create ReadPAC, a function that receives and processes messages from a PAC Web server.
ReadDigitalInput is a macro and ReadPAC is a function—what’s the difference?
• Functions can return a value; macros can’t.
• Functions can be invoked directly from a worksheet cell; macros can’t. (That’s why you assigned
ReadDigitalInput to a button click.)
To create and test the ReadPAC function:
1. In the Visual Basic Editor, right-click anywhere in the project tree, and then in the pop-up menu, click
Insert > Module.
The Module1 (Code) window opens. A module is a container for holding VBA code. You’ll create and save
your function in Module1.
You can resize the two object windows to switch easily between them.
Throughout this tutorial, if you can’t find a particular code window, double-click its location in the project tree
to open it. (Most macros will be in Sheet1 and most functions will be in Module1.)
2. Add the following code to Module1, and then save your VBA project:
A—A function returns a value (identified as Targ et) to the macro or function that calls it. In this function,
Target is a string variable.
Statements
B and C are simply for testing purposes:
B is executed when ReadPAC has successfully been called.
C is the Target that is passed whenever a procedure calls ReadPAC.
Now, you need to modify ReadDigitalInput to call ReadPAC and display Target.
3. Switch windows to work with ReadDigitalInput. (If the macro isn’t visible, double-click Sheet1 in the
project tree to open the Sheet1 Code window.)
a. Comment out: MsgBox ("ReadDigitalInput called").
Function ReadPAC(Target As String) As String
MsgBox ("ReadPAC successfully received the string ios/digitalInputs")
ReadPAC = "ReadPAC returned this value"
End Function
A
B
C

OPTO 22 • 800-321-6786 • 1-951-695-3000 • www.opto22.com • sales@opto22.com
© 2017 Opto 22. All rights reserved. Dimensions and specifications are subject to change. Brand or product names used herein are trademarks or registered trademarks of their respective companies or organizations.
PAGE 17
Form 2229-170824
Using the SNAP PAC REST API with Excel
b. Then add the statements marked A and B.
c. Save your VBA project.
A—When you click the Read Digital Inputs button, ReadDigitalInput passes the string “ios/digitalInputs” to
ReadPAC. This string doesn’t do anything now, but later it will become part of a complete REST command that
ReadPAC will send to your PAC.
B—If the call is successful, the Target is assigned to strResp, and is displayed in a message box.
4. Switch to Excel, and then click Read Digital Inputs.
The first message verifies that you successfully called the ReadPAC function.
The second message verifies that ReadDigitalInput displays the Target that ReadPAC returned.
5. Add references
For VBA to communicate with a PAC, you may need to add references (VBA programming libraries).
1. From the Visual Basic Editor menu bar, click Tools > References.
Some references are selected by default. Your version of Excel’s default references may be different.
2. Make sure each of the following references is selected. You may have to scroll down to find the reference.
Reference name File name (used only if you can’t
find the reference in the list)
Visual Basic for Applications
VBE<version number>.DLL
Sub ReadDigitalInput()
Dim ws As Worksheet: Set ws = Worksheets("Store")
Dim strResp As String
'MsgBox ("ReadDigitalInput called")
strResp = Module1.ReadPAC("ios/digitalInputs")
MsgBox (strResp)
End Sub
A
B
Browse button

PAGE 18
OPTO 22 • 800-321-6786 • 1-951-695-3000 • www.opto22.com • [email protected]
© 2012–2017 Opto 22. All rights reserved. Dimensions and specifications are subject to change. Brand or product names used herein are trademarks or registered trademarks of their respective companies or organizations.
Form 2229-170824
Using the SNAP PAC REST API with Excel
If you have all the required references, go to step 3.
If you can’t find a reference, you may have to add it to the list by its file name. For example, follow these
steps to add the Microsoft Forms 2.0 Object Library to the list of references:
a. In Windows File Explorer, search your hard drive for the reference by its file name (shown in the table
above). The file name for Microsoft Forms 2.0 Object Library is FM20.DLL, and in Excel 2010, it’s
located in C:\Windows\System32.
b. In the Add Reference dialog box, browse to the folder containing the reference, and then click the
reference to select it.
c. Click Open.
d. In the References dialog box, the reference is added to the list. Now click its check box to select it.
3. When you’ve selected all the required references, click OK to close the References dialog box.
6. Complete the HTTP request
In this step, you program ReadPAC to construct an HTTP call using the text string sent to by ReadDigitalInputs.
1. In ReadPAC, comment out these two statements:
'MsgBox ("ReadPAC function successfully received the string ios/
digitalInputs")
'ReadPAC = "ReadPAC returned this value"
Microsoft Excel <version number> Object Library
EXCEL.EXE
OLE Automation
stdole2.tlb
Microsoft Office <version number> Object Library
MSO.DLL
Microsoft Forms 2.0 Object Library
FM20.DLL
Microsoft Scripting Runtime
SCRRUN.DLL
Microsoft WinHTTP Services <version number>
winhttp.dll
Reference name File name (used only if you can’t
find the reference in the list)

OPTO 22 • 800-321-6786 • 1-951-695-3000 • www.opto22.com • sales@opto22.com
© 2017 Opto 22. All rights reserved. Dimensions and specifications are subject to change. Brand or product names used herein are trademarks or registered trademarks of their respective companies or organizations.
PAGE 19
Form 2229-170824
Using the SNAP PAC REST API with Excel
2. Below the statements you commented out, add these statements, substituting your PAC’s IP address
(or hostname) and authentication key and value (user credentials) for the ones in the sample:
3. Save your VBA project.
A—This statement declares new variables (pac, username, and password) for your PAC’s IP address (or
hostname) and authentication key and value.
B—These statements declare a variable, strURL, that creates the REST API command sent to the PAC. The URL
starts with the PAC’s IP address (or hostname), followed by a string that is part of an API command to get data
from a strategy, followed by the value of Target. Target depends on the button you click; in this case, Target is
"ios/digitalInputs", the strResp you coded for the Read Digital Inputs button (page 17).
C—hReq is a WinHttpRequest object variable built using the Microsoft WinHTTP library (one of the references
on page 17). Once you declare hReq, you have a variety of methods and properties to use:
• hReq.Open establishes the type of request. In this tutorial, GET and POST requests use the URL in the
string variable strUrl, and set asynchronization to True or False. False is the default if you omit this
argument. True will fail in this example. The value of strUrl must be a properly constructed URL call to
the PAC’s REST API.
• hReq.SetCredentials provides the user name and password needed to access to the PAC. The last
argument must be set to 0 (zero) to communicate with the server. (A value of 1 indicates a proxy server,
and isn’t applicable to a PAC Web server.)
• hReq.Send triggers the request. After the Send, your code can read the returned values for hReq.Status,
hReq.StatusText, and hReq.ResponseText.
– hReq.Status contains an HTTP status code (as defined by the World Wide Web Consortium, https://
www.w3c.org) that indicates success or failure in connecting. 200 means success.
– hReq.StatusText contains the W3C text definition of the status code; for example, the definition of
code 200 is “Success”. Status and StatusText contain useful information to troubleshoot errors.
– hReq.ResponseText contains the requested information in JSON format. You’ll use this property later
to see the response from your PAC.
D—This statement is for testing purposes. It displays a message box containing the HTTP status code and
status code text returned by the PAC.
C
D
B
A
Dim pac As String
pac = "http://10.20.30.40"
Dim username As String
username = "rw"
Dim password As String
password = "rw"
Dim strUrl As String
strUrl = pac & "/api/v1/device/strategy/" & Target
Dim hReq As New WinHttpRequest
hReq.Open "GET", strUrl, False
hReq.SetCredentials username, password, 0
hReq.Send
MsgBox (hReq.Status & ", " & hReq.StatusText)

PAGE 20
OPTO 22 • 800-321-6786 • 1-951-695-3000 • www.opto22.com • [email protected]
© 2012–2017 Opto 22. All rights reserved. Dimensions and specifications are subject to change. Brand or product names used herein are trademarks or registered trademarks of their respective companies or organizations.
Form 2229-170824
Using the SNAP PAC REST API with Excel
ReadPAC should now look something like this:
4. Switch to Excel, and then click the Read Digital Inputs button.
If the function is successful, a message box displays 200, OK.
When you click OK, another message box displays a blank message which you can ignore.
5. Click OK to close the blank message box.
6. Switch to Visual Basic, and in ReadPAC, comment out the test message:
MsgBox (hReq.Status &
", " & hReq.StatusText)
7. Below the comment, add this statement:
A—This statement assigns the HTTP response text to ReadPAC’s return value.
8. Save your VBA project, and then in Excel, click Read Digital Inputs to test the code.
Two message boxes are displayed.
The second one is blank because ReadPAC
didn’t return anything to ReadDigitalInput,
so its MsgBox (strResp) statement had
nothing to display.
ReadPAC = hReq.ResponseText
A

OPTO 22 • 800-321-6786 • 1-951-695-3000 • www.opto22.com • sales@opto22.com
© 2017 Opto 22. All rights reserved. Dimensions and specifications are subject to change. Brand or product names used herein are trademarks or registered trademarks of their respective companies or organizations.
PAGE 21
Form 2229-170824
Using the SNAP PAC REST API with Excel
If you’re using the SNAP PAC Learning Center strategy and modules, the message box displays the
JSON-formatted data returned from your PAC:
If you’re using a different strategy and there are no points to display, the message box looks like this:
Congratulations! Your PAC responded to your request.
7. Add error checking to ReadPAC
1. In the Visual Basic Editor, open ReadPAC.
2. Below the statement,
ReadPAC = hReq.ResponseText, add this code:
3. Save your VBA file.
A—If the returned HTTP status code is 200 (“Success”), the JSON response is displayed in the message box.
B—If the condition is false (meaning that the PAC Web server returned anything other than a status code 200,
ReadPAC returns the word “ERROR” and displays a message box with the word “Error,” the returned status
code, and its description.
8. Add Error checking to ReadDigitalInput
1. In the Visual Basic Editor, open ReadDigitalInput, and below the statement MsgBox (strResp), add
this code:
If hReq.Status = 200 Then
ReadPAC = hReq.ResponseText
Else
ReadPAC = "ERROR"
MsgBox ("Error: " & hReq.Status & ", " & hReq.StatusText)
End If
A
B
If (strResp <> "ERROR") Then
MsgBox("good")
End If
A

PAGE 22
OPTO 22 • 800-321-6786 • 1-951-695-3000 • www.opto22.com • [email protected]
© 2012–2017 Opto 22. All rights reserved. Dimensions and specifications are subject to change. Brand or product names used herein are trademarks or registered trademarks of their respective companies or organizations.
Form 2229-170824
Using the SNAP PAC REST API with Excel
A—The brackets mean “is not,” so this statement checks to see if the value returned by ReadPAC is not
the word “ERROR.” If the condition is true, the Then statement is executed and a message box with the
word “good” is displayed.
2. Save your VBA project, and then in Excel, click Read Digital Inputs to test the code.
If ReadPAC doesn’t return the word “ERROR,” you’ll first see a message box with the JSON response and
then another message box with the word “good”. Otherwise, you’ll see the error message box you coded
in step 7. Add error checking to ReadPAC (on page 21).
3. Next, you’ll write code to handle situations where the request is valid but the response doesn’t include
any data (for example, when a strategy doesn’t have any digital input points, as shown on page 21).
a. In ReadDigitalInput, comment out MsgBox ("good"), and then add the lines marked by A , B,
and
C to create a “nested” If statement inside the existing If statement
A—This statement checks to see if ReadPAC returns “[]”.
B—If the condition is true, a message box displays the message.
C—This statement closes the nested If.
b. Save your VBA project.
To test that last bit of error handling, you need a strategy without any digital input points. If you’d like to try it,
here are the steps:
1. Open PAC Control.
2. Archive your Convenience Store strategy.
3. Open the Lighting_Control chart and remove the commands in the Control Lights block.
4. Open the Fuel_Monitor chart, and from within the Fuel_Monitor script block, comment out the two
lines that refer to Alarm.
5. In the project tree, open the Points folder and delete the points configured under Module 0.
6. Download and run the strategy.
7. In Excel, click the Read Digital Inputs button.
8. If your test is successful, restore your previous strategy from the archive file to continue the tutorial.
PARSING JSON
JSON stands for JavaScript Object Notation. It uses plain text to convey an object’s properties and their values.
A JSON response can be a simple object, an object with multiple properties, an array of objects, or a hierarchy
of objects and arrays.
In the following images, spaces and line breaks have been added for legibility.
Simple JSON object
If (strResp <> "ERROR") Then
'MsgBox ("good")
If (strResp = "[]") Then
MsgBox ("The PAC has no Digital Input Points")
End If
End If
A
B
C

OPTO 22 • 800-321-6786 • 1-951-695-3000 • www.opto22.com • sales@opto22.com
© 2017 Opto 22. All rights reserved. Dimensions and specifications are subject to change. Brand or product names used herein are trademarks or registered trademarks of their respective companies or organizations.
PAGE 23
Form 2229-170824
Using the SNAP PAC REST API with Excel
JSON object with multiple properties
An array of JSON objects
JSON object with hierarchy and arrays
1. Import the JsonConverter
The sample files with this tutorial include a third-party module, JsonConverter.bas, that parses JSON-formatted
data. This module may be redistributed as long as its copyright statement is included and its terms are
respected. The code is maintained on GitHub (https://github.com).
To import the JsonConverter into your VBA project:
1. In the Visual Basic Editor, right-click the Modules folder in the project tree.
2. In the pop-up menu, click Import File.
3. Browse to the folder containing the tutorial sample files. Select JsonConverter.bas, and then click Open.

PAGE 24
OPTO 22 • 800-321-6786 • 1-951-695-3000 • www.opto22.com • [email protected]
© 2012–2017 Opto 22. All rights reserved. Dimensions and specifications are subject to change. Brand or product names used herein are trademarks or registered trademarks of their respective companies or organizations.
Form 2229-170824
Using the SNAP PAC REST API with Excel
The JsonConverter is added to the Modules folder.
2. Parse I/O point values
Now that your code checks for errors and for the lack of configured points, you can assume the data returned
from the PAC contains I/O point names and values in JSON format.
To parse the returned data with the JsonConverter, you need to know what type of JSON string (described
starting on page 22) will be returned. For example, when you read digital inputs, the returned data is an array
of JSON objects:
Parsing an array of JSON objects is easier if you assign a name to the array using JSON conventions. Therefore,
you’ll first embed the array in a JSON string that identifies “data” as the name of the array. Once the array is
prepared this way, you can send it to the JsonConverter to get the individual names and values.
1. In the ReadDigitalInput macro, add the lines marked A, B, C, D, and E:
A—Else marks the beginning of the parsing code.
Else
'parse data
Dim prejson As String
prejson = "{""data"":" & strResp & "}"
Dim Parsed As Dictionary
Set Parsed = JsonConverter.ParseJson(prejson)
Dim value As Dictionary
Dim i As Long
i = 0
For Each value In Parsed("data")
Dim tmp1 As String
Dim tmp2 As String
ws.Cells(3 + i, 2).value = value("name")
ws.Cells(3 + i, 3).value = value("value")
i = i + 1
Next value
A
C
D
E
B

OPTO 22 • 800-321-6786 • 1-951-695-3000 • www.opto22.com • sales@opto22.com
© 2017 Opto 22. All rights reserved. Dimensions and specifications are subject to change. Brand or product names used herein are trademarks or registered trademarks of their respective companies or organizations.
PAGE 25
Form 2229-170824
Using the SNAP PAC REST API with Excel
B—These statements declare prejson as a new string variable and assign to it your array under the
property name, data.
CAUTION: Notice the double set of quotes enclosing “data”. Visual Basic uses quotes to indicate strings, and JSON
uses quotes to indicate property names. It’s easy to make an error when constructing a JSON property name.
C—This statement creates a JSON object called Parsed.
D—After this line runs, Parsed will contain an array named data.
E—To parse an array, you need to count the items in the array, and then parse each by name and
value. This code creates a For loop that, starting with the first item, gets the name and value for each
item in the array.
–An integer value, i, places the data in consecutive cells in the worksheet.
– value becomes each item in the array, with properties name and value.
– At the beginning of this macro, you created the object ws to represent the worksheet. ws.Cells lets
you read and write to cells using numbers to represent the target cell. For example, ws.Cells
recognizes cell B3 as 3, 2 (third row, second column).
The first time the statement ws.Cells(3 + i, 2).value = value("name") runs, it copies into cell B3 the name of
the first item in the array. (In this case, the first item is “Emergency.”)
The loop increments the row by 1 (3 + i), putting the next time’s name into cell B4.
Likewise, the value of each item is copied into column C so it can be displayed next to its name.
The complete macro looks like this:
2. Save your VBA project.
3. In Excel, click Read Digital Inputs to test your code.

PAGE 26
OPTO 22 • 800-321-6786 • 1-951-695-3000 • www.opto22.com • [email protected]
© 2012–2017 Opto 22. All rights reserved. Dimensions and specifications are subject to change. Brand or product names used herein are trademarks or registered trademarks of their respective companies or organizations.
Form 2229-170824
Using the SNAP PAC REST API with Excel
The point names and states appear in cells B3:C6.
READING POINTS, VARIABLES, AND TABLES
You can easily copy and modify the ReadDigitalInput macro to read other values. Following these steps will
add functionality to the Read Digital Outputs button:
1. Paste a copy of ReadDigitalInput into the Sheet1 (Store) Code window.
2. Rename the copied macro (for example, “ReadDigitalOutput”).
3. If you’re using a different worksheet, change the worksheet name.
4. Change
strResp‘s argument to get digital outputs. For future reference, here are the arguments:
NOTE: You can’t read or write to pointer tables.
5. Change the error message to: "The PAC has no Digital Output Points".
6. Change the cells that the macro writes to. In the case, start writing digital output point names in cell D3
(3, 4) and start writing values in E3 (3, 5).
7. Save your VBA project.
8. In Excel, assign the macro to the Read Digital Outputs button.
9. Test the button.
10. Now create and test macros for the Read Analog Inputs and Read Analog Outputs buttons.
For Use this argument
Digital inputs
"ios/digitalInputs"
Digital outputs
"ios/digitalOutputs"
Analog inputs
"ios/analogInputs"
Analog outputs
"ios/analogOutputs"
String variables
"vars/strings"
Int32 variables
"vars/int32s"
Int64 variables
"vars/int64s"
Float variables
"vars/floats"
Up timer variables
"vars/uptimers"
Down timer variables
"vars/downtimers"
String tables
"tables/strings"
Integer 32 tables
"tables/int32s"
Integer 64 tables
"tables/int64s"
Float tables
"tables/floats"

OPTO 22 • 800-321-6786 • 1-951-695-3000 • www.opto22.com • sales@opto22.com
© 2017 Opto 22. All rights reserved. Dimensions and specifications are subject to change. Brand or product names used herein are trademarks or registered trademarks of their respective companies or organizations.
PAGE 27
Form 2229-170824
Using the SNAP PAC REST API with Excel
READING TAGS
Reading a specific tag requires two additional changes to the ReadDigitalInput macro:
• The string sent to ReadPAC depends on the tag you want to read.
• The JSON object sent to the JsonConverter is a single JSON object (not an array).
Following the steps you’ve already done to create and code the Read Digital Inputs button, follow these steps
to read the Store_Temperature tag in the Convenience Store strategy:
1. In Excel, create a button in cell A5, and name it Get Temperature.
2. In the Visual Basic Editor’s Sheet1 (Store) Code window, paste a copy of the ReadAnalogInput macro
(that you created in step 10 on page 26), and then make these changes:
a. Rename the new macro (for example, GetTemperature).
b. If you’re using a different worksheet, change the worksheet name in the code.
c. Change ReadPAC’s argument to: "ios/analogInputs/Store_Temperature/eu"
“/eu” stands for “Engineering Units,” and is always a part of the command to read a single analog point.
(If you’re reading a single digital point, you’d request its state: “
/state”.) For the entire list of SNAP PAC REST API
commands, see
http://developer.opto22.com/static/generated/pac-rest-api/swagger-ui/index.html.
d. Delete all of the code you added instep 1, page 24, and replace it with this:
Else
'parse data
Dim json As Object
Set json = JsonConverter.ParseJson(strResp)
Dim tempStr As String
tempStr = json("value")
ws.Cells(6, 1).value = tempStr
Because this time you’re getting a single JSON object, you can send the response straight to the
Json.Converter (without having to count and separate each item in an array).
The code should look something like this:
3. Save your VBA project.
4. In Excel, assign the macro to the Get Temperature button.
5. Click Get Temperature to test the code.

PAGE 28
OPTO 22 • 800-321-6786 • 1-951-695-3000 • www.opto22.com • [email protected]
© 2012–2017 Opto 22. All rights reserved. Dimensions and specifications are subject to change. Brand or product names used herein are trademarks or registered trademarks of their respective companies or organizations.
Form 2229-170824
Using the SNAP PAC REST API with Excel
First, ReadPAC displays its message box, and when you click OK, GetTemperature displays the parsed
value in cell A6.
WRITING TO A DIGITAL OUTPUT POINT
To write to a PAC, you create a POST command that sends a JSON-formatted value with the same data type as
the tag you want to write to. For example, to write to a digital point, you would send a value of True or False; to
write to a floating point or integer, you would send a numerical value.
Here’s an overview of the steps to write to a digital output:
1. Create an On/Off control using a Combo box
2. Add selections to the combo box
3. Create a macro for the combo box
4. Build a Write function
Note: In Excel, a On/Off control is called a combo box; in VBA, it’s called a dropdown list.
1. Create an On/Off control
This activity assumes you have a functioning Read Digital Output button in cell D2. (For details, see page 26).
1. In Excel’s Developer tab, click Insert, and select the Combo Box form control.
Combo Box

OPTO 22 • 800-321-6786 • 1-951-695-3000 • www.opto22.com • sales@opto22.com
© 2017 Opto 22. All rights reserved. Dimensions and specifications are subject to change. Brand or product names used herein are trademarks or registered trademarks of their respective companies or organizations.
PAGE 29
Form 2229-170824
Using the SNAP PAC REST API with Excel
2. Place the combo box in cell F3.
3. To rename the combo box, right-click it, then click the down arrow in the Name Box, and then type
combo_alarm
.
2. Add selections to the combo box
Next, you need to assign values for the user to select in the combo box.
1. In the Visual Basic Editor, double-click the ThisWorkbook object. A new ThisWorkbook Code window
opens.
ThisWorkbook is for code that is accessible by the entire workbook. It’s a location for procedures that are
called when the workbook opens.
2. In the ThisWorkbook Code window, add the following code:
A—This statement calls Workbook_open, which automatically invokes the event when the workbook opens.
B—These statements declare a DropDown object referenced by the name combo_alarm.
First, select the combo box
Then, click the Name Box’s down arrow and type the new name
Private Sub Workbook_open()
Dim cs As Object: Set cs = Worksheets("Store")
Dim Alarm As Object: Set Alarm = cs.DropDowns("combo_alarm")
If Alarm.ListCount = 0 Then
Alarm.AddItem "On"
Alarm.AddItem "Off"
End If
End Sub
A
B
C
D

PAGE 30
OPTO 22 • 800-321-6786 • 1-951-695-3000 • www.opto22.com • [email protected]
© 2012–2017 Opto 22. All rights reserved. Dimensions and specifications are subject to change. Brand or product names used herein are trademarks or registered trademarks of their respective companies or organizations.
Form 2229-170824
Using the SNAP PAC REST API with Excel
C—To avoid adding more than one set of selections, the subroutine first checks if there are selections already
added to the dropdown list. ListCount is 0 if there are no selections.
D—If there are no items in combo_alarm, this statement adds two items: On and Off.
3. Save your VBA project.
4. Save the workbook.
5. Close and reopen the workbook. You need to reopen the workbook to initiate the new subroutine.
6. Click the On/Off control to verify that On and Off are displayed in the list.
3. Create a macro for the combo box
In this step, you create a macro that reads whichever item the user has selected in the combo box.
1. In the Visual Basic Editor, open the Sheet1 (Store) Code window.
2. At the bottom of the window, add the following macro:
NOTE: "true" and "false" are written in lowercase letters.
A—thisDD is an object that represents the combo box. It has properties ListIndex and List.
– ListIndex is the number corresponding to the menu item that the user has selected.
– List lists the text content of all selections.
thisDD.List(thisDD.ListIndex) reads the content of the selected index.
B—These statements test the content of thisDD.ListIndex for a match with On or Off, and then assigns On to a
true value and Off to a false value. You could have skipped a step by populating the combo box with words
like “TRUE” and “FALSE,” but this sample shows how to implement a more user-friendly menu option. Another
shortcut would be to skip matching the text string, and simply check if the value of thisDD.ListIndex is 1 (for
the first item in the list) or 2 (for the second item).
3. Save your VBA project.
4. In Excel, assign the new WriteToAlarm macro to the combo box.
5. Save your Excel workbook.
6. Test the values in the combo box.
When you click On, you should see a message box with “value to send: true”
When you click Off, the message box reads “value to send: false”
Sub WriteToAlarm()
Dim ws As Worksheet: Set ws = Worksheets("Store")
Dim thisDD As Object: Set thisDD = ws.DropDowns("combo_alarm")
Dim ddVal As String
ddVal = thisDD.List(thisDD.ListIndex)
Dim val As String
If ddVal = "On" Then
val = "true"
ElseIf ddVal = "Off" Then
val = "false"
End If
MsgBox ("value to send: " & val)
End Sub
B
A

OPTO 22 • 800-321-6786 • 1-951-695-3000 • www.opto22.com • sales@opto22.com
© 2017 Opto 22. All rights reserved. Dimensions and specifications are subject to change. Brand or product names used herein are trademarks or registered trademarks of their respective companies or organizations.
PAGE 31
Form 2229-170824
Using the SNAP PAC REST API with Excel
4. Build a Write function
Now, you’ll create a common function to handle write commands.
1. In the Visual Basic Editor, open the Module1 Code window, and then type the following code, replacing
the IP address and authentication key and value (user credentials) with the information for your PAC:
2. Save your VBA project.
You can see that this function is very similar to ReadPAC. The new function constructs an API command and
passes the PAC’s IP address and authentication key and value (user credentials) in the HTTP request’s
Authorization header. At the end, it returns a value. But the differences between ReadPAC and WriteToPac are
important:
A—WriteToPac has a new variable, val, which will be the string you send to the PAC.
B—The HTTP request is a POST. (When you read a value, you use a GET request—like you did in ReadPAC).
C—WriteToPac sends the string you construct to the value property of the designated point on the PAC. Since
you’ll be writing to a digital point, you’ll be creating a string that looks like either this:
{"value":true} or
this:
{"value":false}). Remember that Visual Basic uses quotes to delineate strings, and JSON uses
quotes for the property name (which explains the double set of quotes needed to create the property).
D—No function is complete until it returns a value. You could return value by writing a simple text string (for
example,
WriteToPac = "Task done"). Better yet, since the PAC will return the status from the HTTP
POST request, you can use the status for your returned value. This code takes the reply from the PAC (which
will be a JSON string) and sends it to the JsonConverter. The object response includes the message property,
which, in this case, you’ll use as WriteToPac’s returned value.
Function WriteToPac(Target As String, val As String) As String
Dim pac As String
pac = "http://10.20.30.40"
Dim username As String
username = "rw"
Dim password As String
password = "rw"
Dim strUrl As String
strUrl = pac & "/api/v1/device/strategy/" & Target
'Build HTTP request
Dim hReq As New WinHttpRequest
hReq.Open "POST", strUrl, False
hReq.SetRequestHeader "Content-type", "application/json"
hReq.SetCredentials username, password, 0
hReq.Send ("{""value"":" & val & "}")
Dim response As Object
Set response = JsonConverter.ParseJson(hReq.ResponseText)
WriteToPac = response("message")
End Function
A
B
C
D

PAGE 32
OPTO 22 • 800-321-6786 • 1-951-695-3000 • www.opto22.com • [email protected]
© 2012–2017 Opto 22. All rights reserved. Dimensions and specifications are subject to change. Brand or product names used herein are trademarks or registered trademarks of their respective companies or organizations.
Form 2229-170824
Using the SNAP PAC REST API with Excel
3. Now you’re ready to call WriteToPac from a macro. Return to the Sheet1(Store) Code window, and in the
WriteToAlarm macro, add the following code directly above the End Sub statement:
A—The macro sends to ReadPAC this string, "ios/digitalOutputs/Alarm/state", which ReadPAC
uses to construct the API command to write to the Alarm digital output point.
B—If the write is successful, then this statement runs the ReadDigitalOutput macro, which gets and displays
the Alarm point’s value in cell E3. These statement demonstrate how to call another macro from within the
same page of code.
4. Save the project, and then test the combo box in Excel. In addition to seeing message boxes, the value in
cell E3 changes, depending on whether you send On or Off. Also, if you’re using the SNAP PAC Learning
Center and you send On, the alarm in the Learning Center will sound.
Write to Analog Outputs
Now that you’ve walked through all the steps to create and use procedures in Excel and VBA, the instructions
in this tutorial become less detailed (and possibly a bit more challenging).
Using what you’ve learned and following the steps below, you’ll perform these functions:
• Create an app that allows a user to choose a number (either by typing or using a spin button)
• Write code that reads the number and then writes it to the heater analog output point in the PAC
This activity assumes you have a functioning Read Analog Outputs button in cell D9. (For details, see page 26).
1. Draw a button and spinner
1. In Excel, open the Developer tab.
2. Use the Insert menu to select the button control, and then place it in cell F12.
3. Change the button’s label to “Send”.
4. Now, use the Insert menu to select the spin button control, and then place it in cell H12.
5. Right-click the spin button control, and Select Format Control from the pop-up menu.
6. In the Format Control dialog box, choose the Control tab, and then set the Minimum value to 0 and the
Maximum value to 100.
7. In the Cell link field, set the linked cell to G:12 (either by typing “$G$12”, or by clicking the spreadsheet
icon in the Cell Link field, and then clicking the cell G12 in the worksheet).
8. In Excel, test the spin button. Notice that the value written in cell G12 changes. You can also type a
number in cell G12 and use the spin button to increase or decrease the number.
Dim sendVal As String
sendVal = Module1.WriteToPac("ios/digitalOutputs/Alarm/state", val)
If sendVal = "Success" Then
ReadDigitalOutput
End If
A
B

OPTO 22 • 800-321-6786 • 1-951-695-3000 • www.opto22.com • sales@opto22.com
© 2017 Opto 22. All rights reserved. Dimensions and specifications are subject to change. Brand or product names used herein are trademarks or registered trademarks of their respective companies or organizations.
PAGE 33
Form 2229-170824
Using the SNAP PAC REST API with Excel
2. Write a macro to send the value to the PAC
1. Open the Sheet1(Stores) Code window, and then paste this code:
2. Assign the writeToHeater macro to the Send button, and then test both buttons.
CREATE AN AUTOMATED CHART
An advantage to bringing PAC data into Excel is that it allows you to analyze the data using Excel’s Charts. In
this activity, you’ll build a chart that plots a temperature trend as write new values to the Heater tag.
The basic steps are:
1. Create Start and Stop buttons
2. Draw a chart graphic
3. Create global variables and macros in Module 1
4. Extend the example
5. Update chart
Sub writeToHeater()
Dim ws As Worksheet: Set ws = Worksheets("Store")
Dim val As String
val = ws.Cells(12, 7).value
'This code tests the value in cell G12 to verify that it is a number.
Dim testnum
testnum = IsNumeric(val)
'If the value passes the test, the macro sends the number and
'the name of the I/O point to the WriteToPac function.
If testnum = True Then
Dim sendVal As String
sendVal = Module1.WriteToPac("ios/analogOutputs/Heater/eu", val)
'When the code runs successfully, the value of Heater is updated.
If sendVal = "Success" Then
ReadAnalogOutput
Else
MsgBox ("Error: " & sendVal)
End If
Else
MsgBox ("Please enter an integer value in cell G12")
End If
End Sub

PAGE 34
OPTO 22 • 800-321-6786 • 1-951-695-3000 • www.opto22.com • [email protected]
© 2012–2017 Opto 22. All rights reserved. Dimensions and specifications are subject to change. Brand or product names used herein are trademarks or registered trademarks of their respective companies or organizations.
Form 2229-170824
Using the SNAP PAC REST API with Excel
Programming Architecture
Your automated chart will read the True/False state of a global variable to indicate if a timer is active, and to
invoke a function that gets and plots data. This code consists of global variables, macros, and functions, all of
which you’ll code in Module1.
The Start button instructs the code to call a function after10 seconds. That function checks if timerActive is
True, and if it is, the function gets the data, adds it to the worksheet, and updates the chart. Lastly, the code
sets the function to repeat every 10 seconds until the user clicks Stop.
1. Create Start and Stop buttons
1. In Excel, open the Developer tab.
2. Use the Insert menu to select the button control, and then place it in cell A16.
3. Change the button’s label to “Start”.
4. Repeat the process to create a “Stop” button in cell A17.
2. Draw a chart graphic
1. In Excel, click the Insert tab (—not the Insert menu on the Developer tab).
2. In the Charts group, click Scatter, and then select Scatter with Straight Lines and Markers. Drag the new
chart next to the Start and Stop buttons.
3. Resize the chart so that it doesn’t extend beyond row 31.
4. Right-click the chart and choose Select Data.

OPTO 22 • 800-321-6786 • 1-951-695-3000 • www.opto22.com • sales@opto22.com
© 2017 Opto 22. All rights reserved. Dimensions and specifications are subject to change. Brand or product names used herein are trademarks or registered trademarks of their respective companies or organizations.
PAGE 35
Form 2229-170824
Using the SNAP PAC REST API with Excel
5. With the Select Data Source dialog box open, select cells B31:C41 in the Store worksheet. The range is
displayed in the Chart data range field.
6. Click OK.
7. Rename the chart’s name property to “temptrend”. The easiest way to do this is to:
a. Right-click the chart to enable the Chart Tools tab.
b. Click the Chart Tools Layout tab, and then click Properties.
c. In the Chart Name field, type: temptrend
3. Create global variables and macros in Module 1
1. Open the Module1 Code window and scroll to the top. At the very top of the window, add this code:
Public timerActive As Boolean
Public timerInterval As Date
You’ll set timerActive to determine whether the data collection function runs.
timerInterval will contain the delay period.
2. Scroll to the end of Module1, and then add the following code that creates macros for the Start and Stop
buttons. Note that you’re creating the macros in Module1 instead of in a Sheet; this way, the macros will
have access to the timerActive and timerInterval global variables.
'The startTimer macro starts a timer that invokes
'the WriteToChart macro (below) every 10 seconds
Sub startTimer()
timerActive = True
timerInterval = "0:00:10"
First, right-click the chart to select it. Handles appear around its border.

PAGE 36
OPTO 22 • 800-321-6786 • 1-951-695-3000 • www.opto22.com • [email protected]
© 2012–2017 Opto 22. All rights reserved. Dimensions and specifications are subject to change. Brand or product names used herein are trademarks or registered trademarks of their respective companies or organizations.
Form 2229-170824
Using the SNAP PAC REST API with Excel
count = 0
Application.OnTime Now() + TimeValue(timerInterval), "WriteToChart"
End Sub
'The stopTimer macro stops the timer
Sub stopTimer()
timerActive = False
End Sub
'The WriteToChart macro invokes the built-in "Application.OnTime"
method
'that schedules the WriteToChart to run every 10 seconds
Sub WriteToChart()
If timerActive Then
MsgBox ("timer on")
Else
MsgBox ("timer off")
End If
End Sub
3. Save your VBA project.
4. Assign the startTimer macro to your Start button.
5. Assign the stopTimer macro to your Stop button.
6. Test your startTimer macro.
In 10 seconds, your WriteToChart function should run and display the “timer on” message.
7. Close the message.
8. To test the false path, click the Start and then quickly click Stop.
In 10 seconds, you should see the “timer off” message. (If you don’t, look to see if it’s behind an active
window.)
4. Extend the example
Next, you’ll add code that perpetuates the timer and inserts rows into the worksheet.
1. In the WriteToChart macro, comment out: MsgBox ("timer on")
2. Pop-up messages can be a problem when you expect a function to repeat. Instead of showing a
message that must be answered, you’ll show a changing variable in your worksheet.
Below
'MsgBox ("timer on"), insert this code:
Dim ws As Worksheet: Set ws = Worksheets("Store")
'Application.OnTime runs a function at the time specified in its
'first parameter. Now() retrieves the current time.
'TimeValue() instructs the application to interpret the text string
'in "timerInterval" as a time variable.
'By adding the timer interval to Now(), you've told Excel to run
'the function 10 seconds from now, and repeat as long as the
'boolean variable timerActive is true.
Application.OnTime Now() + TimeValue(timerInterval), "WriteToChart"
'You've seen this code before—it gets data from the PAC.
Dim val As String
val = ReadPAC("ios/analogInputs/Store_Temperature/eu")
'And here's a repeat of the code that sends the data to be parsed.

OPTO 22 • 800-321-6786 • 1-951-695-3000 • www.opto22.com • sales@opto22.com
© 2017 Opto 22. All rights reserved. Dimensions and specifications are subject to change. Brand or product names used herein are trademarks or registered trademarks of their respective companies or organizations.
PAGE 37
Form 2229-170824
Using the SNAP PAC REST API with Excel
If (strResp <> "ERROR") Then
Dim json As Object
Set json = JsonConverter.ParseJson(val)
Dim tempStr As String
tempStr = json("value")
End If
'This code puts the returned value into cell B32.
ws.Cells(32, 2).value = Time
'This built-in Excel function waits 2 seconds (so you can
'see the time in B32). In a real application, you would omit
'this delay (unless you really need it).
Application.Wait (Now + TimeValue("0:00:02"))
'This statement inserts a row that moves the previous time
'down to make room for the updated time B32.
ws.Cells(32, 1).EntireRow.Insert
3. Save your VBA project.
4. Test your function. (Return to your worksheet and click Start.)
After 10 seconds, you should see the time in cell B33, and updated every 10 seconds. Stop the chart, and
when the “timer off” message is displayed (after 10 seconds), click OK. If you don’t see the “timer off”
message, look for it behind the active window.
5. Update chart
1. Add the following code below the line, ws.Cells(32, 1).EntireRow.Insert
'This statement declares the chart object named temptrend
Dim myShape As Shape: Set myShape = ws.Shapes("temptrend")
'This statement assigns its data to cells B32:C42.
myShape.Chart.SetSourceData Range(ws.Cells(32, 2), ws.Cells(42, 3))
2. In Excel, click the start button to test your function, and then and wait for 10 values to be collected. (After
Excel plots several readings, it automatically adjusts the chart’s scaling.)
3. To see trending changes in the chart, change the temperature by using the controls you created in
“Write to Analog Outputs” on page 32.

PAGE 38
OPTO 22 • 800-321-6786 • 1-951-695-3000 • www.opto22.com • [email protected]
© 2012–2017 Opto 22. All rights reserved. Dimensions and specifications are subject to change. Brand or product names used herein are trademarks or registered trademarks of their respective companies or organizations.
Form 2229-170824
Using the SNAP PAC REST API with Excel
SUMMARY
You created an Excel macro-enabled workbook that allows you to do the following from an Excel worksheet:
• Read analog and digital input and output points.
• Write to analog and digital output points.
• Parse JSON text strings.
• Check for input and return errors.
• Collect data on an automated interval.
• Display data in an Excel chart.
You can also use the macro-enabled Excel chart, Opto22_ReadingWritingSamples.xlsm, to construct API calls
using both the SNAP PAC REST API and the groov API.
