
EDRS Local Registrar User Manual
Michigan Department of Information Technology
Local Registrar/Staff
User Manual
Michigan EDRS
(Electronic Death Registration System)
February 2020
2.7

EDRS Local Registrar/Staff User Manual Michigan EDRS Project
EDRS Local Registrar User Manual
2
COPYRIGHT INFORMATION
Copyright © 2010 State of Michigan
All rights reserved. This publication is protected by copyright and international treaty. No part of this publication
may be reproduced in any form by any means without prior written authorization from Michigan Office of the
State registrar, Michigan Department of Health and Human Services.
February 2020

EDRS Local Registrar/Staff User Manual Michigan EDRS Project
EDRS Local Registrar User Manual
3
CONTENT
MICHIGAN DEPARTMENT OF INFORMATION TECHNOLOGY ............................................................................. 1
COPYRIGHT INFORMATION.............................................................................................................................................. 2
CONTENT ................................................................................................................................................................................. 3
REVISION HISTORY .............................................................................................................................................................. 6
INTRODUCTION ..................................................................................................................................................................... 7
1.1 PURPOSE ...................................................................................................................................................................... 7
1 REGISTERING FOR EDRS ACCESS ................................................................................................................................ 7
1.1 REGISTERING AS A MILOGIN USER .............................................................................................................................. 7
2 ACCESSING EDRS ........................................................................................................................................................ 10
2.1 MILOGIN SCREEN ...................................................................................................................................................... 10
2.2 THE MILOGIN APPLICATION PORTAL ........................................................................................................................ 10
2.3 TERMS & CONDITIONS: ELECTRONIC DEATH REGISTRY SYSTEM .............................................................................. 12
2.4 LOGGING IN USING MULTIFACTOR AUTHENTICATION (MFA) ................................................................................... 13
2.4.1 Multifactor Authentication (MFA) .................................................................................................................... 13
2.4.2 Enter Passcode .................................................................................................................................................. 14
2.5 PRIVACY AGREEMENT ............................................................................................................................................... 14
2.6 ORGANIZATION/LOCATION SELECTION ...................................................................................................................... 15
3 LOCAL REGISTRAR OVERVIEW ................................................................................................................................. 16
3.1 LOCAL REGISTRAR (LR) ............................................................................................................................................ 16
4 LOCAL REGISTRAR’S HOME PAGE FEATURES ...................................................................................................... 17
4.1 HOME SCREEN ........................................................................................................................................................... 17
4.2 CASE MANAGEMENT .................................................................................................................................................. 18
4.2.1 Search Filter Screen .......................................................................................................................................... 18
4.2.1.1 Search Result Screen ........................................................................................................................................................19
4.2.1.2 View Death Record Details (Last Name link on Search Results screen) .......................................................................19
4.2.1.3 View Case Summary Screen (Search Results screen) ....................................................................................................20
4.2.2 Register Record Filed on Paper ....................................................................................................................... 20
4.2.3 Print Blank Forms ............................................................................................................................................. 21
4.2.4 Reports .............................................................................................................................................................. 22
4.3 ADMINISTRATION ....................................................................................................................................................... 23
4.3.1 File Number Settings ........................................................................................................................................ 23
4.3.2 Work Queue Manager ...................................................................................................................................... 23
4.4 WORK QUEUES .......................................................................................................................................................... 24
4.4.1 Using Your Work Queues .................................................................................................................................. 24
4.5 MESSAGES ................................................................................................................................................................. 26
4.5.1 Message Inbox ................................................................................................................................................... 26
4.5.2 Message Inbox – View Message ........................................................................................................................ 27
5 DEATH RECORD TABS AND BUTTONS ...................................................................................................................... 28
5.1 CERTIFICATE OF DEATH ............................................................................................................................................. 28
5.1.1 Certificate of Death Action Buttons................................................................................................................... 28
5.1.2 Edit Death Case ................................................................................................................................................ 29
5.2 ACTIVITY HISTORY .................................................................................................................................................... 30
5.3 COMMENTS ................................................................................................................................................................ 30
5.4 MESSAGES ................................................................................................................................................................. 30
5.4.1 Send Message .................................................................................................................................................... 30
5.4.2 Message History ................................................................................................................................................ 31
5.5 IMAGES ...................................................................................................................................................................... 32
5.5.1 Scan Image ........................................................................................................................................................ 32
5.5.2 Image History .................................................................................................................................................... 33
5.6 INFO (DEATH RECORD INFORMATION) ....................................................................................................................... 33

EDRS Local Registrar/Staff User Manual Michigan EDRS Project
EDRS Local Registrar User Manual
4
5.7 CORRECTIONS (HISTORY) .......................................................................................................................................... 33
5.8 RUN ERROR CHECKS ................................................................................................................................................. 34
6 ACCEPTING AND FILING RECORDS ........................................................................................................................... 34
6.1 ACCEPTING AND FILING RECORDS ............................................................................................................................. 34
6.1.1 Accessing a Ready to be Filed Death Record .................................................................................................... 35
6.1.2 Reviewing a Death Certificate for Filing .......................................................................................................... 36
6.1.3 Accepting and Filing a Death Certificate .......................................................................................................... 37
6.1.4 Assigning File Numbers to a Death Certificate ................................................................................................. 37
6.2 CONFIRMING DEATH RECORD STATUS ...................................................................................................................... 38
6.3 PRINTING ABSTRACTS AND CERTIFICATES ................................................................................................................. 39
6.3.1 State registrar (SR) ............................................................................................................................................ 39
7 REGISTER RECORD FILED ON PAPER ....................................................................................................................... 41
7.1 REGISTER RECORD FILED ON PAPER (SEARCH FOR POTENTIAL MATCHES) ................................................................ 41
7.1.1 No Potential Matches Found ............................................................................................................................. 41
7.2 ADD CERTIFICATE OF DEATH ..................................................................................................................................... 42
7.2.1 Entering information into the Death Certificate ............................................................................................... 42
7.2.1.1 Completing Decedent Identification Information .............................................................................................................42
7.2.1.2 Location of Death & Residence Information ....................................................................................................................43
7.2.1.3 Birth Place & Ancestry .....................................................................................................................................................43
7.2.1.4 Parental Information .........................................................................................................................................................43
7.2.1.5 Informant Information ......................................................................................................................................................44
7.2.1.6 Disposition........................................................................................................................................................................44
7.2.1.7 Certification ......................................................................................................................................................................44
7.2.1.8 Cause of Death .................................................................................................................................................................45
7.2.1.9 Medical Examiner ............................................................................................................................................................45
7.2.2 Death Case Saved Successfully ......................................................................................................................... 46
7.2.3 Errors ............................................................................................................................................................... 46
7.2.4 Scanning Documentary Evidence ...................................................................................................................... 46
8 FILE NUMBER SETTINGS ............................................................................................................................................... 47
8.1 FILE NUMBER SETTINGS (LOCAL REGISTRAR ONLY) ................................................................................................. 47
8.1.1 Create File Number Settings ............................................................................................................................. 47
8.1.2 Void File Number Settings ................................................................................................................................ 48
8.1.3 Look up Voided File Numbers ........................................................................................................................... 48
10 WORK QUEUES ............................................................................................................................................................... 49
10.1 WORK QUEUE MANAGER....................................................................................................................................... 49
10.2 ADD NEW WORK QUEUE ....................................................................................................................................... 50
10.2.1 How to set up a Ready for Filing Work Queue .................................................................................................. 51
10.2.1.1 Naming the Ready for Filing Work Queue ..................................................................................................................51
10.2.1.2 Customizing the Ready for Filing Work Queue ...........................................................................................................51
10.2.1.3 Assign Users ................................................................................................................................................................51
10.2.2 How to set up a Correction Request Work Queue ............................................................................................. 52
10.2.2.1 Naming the Correction Request Work Queue ..............................................................................................................52
10.2.2.2 Customizing the Correction Request Work Queue.......................................................................................................52
10.2.2.3 Assigned Users .............................................................................................................................................................53
10.2.3 Edit Existing Work Queue ................................................................................................................................. 53
10.2.3.1 Adding a User ..............................................................................................................................................................53
10.2.3.2 Changing Queue Criteria ..............................................................................................................................................54
11 ELECTRONIC CORRECTION REQUESTS ................................................................................................................ 54
1.1 ACCEPTING A CORRECTION REQUEST ........................................................................................................................ 54
1.1.1 Compare the Correction Request ...................................................................................................................... 55
1.1.2 Accept or Reject the Correction Request ........................................................................................................... 56
1.1.3 Notification of Correction Acceptance .............................................................................................................. 56
12 EXITING EDRS ................................................................................................................................................................. 57
2.1 EDRS LOG OUT: ........................................................................................................................................................ 57
APPENDIX A CHECKLIST FOR ACCEPTING A RECORD ........................................................................................ 58


EDRS Local Registrar/Staff User Manual Michigan EDRS Project
EDRS Local Registrar User Manual
6
REVISION HISTORY
Name
Date
Reason For Changes
Versio
n
Liby A George
11/05/2008
Original Version
1.0
Jim Monkiewicz
11/18/2009
Version updates
1.1
Jim Monkiewicz
11/23/2009
Version updates
1.2
Jim Monkiewicz
11/24/2009
Version updates
1.3
Jim Monkiewicz
02/16/2010
Update to UG Standard Document format
1.43
Jim Monkiewicz
03/24/2010
Update to latest EDRS version
2.0
Michigan Public Health Institute
12/05/2014
Update to latest EDRS version
2.1
Michigan Public Health Institute
02/04/2015
Update to latest EDRS version
2.2
Michigan Public Health Institute
02/22/2016
Update to latest EDRS version
2.3
Michigan Public Health Institute
01/30/2017
Update to latest EDRS version
2.4
Michigan Public Health Institute
12/18/2017
Update to latest EDRS version
2.5
Michigan Public Health Institute
10/16/2019
Updates to EDRS Login Section
2.6
Michigan Public Health Institute
02/05/2020
Updates to EDRS Images
2.7

EDRS Local Registrar/Staff User Manual Michigan EDRS Project
EDRS Local Registrar User Manual
7
INTRODUCTION
1.1 Purpose
The purpose of this document is to provide the local registrar and his/her staff with step-by-step
instructions on how to use the Michigan Electronic Death Registration System (EDRS). The
material contained in this manual covers those areas that are pertinent to local registrars and the
processing of death cases.
Though the material is intended to be as complete as possible, it will certainly not cover all
situations or problems that will arise. When you are confronted with an issue or problem and
you are not sure what course to follow, you can contact the State Vital Records office for
assistance.
1 REGISTERING FOR EDRS ACCESS
In order to access EDRS, each authorized individual will need to register as a State of Michigan
MILogin user. MILogin registration and subsequent access to an active account will be done through
your PC's web browser at https://milogintp.michigan.gov.
1.1 Registering as a MILogin User
As a new, first-time user, you will need to request a User ID from the MILogin screen using the
Sign Up button.

EDRS Local Registrar/Staff User Manual Michigan EDRS Project
EDRS Local Registrar User Manual
8
A new screen will be displayed requesting personal identification information about you in order
to complete your MILogin registration. Enter the required information, answer the verification
question, and click the terms & conditions link to read the terms & conditions.
Once all required fields are complete and you have checked the box indicating you agree to the
terms & conditions, click the Next button.
Please note: Fields marked with an asterisk (*) are required fields.

EDRS Local Registrar/Staff User Manual Michigan EDRS Project
EDRS Local Registrar User Manual
9
Next, create a User ID and Password using the guidelines listed on the website.
You will also need to select one or more of the Security Options (Email, Mobile (Text/SMS),
and/or Security Question). Once you have created your User ID and password, and selected your
security option(s), click the Create Account button to continue. You will receive a message that
‘Your account has been successfully created.’ Your email address, phone number, and/or mobile
number will also be used for multifactor authentication (MFA).
The page will refresh. Click the Login to your account link to continue the process.
Please note: In your email inbox, you will receive a confirmation email from
[email protected]. This email will contain the User ID that you just created. A link to the
Helpdesk information and a contact number will also be provided in the email.

EDRS Local Registrar/Staff User Manual Michigan EDRS Project
EDRS Local Registrar User Manual
10
2 ACCESSING EDRS
2.1 MILogin Screen
Whenever you use EDRS in the future, return to https://milogintp.michigan.gov. Enter your
assigned User ID and password, then click the Login button.
Please note: Do not save User ID and password in your browser.
If you have forgotten your password, enter your User ID and click the Forgot your password?
link. You will be contacted in the manner that you selected in your initial registration. A new
temporary password will be issued. MILogin will redirect you to a page to change your
password.
2.2 The MILogin Application Portal
Once you have successfully logged in, the Application Portal screen will be displayed. You
must have the Electronic Death Registry System link available in order to access EDRS. If the
link does not appear on the application list, then either the application has not yet been approved
or you have not yet requested your subscription to EDRS. You will need to request access to
EDRS by clicking on Request Access from your home page.
EDRS Local Registrar/Staff User Manual Michigan EDRS Project
EDRS Local Registrar User Manual
11
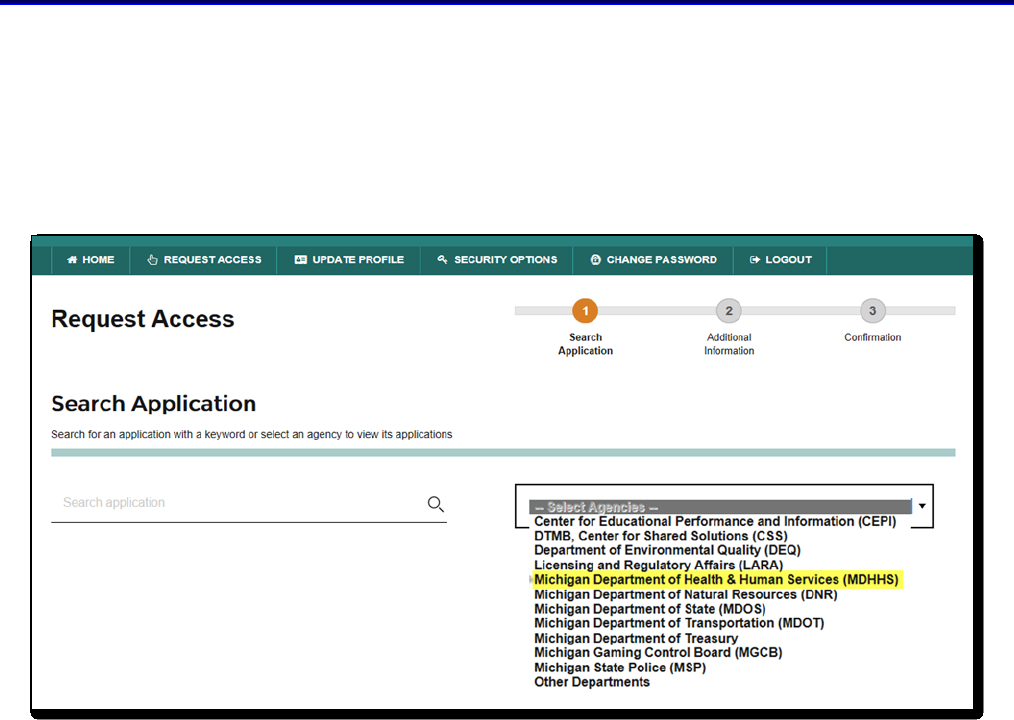
There are two options when selecting an application:
Either type your search criteria in the Search Application field, then click the Search button,
OR click the Michigan Department of Health & Human Services option in the agency list.
Then select the Electronic Death Registry System option. Once you have selected the
Electronic Death Registry System application, click the Request Access button.
You will also need to complete and sign an MDHHS Security Agreement prior to using EDRS.
Please note: Subscription requests will normally be approved within 1-2 business days. Once
you receive a subscription approval email, you may begin using the EDR System.

EDRS Local Registrar/Staff User Manual Michigan EDRS Project
EDRS Local Registrar User Manual
12
2.3 Terms & Conditions: Electronic Death Registry System
Terms & Conditions: Electronic Death Registry System Notification page will appear every time
you log into the EDRS application. This notification is asking you to agree to the terms of use
regarding the electronic system. Please read through this information carefully so that you have a
full understanding of the system user expectations. Click the Acknowledge/Agree button to
continue.

EDRS Local Registrar/Staff User Manual Michigan EDRS Project
EDRS Local Registrar User Manual
13
2.4 Logging in Using Multifactor Authentication (MFA)
To help maintain the highest possible security, EDRS has incorporated the use of Multifactor
Authentication (MFA) as part of the login process, using email, phone call, or text messaging.
2.4.1 Multifactor Authentication (MFA)
After logging in and acknowledging the Terms & Conditions, you will be presented with the
available options. The MFA options displayed will depend on your MILogin account. Select
your desired option, and you will receive a code.

EDRS Local Registrar/Staff User Manual Michigan EDRS Project
EDRS Local Registrar User Manual
14
2.4.2 Enter Passcode
Enter the passcode that you receive, and click Submit to complete login. This process will
need to be done once per day.
2.5 Privacy Agreement
Once you have selected the Electronic Death Registry System application and completed
Multifactor Authentication, you will see the Privacy Agreement screen below. You will need to
read this screen carefully and thoroughly the first time you use the system and before clicking on
the Accept button.
Please note: You must accept the Privacy Agreement in order to gain access to EDRS. If the
Decline button is selected, you will be returned to the main MiLogin screen.

EDRS Local Registrar/Staff User Manual Michigan EDRS Project
EDRS Local Registrar User Manual
15
2.6 Organization/Location Selection
In the event that you are associated with more than one facility you will be presented with an
Organizations & Locations page every time you log into the application. You can then select an
organization from the list and then click the Proceed button, which allows you to process
electronic death records for that facility. However, in the event that you only work in one
location then you will never see this option and you will be taken directly from the Privacy
Agreement page to your Home page.
EDRS Local Registrar/Staff User Manual Michigan EDRS Project
EDRS Local Registrar User Manual
16
3 LOCAL REGISTRAR OVERVIEW
This section is intended as a brief snapshot of the local registrar role in reviewing, accepting, and filing a
death record. This represents one possible scenario for using EDRS. Other available options are
described in subsequent chapters of the manual.
3.1 Local Registrar (LR)
EDRS will automatically route death records at the work flow step Ready for Filing to the
correct jurisdiction when the personal and medical sections of the record have been certified.
The local registrar will review all submitted death data (See Section 7 Accepting and Filing
Records). The local registrar will number and file the record. The record will remain available
for editing for 30 days. After this time, the record will be automatically sent to the State
Registrar for review.
Please Note: In the event that you are a city clerk, records will automatically be routed to your
work queue when the workflow step reaches Ready for City Filing, then automatically routes to
the County and State appropriately.

EDRS Local Registrar/Staff User Manual Michigan EDRS Project
EDRS Local Registrar User Manual
17
4 LOCAL REGISTRAR’S HOME PAGE FEATURES
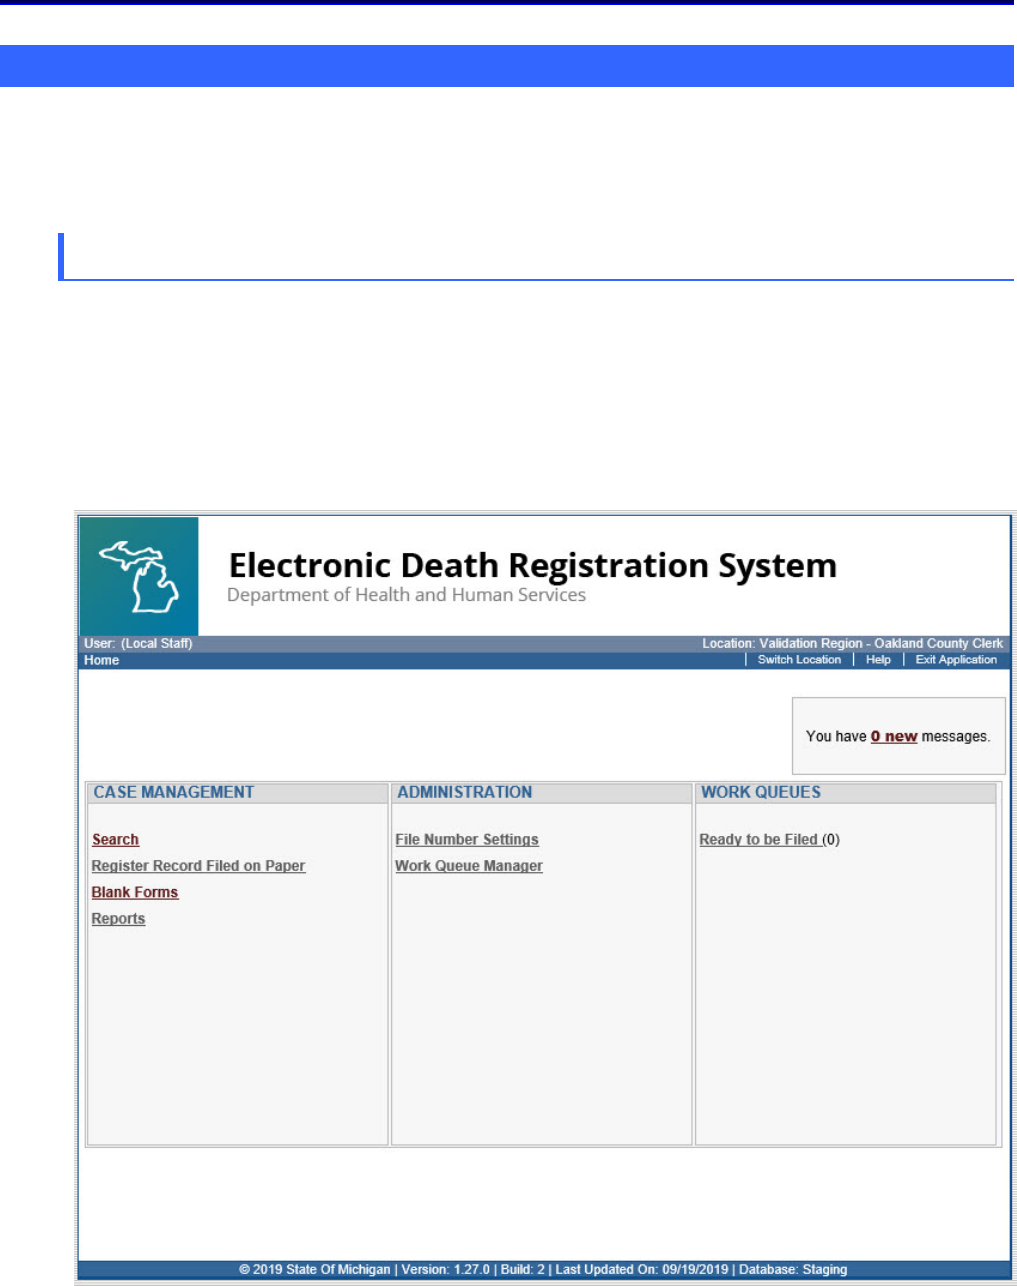
4.1 Home Screen
Each time you log into EDRS, the local
registrar’s Home screen will appear. Several
options are available depending on what
access privileges you have been granted. The
Help link located at the top right hand side of
the User Identification bar is available for
general help information. Clicking on the
underlined hyperlinks will provide access to
perform any required tasks.
Four general areas of the user Home screen
(Listed Below) are available for your use:
#
Area
Description
1
The CASE MANAGEMENT area offers tools to manage and
perform operations on death cases currently associated with your
office. The tools listed have been assigned based on your
assigned role and privileges.
2
The ADMINISTRATION area provides tools to manage EDRS
activities within your office. You will only see tools available to
you based on your role and privileges.
3
The WORK QUEUES area identifies those groupings of tasks
(queues) assigned to you or your work team. The queues can be
managed by you or the local User Manager.
4
Use of the # new link will provide access to your EDRS secure
messages. Messages may include comments or information.

EDRS Local Registrar/Staff User Manual Michigan EDRS Project
EDRS Local Registrar User Manual
18
4.2 Case Management
The Case Management area provides tools associated with common death record processing
tasks.
4.2.1 Search Filter Screen
Clicking the Search link on the Home screen will display the Search Filter screen. For the
local registrar, local staff, or city clerk, the value for County of Death or City of Death will
be automatically filled according to the user manager profile information. Values may be
added to the available fields to narrow down the search results.
You must search for a record by typing information in one or more of the following fields:
Last Name, SSN, State File Number, or Local File Number. If you fail to put values in one of
these fields, you will receive an error message and will not be allowed to perform your
search.
If you are searching for a death case by the decedent’s name, then you may use the % symbol
as a wildcard search feature. A letter must be first entered before the % is used. Letters may
follow the % to further narrow the search results (e.g., entering J%n in the First Name field
would find all records for John, Jon, Jan, etc.). The wildcard search will not work when
searching by name if the Last Name field is blank.
As the example above illustrates, search filters have been set as: a Last Name beginning with
S followed by the % wildcard character, a First Name beginning with J followed by %.
You will receive an error if % is only used or if % is used before any letter. If no results are
found, the message “No matching records found for the search criteria” will appear. The
% can only be used in First or Last Name search fields.
Please Note: You will only be able to search for records that are in your jurisdiction.

EDRS Local Registrar/Staff User Manual Michigan EDRS Project
EDRS Local Registrar User Manual
19
4.2.1.1 Search Result Screen
The screen below is a sample list of death cases that matched the search criteria entered.
The user may choose to view the summary and may do this by clicking on the View link.
You may view the actual death certificate by clicking on the Last Name link. If you
choose to modify your search pick the Modify Search button. You will then be returned
to the Search screen so that the original search criteria can be modified.
4.2.1.2 View Death Record Details (Last Name link on Search Results screen)
To view a death record you would click on the Last Name link on the Search Results
screen (See Image 1). A screen similar to the example below will be displayed (See
Image 2). Using the tabs at the top of the death certificate you can perform various
actions on the death certificate (See Section 6 Death Record Tabs).
Image 2
Image 1

EDRS Local Registrar/Staff User Manual Michigan EDRS Project
EDRS Local Registrar/Staff User Manual
20
4.2.1.3 View Case Summary Screen (Search Results screen)
If you click the View link in the Search Results screen (See Image 1), a screen similar to
the one below will appear (See Image 2). This screen provides the case summary and
contact information for the individuals responsible for the death case.
4.2.2 Register Record Filed on Paper
The Register Record Filed on Paper link can be used to input paper death certificates that
have not previously been filed into the Electronic Death Registration System. The Register
Record Filed on Paper link is located on the Home screen under Case Management (See
Section 8 Register Record Filed On Paper).
Image 1
Image 2

EDRS Local Registrar/Staff User Manual Michigan EDRS Project
EDRS Local Registrar/Staff User Manual
21
4.2.3 Print Blank Forms
Choosing the Print Blank Forms link from the local registrar Home screen will display a list
of the available blank forms that may be printed. You may choose any of the available forms
by clicking on the underlined name of the form. The form displayed below is a Michigan
Certificate of Death form. The form can be viewed, printed, or saved in the PDF format.
Other options available include zoom in/out and moving between pages on multi-page forms.

EDRS Local Registrar/Staff User Manual Michigan EDRS Project
EDRS Local Registrar/Staff User Manual
22
4.2.4 Reports
EDRS provides several standardized reports for use by local registrars to help manage and
monitor local death processing information. Appropriate roles and privileges are required in
order to access or customize reports.

EDRS Local Registrar/Staff User Manual Michigan EDRS Project
EDRS Local Registrar/Staff User Manual
23
4.3 Administration
4.3.1 File Number Settings
Local registrars are provided with the option to change the file number settings associated
with their local jurisdiction. File number settings can be established for your County and City
requirements (See Section 9 File Number Setting).
4.3.2 Work Queue Manager
The work queues area identifies those groupings of tasks (queues) assigned to you or your
work team. As a local registrar, it will be helpful to have work queues created to identify
records that require review by your office. The Work Queue Manager link allows you to
create a work queue from scratch and see a completed list of work queues you have already
created (See Section 10 Work Queues).

EDRS Local Registrar/Staff User Manual Michigan EDRS Project
EDRS Local Registrar/Staff User Manual
24
4.4 Work Queues
4.4.1 Using Your Work Queues
Clicking a Work Queue on the Home screen (for example, Filed in the sample screen below)
will open your Work Queues screen.
Once the Work Queues screen is displayed, you may navigate to other work queues by
choosing them from the drop-down list next to the Work Queue field (See Image Below).
You have the option to sort the death cases in your work queue by selecting a descriptor in
the Sort By drop-down and clicking the Apply Filter button.
A listing of death cases meeting the criteria set when the work queue was created will be
displayed. Death cases are accessed by clicking on the underlined Decedent Name link.
Choosing the Close button will return you to your Home screen.

EDRS Local Registrar/Staff User Manual Michigan EDRS Project
EDRS Local Registrar/Staff User Manual
25
Once an electronic record has been selected, the Death Case View screen will be displayed.
You may then review the record and its supporting information and determine the
appropriate action to follow in your death case process.
EDRS Local Registrar/Staff User Manual Michigan EDRS Project
EDRS Local Registrar/Staff User Manual
26
4.5 Messages
An important tool on the local registrar Home screen is the new message link that provides
access to your EDRS secure messages. Messages may include case communications or
information.
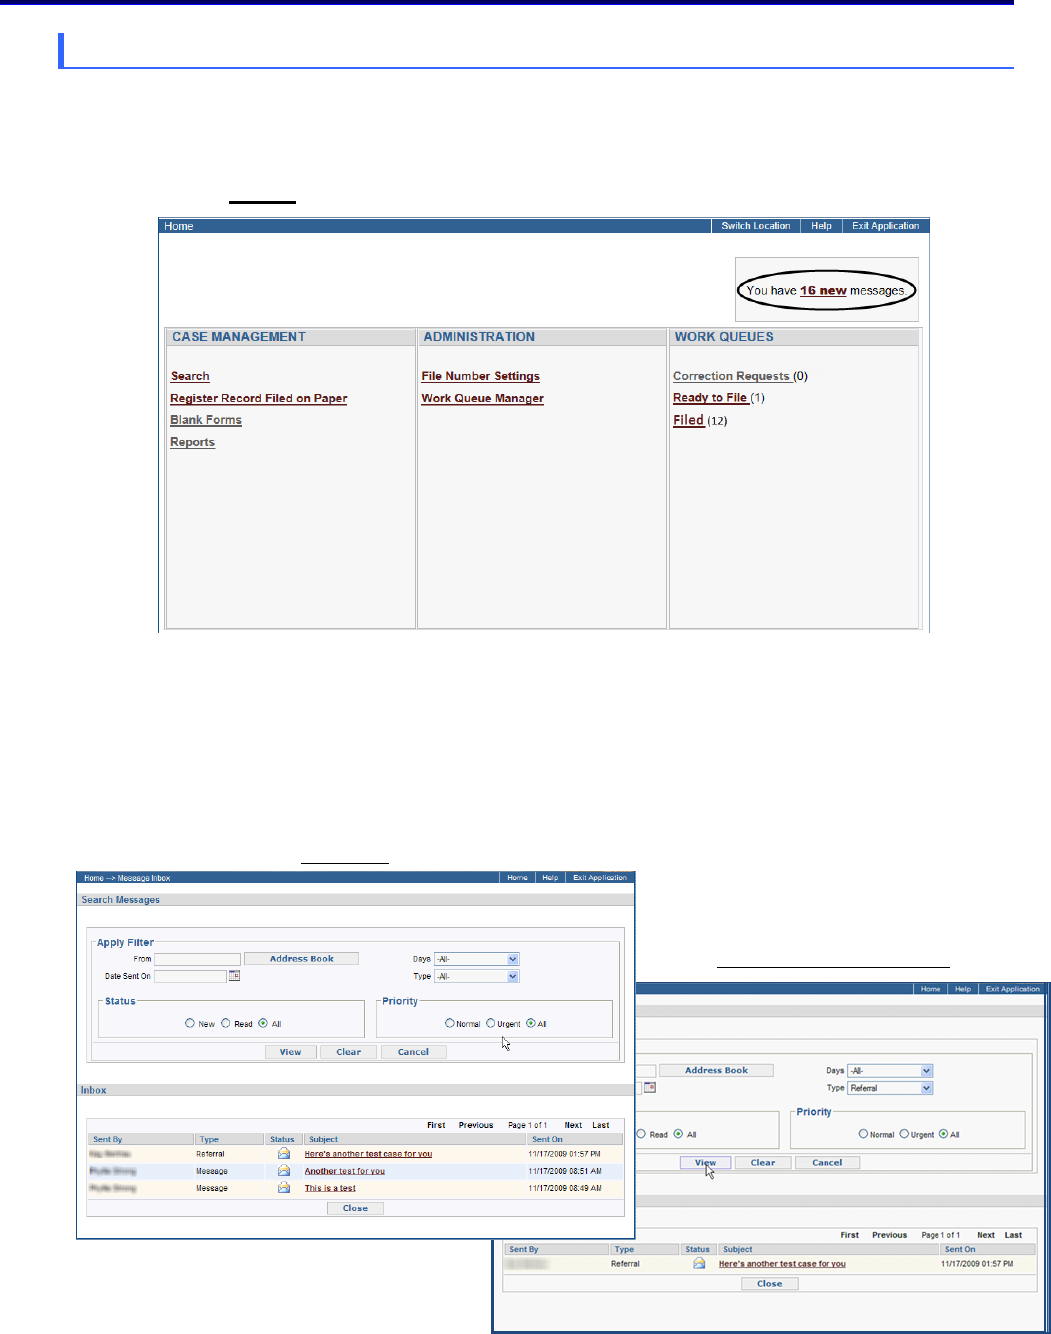
Clicking on the # new link will display your Message Inbox and available messages.
4.5.1 Message Inbox
Your Message Inbox displays all messages sent to you, as well as tools to filter the results to
help focus on your specific requirements. As an example, filters may be applied to limit the
display to selected message types, time periods, originator of the message, Date Sent On, etc.
Unfiltered
Filtered by Type (Referral)

EDRS Local Registrar/Staff User Manual Michigan EDRS Project
EDRS Local Registrar/Staff User Manual
27
The Messaging Inbox is equipped with many features that are designed to assist you with
your daily work flow. One of these features is the ability to search the inboxes of other
employees at your facility. This can be extremely useful in the event that a coworker is out of
the office and cannot log into the application to view their messages every day. The other
staff has the ability to view this content for the coworker.
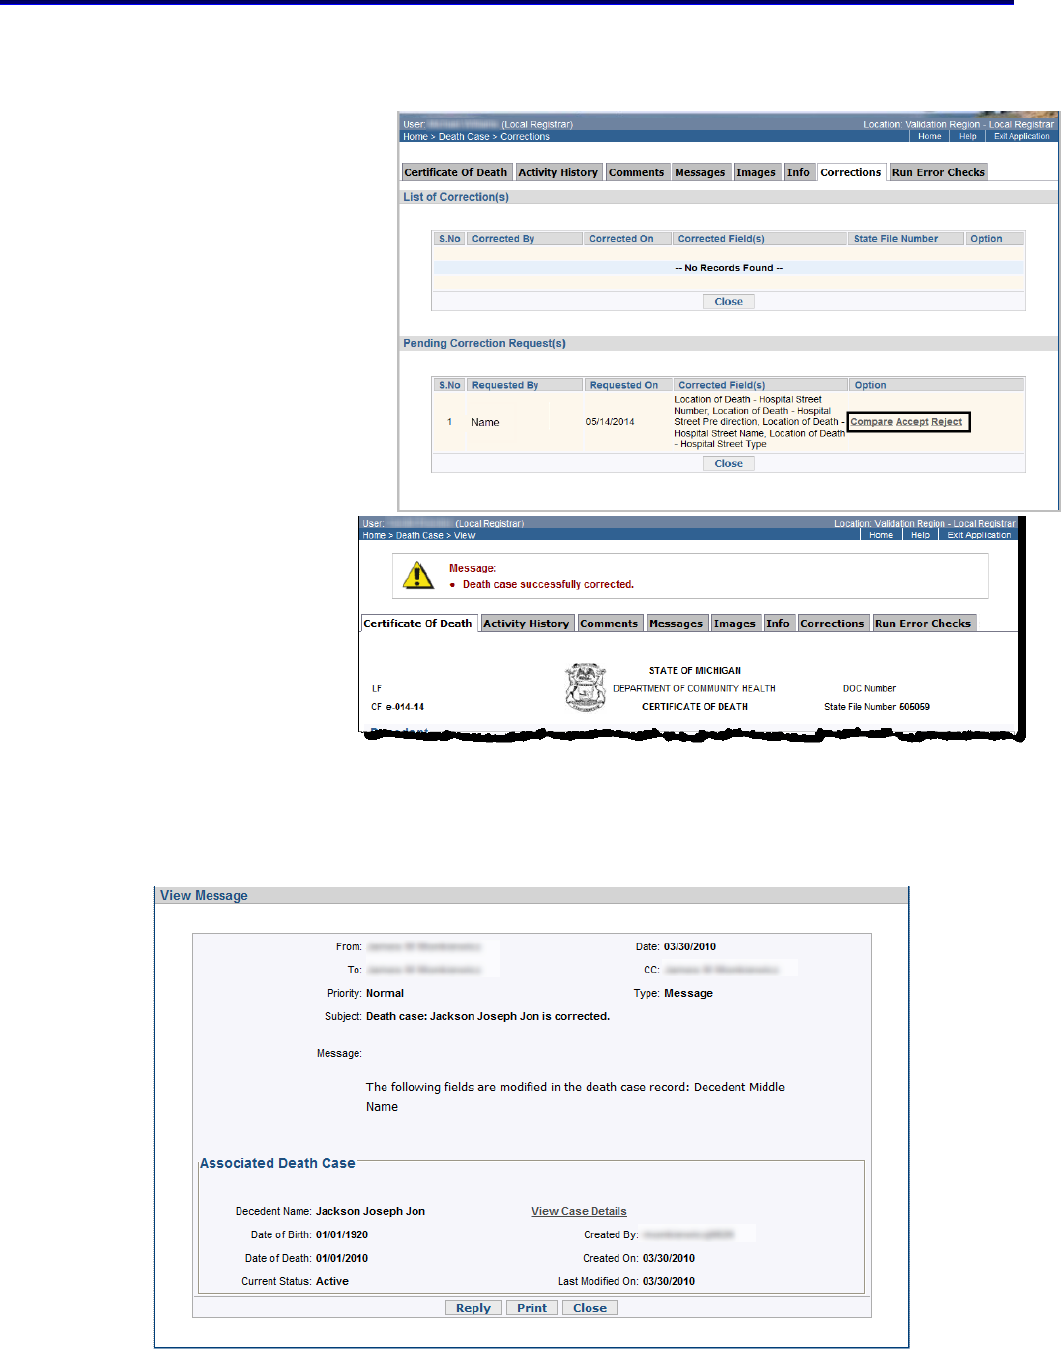
4.5.2 Message Inbox – View Message
When you click on a message Subject link, in the inbox, a copy of the message will be
opened in a new screen. The message includes the originator’s name, date sent, the message
type, the subject, the complete message text and information regarding the associated death
case.
You may use the Reply button to respond back to the sender or print the message using the
Print button. Once you have completed viewing the message, you may click on the Close
button to exit and return to the Message Inbox screen.
You can also view details of a case by clicking on the View Case Summary link under the
Associated Death Case section which takes you into the certificate of death.

EDRS Local Registrar/Staff User Manual Michigan EDRS Project
EDRS Local Registrar User Manual
28
5 DEATH RECORD TABS AND BUTTONS
In addition to the Certificate of Death tab, additional tabs are available, supporting different activities
associated with the death record. Selecting any individual tab will present the requested information or
tool for managing the case. These next sections will detail the features and functions of each tab.
5.1 Certificate of Death
The Certificate of Death tab is the primary launch point for each death record. This is the tab
that is displayed when the death case is initiated. When registering a record filed on paper the
death record opens in the edit mode. When you access a record to review, accept, and file, or
make a correction a series of actions buttons become available at the bottom of the record. As the
case proceeds through the process, the Certificate of Death tab may be in a “Read-Only” state;
meaning that additional input is not permitted until the record is activated for editing (by
selecting the Edit button at the bottom of the screen).
5.1.1 Certificate of Death Action Buttons
As death record sections are certified, then referred or transferred on to others for review and
certification, you may notice that the buttons available at the bottom of the Death Certificate
View screen will change. This is generally based on the current Work Flow Step and Record
Status. The following examples illustrate these context sensitive changes.
Record Status: In Progress/Work Flow Step: Ready for Filing or Ready for City Filing
Register a Record Filed on Paper
Record Status: Active/Work Flow Step: Filed

EDRS Local Registrar/Staff User Manual Michigan EDRS Project
EDRS Local Registrar User Manual
29
The following table identifies and describes buttons that may appear on the Death Certificate
View screen.
Record Status
In Progress
Active
Button
Description
X
X
When the record status is In Progress, the Edit button will
be displayed providing the ability to modify un-filed or
certified death records.
X
When the record is Ready for Filing the Record Status is
In Progress. The Accept and File button will be displayed
providing the ability to accept the record and then become
Filed status.
X
When the record is Ready for Filing the record status is In
Progress. The Decline to File button will be displayed
providing the option to decline the record.
X
X
Printing LR copy/Certified copy /Administrative copy
/Fact of Death/File Copy are available when the record
status is Active. Only File copy is available when record
status is In Progress.
X
The Save button will display when Register Record Filed
on Paper. This button provides the ability to save the record
and it is stored within the EDR system.
X
Once the record is Filed, this button provides you the ability
to retract the record and change the status to Ready for
Filing.
X
X
The Close button is used to return you to the page you were
previously on.
5.1.2 Edit Death Case
Death cases may be edited to correct any errors or omissions. Selecting the Edit button
displays the Death Case Edit screen. Once the corrections or changes are made, you must
click on the Save button to ensure that the changes are saved.

EDRS Local Registrar/Staff User Manual Michigan EDRS Project
EDRS Local Registrar User Manual
30
5.2 Activity History
The Activity History tab displays the list of actions performed on the death case. The list also
details the date the action was performed, who was responsible for the action, and their location.
Clicking on the Certificate of Death tab or the Close button will return you to the certificate of
death.
5.3 Comments
State registration staff uses the Comments tab to indicate any changes made to the record
excluding completion of pending cause records and local registrar staff should enter a comment
if changes are made to the record by their office. Any form of comments you feel that will be
important regarding the death case can be entered here. Once the comments are entered, click on
the Save button to ensure that the comments are saved with the death record. Once saved,
comments cannot be deleted.
A list of any previously entered comments will also be displayed on the Comments screen under
the Comments History section. Clicking on the Certificate of Death tab or the Close button will
return you to the certificate of death.
5.4 Messages
The Messages tab provides the capability for sending messages associated with the currently
active death case. Additionally, your Message History is displayed and options are provided for
managing those messages. Once a message is sent, it cannot be deleted. Clicking on the
Certificate of Death tab or the Close button will return you to the certificate of death.
5.4.1 Send Message
The Send Message section of the Messages tab provides access to the EDRS address book to
select recipients for the message being created. Selecting the Address Book button will
display the address book, with name links/email addresses for other EDRS users. If accessed
from the To line, selecting a Name link will populate the To line with the recipients email
address. The To recipient is a requirement (*) in order to send a message.

EDRS Local Registrar/Staff User Manual Michigan EDRS Project
EDRS Local Registrar User Manual
31
Next, enter a Subject for your message. Try to keep the subject short, but reasonably
descriptive. The message Type (Message or Referral) must also be selected from the drop-
down list. You can also, optionally select a priority for the message.
Finally, you are also required (*) to enter your actual Message body.
5.4.2 Message History
The Message History section of the Messages tab can be used to review and manage
messages associated with the current death case. Information is provided regarding the
originator, recipient, message type, subject and message date. Selecting the Subject link will
display a summary of the original message.

EDRS Local Registrar/Staff User Manual Michigan EDRS Project
EDRS Local Registrar User Manual
32
5.5 Images
Attaching images to an electronic death record is a key factor in working with the Electronic
Death Registration System. This function allows you to upload documentary evidence directly
into the application so that medical staff can attest to medical information certified by the
physician, as well as accurately submit medical corrections. A scanned image is mandatory when
staff attests to the medical information or when submitting a correction request for the medical
section of a death certificate.
5.5.1 Scan Image
First, from the Certificate of Death
screen, select the Images tab from
the top of the death case.
You will be taken to the Images
screen where you will see two sections. The top portion is the Image History, where you will
find any images that have already been uploaded into the system. The bottom portion is the
Attach Image section.
In the Attach Image Section, under Select File Location, click on the Browse or Choose File
button. Select a jpg, tiff, png or PDF file that has been saved to your device. After you have
selected your file, click Upload to attach the file to the record.

EDRS Local Registrar/Staff User Manual Michigan EDRS Project
EDRS Local Registrar User Manual
33
5.5.2 Image History
Once the image has been uploaded, you will see it populate in your Image History at the top
of the page. You will notice 3 icons in the Image History section that offer different functions
you can perform on the attached image. The View icon , when clicked, allows you to get a
clear, visible preview of your document so that you can ensure all fields are legible, nothing
is cut off, and any signatures are evident. The Print icon , when clicked, will allow you to
print out a hard copy of the scanned image. The Delete icon , when clicked, will allow
you to delete a scanned image if you decide that it is not legible, clear, or acceptable.
5.6 Info (Death Record Information)
The Info tab shows all available
information about the death case. For
example, you can see who
created/modified the record and the death
case status. Clicking on the Certificate of
Death tab or the Close button will return
you to the certificate of death.
5.7 Corrections (History)
The Corrections tab will display a complete listing of all corrections performed on the current
record. The List of Correction(s) area of the Corrections screen provides information regarding
the type of corrections performed as well as the specific fields that were corrected. The Pending
Correction Request(s) will display corrections that have not been accepted or rejected (See
Section 11 Electronic Correction Requests).
View Screen
Uploaded Image View (Image History)

EDRS Local Registrar/Staff User Manual Michigan EDRS Project
EDRS Local Registrar User Manual
34
5.8 Run Error Checks
Although running an error check is not a
requirement for local registrars, it is
available to you. Choosing the Run Error
Checks tab provides the current Validation
Status of the death record. You may select
one or all of the sections to validate. Once
your selections are complete, selecting the
Validate button will run the validation
routines and edits against all available data
in the record. Any errors or warnings found
in the death case will be displayed. Errors
must be corrected in order for a record to be
certified; while warnings may not need
correction before the processing of the
record is complete they should be reviewed. If there are
any warnings found, you must click the Ignore
Warning(s) button after reviewing to validate all
sections of the record. Clicking on the Certificate of
Death tab or the Close button will return to the original
death case record.
Please Note: There is also a checkbox available that
you can click to run a spell check for the Cause of
Death section only. Results will be displayed at the
bottom of the screen once the Validate button is clicked.
6 ACCEPTING AND FILING RECORDS
6.1 Accepting and Filing Records
As mentioned before, once a death record is completed by funeral directors, medical certifiers,
and/or medical examiners in EDRS, meaning that the personal and medical sections of a death
certificate have been certified, the record will automatically be sent to the local registrar. Your

EDRS Local Registrar/Staff User Manual Michigan EDRS Project
EDRS Local Registrar User Manual
35
role will be to review the death certificate and determine whether it should be accepted or
rejected for filing.
Work Flow Step
Record Status
Filed
Active
6.1.1 Accessing a Ready to be Filed Death Record
To access a death record that is ready for filing, you will need to retrieve the record from
your Ready to File work queue (you will need to establish your work queues prior to
accepting cases, see Section 10 Work Queues).
On the Work Queues page, you will see a list of the death records that need to be reviewed in
you jurisdiction. Notice the status of the records is still In Progress. Records will continue to
have the In Progress status until you review, accept, and file them. Click on the last name of
the decedent to enter the record.

EDRS Local Registrar/Staff User Manual Michigan EDRS Project
EDRS Local Registrar User Manual
36
6.1.2 Reviewing a Death Certificate for Filing
The Death Case View page displays. To review the record, you will need to ensure it was
completed correctly and you will need to view any attachments associated with the case to
verify that the information that was entered into the electronic system is supported by
documentary evidence (Refer to Appendix A Checklist for Accepting a Record).
To begin reviewing the record, you
will need to do the following:
1. Scroll down through the record to
ensure that all of the required
fields are completed correctly.
2. Look in the Images tab for any
attached images or scroll down to
the Cause of Death field where a camera icon will appear if an image is attached. Click
the camera icon to be taken to the Images tab.
The Death Case Images page displays. In this example, there is an Image. When there are
attachments, you will have to compare the image to the death record to ensure the
documentary evidence matches the information in the electronic record. The View icon ,
when clicked, allows you to get a clear, visible preview of the document so that you can
ensure all fields are legible, nothing is cut off and any signatures are evident. The Print icon
, when clicked, will allow you to print out a hard copy of the scanned image so you can
compare the documentary evidence with the electronic information.

EDRS Local Registrar/Staff User Manual Michigan EDRS Project
EDRS Local Registrar User Manual
37
Please Note: An image is only required when a funeral director or medical staff is attesting
to the medical section. If a certifying physician or medical examiner certified the medical
section through the EDR System, an image is not required. This information can be
confirmed by reviewing the Info tab.
6.1.3 Accepting and Filing a Death Certificate
Once you have finished reviewing the death case and there are no issues, you will need to
accept and file the record. To accept and file the record, you will need to scroll to the bottom
of the death case page and click on the Accept & File button.
Please Note: If there was an issue with the death record, you would click on the Decline To
File button. A pop-up will appear asking for confirmation that you would like to decline to
file, click OK. Another pop-up will appear, enter in the reason you are declining to file the
death certificate. The system will send a message to the licensed funeral director who
certified the case, informing them the record has been declined and the explanation entered
by the user declining to file.
6.1.4 Assigning File Numbers to a Death Certificate
Once you click the Accept & File button you will be taken to the File Number screen, there
are two options for adding the Local (if you are a City Registrar) and County File numbers.
You can select either Automatic or Manual.

EDRS Local Registrar/Staff User Manual Michigan EDRS Project
EDRS Local Registrar User Manual
38
Selecting the Automatic option, the system will generate the next available file number. The
Manual option, when selected, allows you to select the file number format and key in the
information for the file number.
To use the Automatic option, you will need to do the following:
1. Click on the I want to automatically select the next available file number radio
button. The system inserts the next available County File Number or City File Number
depending on your role.
2. Click on the File Case button.
To use the Manual option, you will need to
do the following:
1. Click on the I want to manually specify
the file number radio button.
2. Select the Filing Type and desired
Format.
3. Enter in the file number in the chosen format.
4. Click on the File Case button.
Clicking on the File Case button generates either the City or County and State file numbers.
The State Registrar can now review the record. A message will appear at the top of the
record indicating that the death case has been successfully filed; additionally the record status
is updated to Active.
6.2 Confirming Death Record Status
The death record status can be checked at any time by selecting the Info tab from the Death
Certificate View screen. In our example, the death case Info screen shows that in addition to

EDRS Local Registrar/Staff User Manual Michigan EDRS Project
EDRS Local Registrar User Manual
39
certification of both the personal and medical sections the current EDRS Work Flow Step is
Filed, and the Record Status has been updated to Active. As a result, the record will no longer
appear in the Ready to File work queue.
6.3 Printing Abstracts and Certificates
During day-to-day operations you may need to print certified copies and death record abstract
copies relating to the current case. The screen below will be displayed once the Print button is
selected from the active Death Record screen. Select the number of copies (1 – 10) from each of
the drop-down lists. If copies of both types of documents are desired, the Print link must be
selected for each type of copy. If all the requirements are met you will be able to view and print
the certified copy or death record abstract copy.
6.3.1 State registrar (SR)

EDRS Local Registrar/Staff User Manual Michigan EDRS Project
EDRS Local Registrar User Manual
40
Thirty days after the death record is filed by the local registrar the status changes to
Active/Registered.
The records are automatically added to the State Registrar's queue for subsequent review and
processing. No further process steps are required if the State Registrar review identifies no
additional issues associated with the record. Once the review is completed by the State
Registrar’s office, the workflow step will change to Registered & Accepted.

EDRS Local Registrar/Staff User Manual Michigan EDRS Project
EDRS Local Registrar User Manual
41
7 REGISTER RECORD FILED ON PAPER
The local registrar and staff have the option to take paper death certificates and input them into the
electronic system. This is a very useful function because with the implementation of the electronic filing
process you will most likely still receive some records on paper which may cause you to have two
different filing systems (Paper and Electronic). Bringing every record into the electronic system will
alleviate any concern about potential duplicate file numbers and ensure that all private information is
centralized into one location.
7.1 Register Record Filed on Paper (search for Potential Matches)
On the Home page click on Register Record Filed on Paper based upon previous criteria. The
Search Potential Matches screen is now displayed. This screen is used to confirm that a record
does not already exist within EDRS for the decedent. All required fields (as indicated by the *)
must be filled in to complete the search. Be sure to include appropriate initial capitalization for
First and Last Name information as all search information will be carried over to the Create New
Case screen as the death record is processed. Once all information has been completed, the
Search Potential Matches button is selected to start the search.
7.1.1 No Potential Matches Found
If “…no Potential Matches…” are found, the Create New Case button can be selected.

EDRS Local Registrar/Staff User Manual Michigan EDRS Project
EDRS Local Registrar User Manual
42
7.2 Add Certificate of Death
7.2.1 Entering information into the Death Certificate
Selecting the Create New Case button from Potential Match Results will display the Add
Certificate of Death screen, similar to the example below. The information that was entered
as the original search criteria will automatically be filled into the appropriate fields. You will
only have to enter the additional information required into the remaining fields on the
certificate.
Please Note: The LF number or CF number must be entered manually. You MUST type in the
all the file numbers that apply in order to file.
7.2.1.1 Completing Decedent Identification Information
Beginning with certificate fields 1a through 4, review all transferred information for
accuracy and make any necessary changes.
Review Fields 5 through 6c and fill in any additional required information. Then, move
on to Location and Residence Information section of the Death Record.
Please Note: The button may be used to view online Help associated with each field
on the Death Record input for.

EDRS Local Registrar/Staff User Manual Michigan EDRS Project
EDRS Local Registrar User Manual
43
7.2.1.2 Location of Death & Residence Information
Beginning with Field 7 and continuing through Field 8d, enter any missing information
regarding the Location of Death and Current Residence (not just mailing address) of
the deceased. Notice that because the Location of Death was originally entered as a
Michigan county, the Country, State, and County are already filled in.
7.2.1.3 Birth Place & Ancestry
Field 9 is the next in a series of
several fields (through Field 18)
provided for the collection and
input of Birth Place, Social
Security Number (possibly carried
over from initial search screen),
Education, Ancestry information,
Occupation and Marital Status and
Identification. For Fields 12a &
13a, holding down the Control key
will allow multiple selections from
the list. The online Help button provides additional information regarding each field.
Please Note: The system allows for a maximum of 5 different Races and Ancestries for a
decedent. The type-ahead feature will allow race/ancestry options to become available to
you as you start to type in the information.
7.2.1.4 Parental Information
Fields 19 & 20 provides an area for the collection of parental data for the decedent.
Complete name information should be entered, if available.

EDRS Local Registrar/Staff User Manual Michigan EDRS Project
EDRS Local Registrar User Manual
44
7.2.1.5 Informant Information
Fields 21a through 21c are provided to identify the individual used as the source of
information regarding the decedent.
7.2.1.6 Disposition
The Disposition section (Fields 22 through 23d) identifies the method of disposition of
the decedent’s remains. Field 26e, Funeral Facility Handling Disposition, is for the
funeral home only.
7.2.1.7 Certification
Scroll down to the Certification section of the Certificate of Death screen. Beginning
with Field 27a, fill in all appropriate data through Field 34b.
35a will populate once the record has been filed. However, you must complete 35b with
the date the record was filed.

EDRS Local Registrar/Staff User Manual Michigan EDRS Project
EDRS Local Registrar User Manual
45
7.2.1.8 Cause of Death
In the Cause of Death
section of the
Certificate of Death
screen. Beginning with
Field 36, fill in all
appropriate data
through Field 40b.
Field 38 will only be
available to you if the
decedent is female
between the ages of 5
and 75.
Field 39 will default to
Natural if a Medical
Examiner was not
selected in the
Certification section.
7.2.1.9 Medical Examiner
If the Manner of Death was anything other than Natural the Medical Examiner section
must be completed. Begin with Field 41a, and fill in all appropriate data through Field
41g.
After completing all the fields of the death certificate, click the Save button.

EDRS Local Registrar/Staff User Manual Michigan EDRS Project
EDRS Local Registrar User Manual
46
7.2.2 Death Case Saved Successfully
Once you click Save and there are no errors, you will see the “Death case successfully
saved” message at the top of the record and your record has now been filed.
7.2.3 Errors
When you save the record you may
have errors. At the top of the record
you may see a message alerting you
of those errors. You will not be able
to proceed until those errors are
corrected. The fields highlighted in
yellow and have a red outline
indicate the fields you will need to
correct.
7.2.4 Scanning Documentary Evidence
Because you are adding a Registering a Record Filed on Paper you must scan the original
death certificate and attach it to the electronic death record as documentary evidence (See
Section 6.5 Images).

EDRS Local Registrar/Staff User Manual Michigan EDRS Project
EDRS Local Registrar User Manual
47
8 FILE NUMBER SETTINGS
Local registrars are provided with the option to create the file number settings associated with their local
jurisdiction. File number settings can be established for your County and Local requirements.
8.1 File Number Settings (Local Registrar Only)
8.1.1 Create File Number Settings
On the Home page, locate the Administration section and click on the File Number
Settings link. You must have local file number administration rights for the File Number
Settings link to appear on your Home page.
On the File Number Management page, the filing number settings shown defaults to the
current filling year. Select the Filing Year in the drop-down to view the file number
settings. You can only view and manage file numbers related to your jurisdiction.
To create a file number setting, you must click on the New button at the bottom of the File
Number Management page.

EDRS Local Registrar/Staff User Manual Michigan EDRS Project
EDRS Local Registrar User Manual
48
After you click New a pop-up window will appear. Select the Filing year using the drop-
down. Select a file number Format using the drop-down (See Image 1). Check the box in
front of Prefix and enter in a value (optional). Check the box in front of Suffix and enter in a
value (optional). The Desired format will appear after the above fields are completed. Enter
a number in the Begin and End fields to create a range of file numbers used for that
particular filing year. Be sure to establish an end file number large enough to accommodate
the estimated number of cases to be processed through your office. Click the Save button
(See Image 2). Also, be aware that once a file number has been created for a filing year it
cannot be changed.
8.1.2 Void File Number Settings
If you need to Void a file number, go to the File Number Management page. On this page
enter the file number that you want to mark voided in the field. Click the Void button.
The list will display your new voided file number along with the filing year, voided on date,
and who voided it. Once a file number is voided it cannot be used for that filing year.
8.1.3 Look up Voided File Numbers
Image 1
Image 2

EDRS Local Registrar/Staff User Manual Michigan EDRS Project
EDRS Local Registrar User Manual
49
If you would like to look up
a voided number you can do
so on the File Number
Management page. Enter in
the filing year. Enter in the
file number. Click the
Lookup button.
If the file number has been previously voided, it will appear on the list below along with the
filing year, voided on date, and who voided it. If the file number has not been voided, a blank
list will appear, with a message stating that there are “No Records Found.”
10 WORK QUEUES
Local Administration capabilities are typically assigned to a single or small group of users within an
organization. The ability to see and access Administration capabilities are restricted by your
individually assigned roles and privileges. Roles and privileges are assigned by the state registrar’s
office. The work queues area identifies those groupings of tasks (work queues) assigned to you or your
work team.
The first suggested work queue is the Ready for Filing work queue, which will contain all the records
within your jurisdiction that have had the personal and medical section certified and are at Ready for
Filing status. All the records that need your review will automatically appear in this work queue through
the electronic system.
The second suggested work queue is the Correction Request work queue, which will contain all the
records within your jurisdiction that have a pending correction request that need your review. All the
records with a correction request that need your review will automatically appear in this queue through
the electronic system.
10.1 Work Queue Manager
Users with the appropriate privilege assignments can access the Work Queue
Manager by choosing the link from the Home screen.
The Work Queue Manager screen displays the names of the currently active work queues for the
assigned facility; their description; the queue type; the number of users assigned to each queue;
and when the queue was completed.
Users may be added to the work queue by clicking on the queue name hyperlink listed under
Queue Name (e.g., Ready for Filing) on the Work Queue Manager screen.
Two additional control buttons are available for queue management
1. New work queues can be created clicking on the New button from the Work Queue
Manager screen.
2. Work queues can be deleted by clicking on the Select checkbox for any work queue, then
clicking on Delete button.

EDRS Local Registrar/Staff User Manual Michigan EDRS Project
EDRS Local Registrar User Manual
50
10.2 Add New Work Queue
Choosing New from the
Work Queue Manager
screen displays the Add
Work Queue Manager
screen. Field headings
followed by the * (e.g.,
Name *) are required and
must be completed. At a
minimum, the queue
Name, Death Case
Status, and Assigned
Users fields must be
completed to establish a
valid queue.
Each queue must have a
unique queue Name*
assigned (the Name field
is required). Ideally, the
name should be short but
as descriptive as possible.
Work queue names may
not contain any numeric
characters.
Additional information,
regarding the queue’s
purpose, may be entered in
the Description field. This
description appears in the
Work Queue Manager
screen and may be useful
as other queues are added
in the future. In our
example, the work queue
Name will be ‘Ready for
Filing’ and the description
is entered as ‘Death
Records that need to be
filed.’

EDRS Local Registrar/Staff User Manual Michigan EDRS Project
EDRS Local Registrar User Manual
51
10.2.1 How to set up a Ready for Filing Work Queue
10.2.1.1 Naming the Ready for Filing Work Queue
Each work queue must have a unique queue name assigned (the Name field is required).
Ideally, the name should be short but as descriptive as possible. Work queue names may
not contain any numeric characters.
Additional information, regarding the queue’s purpose, may be entered in the
Description field. This description appears in the Work Queue Manager screen and may
be useful as other queues are added in the future. In our example, the queue Name will be
‘Ready for Filing’ and the description is entered as “Death Records that need to be
filed.”
10.2.1.2 Customizing the Ready for Filing Work Queue
Our example work queue will establish a filter for records with a Death Case Status (this
is a required field) of In Progress. Set your Work Flow Step to Ready for Filing. Each
of the filter options are selected from their associated drop-down lists.
Please Note: In the event that you are a City Registrar you would change the workflow
step to Ready for City Filing.
10.2.1.3 Assign Users
One final field requirement for the queue will be the selection of Assigned Users *. In
our example, all Available users in the list will be assigned to the new queue. Selecting
the >> button, between the lists will move all Available users to the Assigned users list.
After all the required selections are complete, use the Save button to establish the new
queue for use.

EDRS Local Registrar/Staff User Manual Michigan EDRS Project
EDRS Local Registrar User Manual
52
10.2.2 How to set up a Correction Request Work Queue
10.2.2.1 Naming the Correction Request Work Queue
Each work queue must have a unique queue Name assigned (the Name field is required).
Ideally, the name should be short but as descriptive as possible. Work queue names may
not contain any numeric characters.
Additional information, regarding the queue’s purpose, may be entered in the
Description field. This description appears in the Work Queue Manager screen and may
be useful as other queues are added in the future. In our example, the queue Name will be
‘Correction Request’ and the Description is entered as “Corrections that need
approval.”
10.2.2.2 Customizing the Correction Request Work Queue
Our example queue will establish a filter for records with a Death Case Status* (this is a
required field) of Active. Set your Work Flow Step to Filed and the Correction
Request Status to Pending. Each of the filter options are selected from their associated
drop-down lists. In the Record Age section select the Less than radio button and input 30
in the days old field.

EDRS Local Registrar/Staff User Manual Michigan EDRS Project
EDRS Local Registrar User Manual
53
10.2.2.3 Assigned Users
One final field requirement for the queue will be the selection of Assigned Users *. In
our example, all Available users in the list will be assigned to the new work queue.
Selecting the >> button, between the lists will move all Available users to the Assigned
users list. After all the required selections are complete, use the Save button to establish
the new work queue for use.
10.2.3 Edit Existing Work Queue
Only the user that created the work queue can edit the filter criteria and users assigned. To do
this you may choose the Work Queue Manager link from the Home screen. Clicking the
name link in the work queue name list will display the Edit Work Queue Manager screen to
complete any edits or changes.
After completing all required changes, choose the Save button to record any changes to the
queue.
10.2.3.1 Adding a User
From the Assign Users section of the Edit Work Queue Manager screen, select an
Available user to be given work queue access. Next, select the > button and the
highlighted user will be added to the Assigned* users list.
Users may be removed from the Assigned* users list by highlighting the name and
selecting the < button.

EDRS Local Registrar/Staff User Manual Michigan EDRS Project
EDRS Local Registrar User Manual
54
10.2.3.2 Changing Queue Criteria
On occasion, you may determine that work queue criteria should be refined to better suit
your work flow needs. From the Edit Work Queue Manager screen select additional or
new filter options to customize the work queue. In the example below, the Record Age
filter radio button has been selected to display only those records that are less than 30
days old versus the original setting of All records. Please remember that the resulting
queue will only display records that meet ALL, selected filter criteria.
Please Note: If you find that the resulting queue does not show expected results, closely
examine individual records that you believe should qualify, using the Info tab to confirm
that your filter criteria is correct.
11 ELECTRONIC CORRECTION REQUESTS
It is the responsibility of the local registrar’s office to review electronic correction requests and
determine whether they should be accepted or rejected depending on the circumstance. Corrections may
be requested electronically by funeral directors and physicians for up to 30 days after a record has been
filed. Medical examiners may submit a correction at any time even after the 30 day period.
1.1 Accepting a Correction Request
Correction requests can be accessed and reviewed by retrieving records directly from your
Correction Request work queue that is located in your work queues column on your home page.
The next screen will display all correction requests in your work queue. To view the record, click
on the Last Name of the decedent.

EDRS Local Registrar/Staff User Manual Michigan EDRS Project
EDRS Local Registrar User Manual
55
1.1.1 Compare the Correction Request
Once you are in the certificate of death, you will see a Corrections tab at the top of the
record. Click on the Corrections tab and it will display a list of corrections and pending
corrections requests. Under Pending Correction Requests, you will see who the correction
is requested by, on what date, the corrected field, and the options to Compare, Accept, or
Reject. When you click on Compare, a screen will display the field name, the current value,
and the new value. To return to the certificate of death, click the Close button.
EDRS Local Registrar/Staff User Manual Michigan EDRS Project
EDRS Local Registrar User Manual
56
1.1.2 Accept or Reject the Correction Request
After you have reviewed the correction request, you have the choice to Accept or Reject the
correction. Once you click
Accept, a message will
appear at the top of the
record indicating the
‘Death case successfully
corrected.’ The correction
is automatically updated
and a message will be sent
to the person it was
requested by in the system,
notifying him or her that
the correction has been
accepted. If the correction
is rejected, a message will
also be sent notifying that
the correction request
was rejected.
1.1.3 Notificatio
n of Correction
Acceptance
Once approved by the local registrar, the original submitter is sent a notification message
regarding the outcome of the requested change. No further action is required for the
associated correction.

EDRS Local Registrar/Staff User Manual Michigan EDRS Project
EDRS Local Registrar User Manual
57
12 EXITING EDRS
You may exit EDRS at any time by choosing the Exit Application link from the user bar to the right of
the Help link. If you are on an active EDRS record screen, be sure to return to the certificate of death
screen and save the record before you exit EDRS.
2.1 EDRS Log Out:

EDRS Local Registrar/Staff User Manual Michigan EDRS Project
EDRS Local Registrar User Manual
58
APPENDIX A
CHECKLIST FOR ACCEPTING A RECORD
Before Accepting an Electronic Record
Make sure…
• All fields are completed
• Field 7a agrees with field 30
• Fields 28a & 28c agree. (28a & 28c can show the same time; however, 28c cannot show an
earlier time than 28a)
• Field 28b should agree with field 4 (4 can be prior to 28b or they can be the same)
• If field 17 indicates married or separated, field 18 needs to be completed
• If field 21b indicates spouse, husband, or wife:
o Field 21a has to correspond with field 18
o Field 17 must indicate married
• If field 30 indicates hospital, field 31 needs to be completed
• If field 39 is anything other than natural, fields 41a-g needs to be completed
• Based on the cause of death, does the record need to be referred to the medical examiner?
Reviewing the Scanned Image
Make sure…
• It is legible
• The entire document is visible (not cut off)
• The image identifies the decedent
• The medical professional signed the scanned document
• The cause of death on the electronic record matches what is listed on the image
• If the scanned document was completed by a medical examiner, be sure fields 2, 3, 4,7b and 7c
are completed on the image
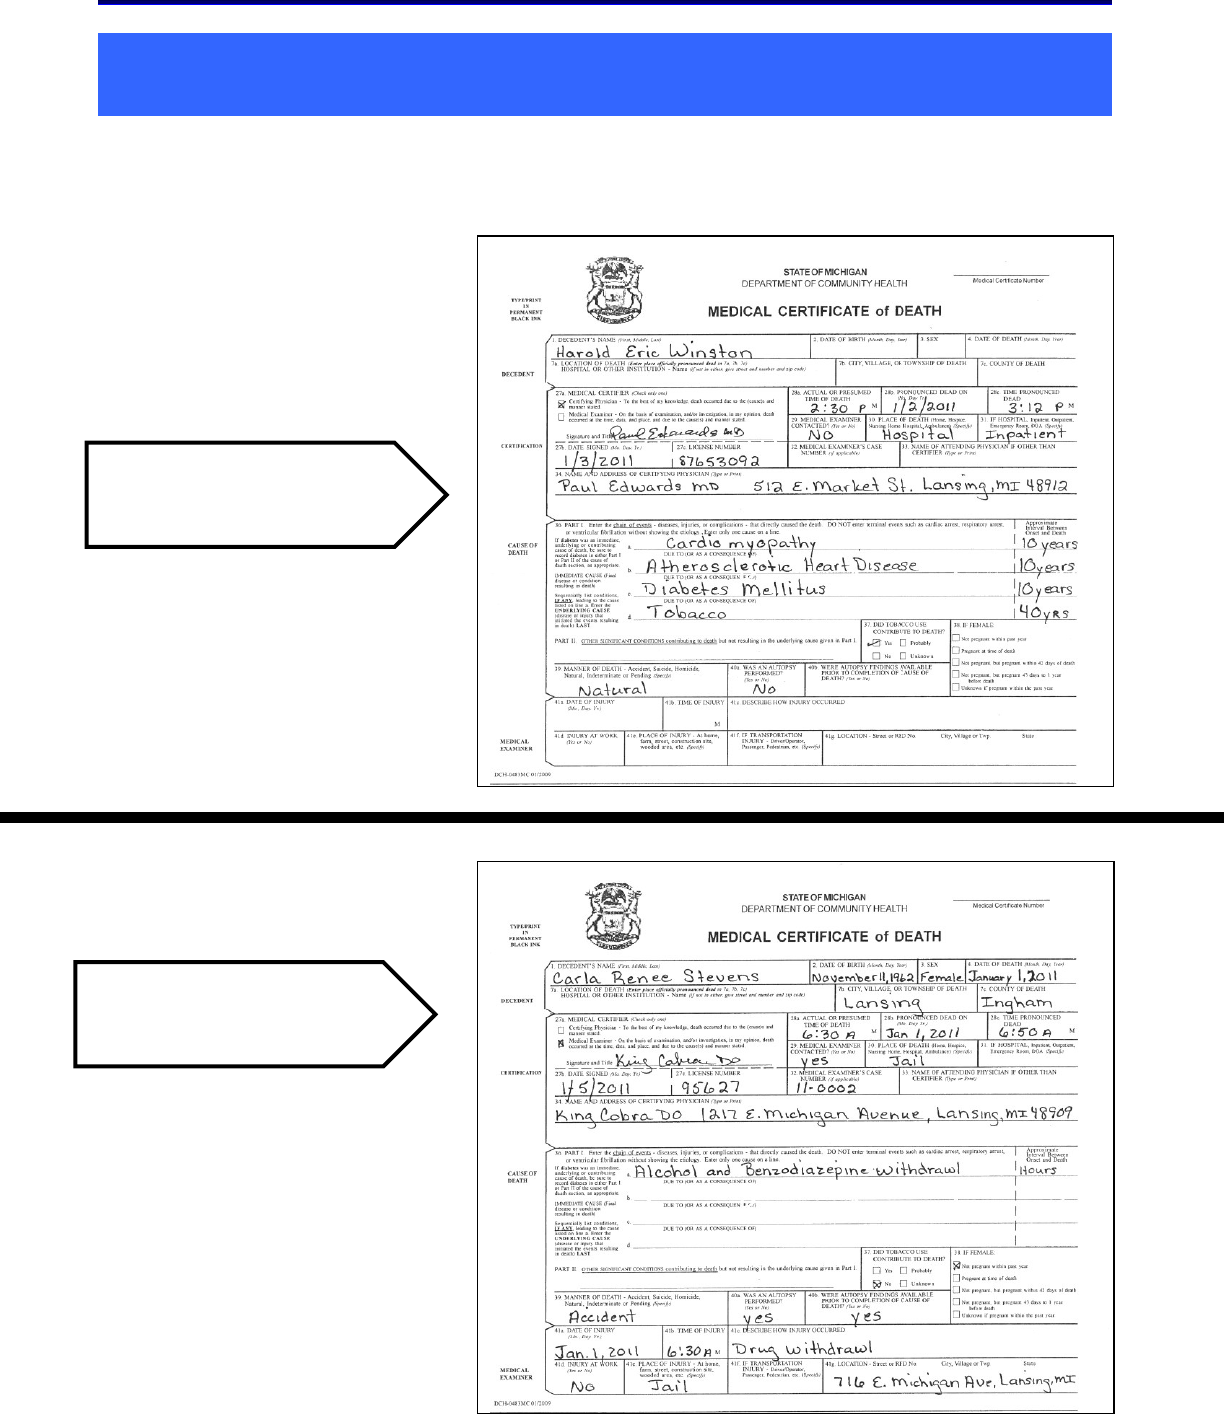
EDRS Local Registrar/Staff User Manual Michigan EDRS Project
EDRS Local Registrar User Manual
59
APPENDIX B
MEDICAL CERTIFICATE OF DEATH REQUIRED FIELDS
Below you will find examples of a Medical Certificate of Death and what information should be
completed when filled out by a Medical Certifier or Medical Examiner.
Medical Certifier
Medical Examiner
