
ONLINE DESIGN
*
1
walsworthyearbooks.com
Tips and Tricks
This document provides step-by-step instructions on how to use Online Design’s tools to create fun designs.
NOTE: It is highly recommended to SAVE often, PROOF and REVIEW the pages before submitting to ensure
your designs appear as expected. When using Transparency with colors, be aware that the colors can drastically
change and the final result may not appear as seen on the computer screen.

ONLINE DESIGN
*
2
walsworthyearbooks.com
Basic Tips and Tricks
Cut-outs
Tools used: Clipping Path, Shadow
Note: When using the Clipping Path tool within Online Design, keep the number of points at a minimum, which
helps pages load faster.
1. Place a photo on the page.
2. Right-click or go to the Photo palette (right side of screen) and choose Clipping Path.
3. Click on Clear path and select either the Angle or Curve Draw tool to begin a custom path around the
subject in the photo.
- Used to select the Clipping Path tools and/or points created around the image
- Used to move the image into the viewing area when zoomed in or out
- Zoom In or Zoom Out
- Used to clear the path either before beginning or to quickly remove a previous path
- Used to close the Clipping Path windows and remove all changes
- Used to complete and save all edits.
- Used to create angled / straight corners
- Used to create curved / rounded corners
- Used to add more points to a path
- Used to delete / remove points around a path
- Used to move a single (one) point at a time
- Used to move a point and it’s neighboring points together

ONLINE DESIGN
*
3
walsworthyearbooks.com
4. Make any necessary adjustments using the Add or Delete Points tools or the Move tools.
5. Click Done once all edits are complete to save the changes.
6. (Optional) Add a Drop Shadow effect to the cut-out photo.

ONLINE DESIGN
*
4
walsworthyearbooks.com
Photo Pop-out
Tools used: Clipping Path
foo tballba
seballsoccertrac
kwrestlinghockeyswi
mmingfootballbaseball
soccer
track
wrest lingho
ck ey sw i m
ming footb
allba sebal
lsocc ertra
ck wr estlin
ghoc key s
w i m ming
footb
al lb a
sebal
ls occ
ertr ac k
wrestlin
ghockeyswi
mmingfootball
baseball
soccer
trackwrestlinghoc
keyswimmingf
ootballbaseba
llsoccertra
ckwrestli
nghoc
keysw
immi
ngfoo
tballb
aseb
allso ccert
ra c k
wres tlingh
ocke ys wi
mm i ng fo
otball base
ba l ls occe
rtrack wrest
lingho ckeys
wi m m i ng
fo ot
ballbaseba llsoccertra
ck
wrestlinghoc k
eyswimmingfootb
allbas eballs
oc c
pdc)
1. Place a photo on the page from the Photo Tray.
2. To select the photo, right-click or go to the Photo palette (right side of screen) and choose Clipping Path.
3. Click on Clear path and select either the Angle or Curve Draw tool to begin a custom path around the
subject in the photo. Be sure to move to the outside edges of the photo to maintain the part of the photo that
will remain as the background.
4. Make any necessary adjustments using the Add or Delete Points tools or the Move tools.
5. Click Done once all edits are complete to save the changes.

ONLINE DESIGN
*
5
walsworthyearbooks.com
Polaroids
Tools used: Shape, Border, Shadow, Rotate, Text
The 3 Amigos
Steven Jones says "Peace!!"
Job #: 000417A Pages: 016-017 08-Aug-2016 (RequestID: 35b055bc-6d3d-44bc-91c5-f611b883ac3b SpreadID: 6v65A4ducOxgBHWzj7wkFF7f Type: Preview PDC: https://sto.walsworthyearbooks.com.s3.amazonaws.com/pdf/Proof/35b055bc-6d3d-44bc-91c5-f611b883ac3b/6v65A4ducOxgBHWzj7wkFF7f.pdc)
1. Using the Shape tool, click on Rectangle.
2. Under the Object palette:
• Change the Width to 19p (3.1667in) and the Height to 21p (3.5000in)
• Change the Fill color to White.
• Change the Border color to Gray 1.
• From the Object palette, select a 0.25 Border.
• Click the Effects palette, click Shadow.
• Change the Offset to 2, Opacity to 50%, Angle to 20.
3. Go back to the Shape tool and click the Rectangle.
4. Under the Object palette:
• Change the Width to 18p (3.0000in) and the Height to 16p (2.6667in)
• Change the Fill color to Gray and the Border to None.
5. Use the Selection tool to drag the second box on top of the first, leave an equal amount of white space on
the left, top and right sides. There should be a large white area below the gray box.
6. Place a photo in the gray box. Double-click the photo to open the cropping window and make any necessary
adjustments.

ONLINE DESIGN
*
6
walsworthyearbooks.com
7. Select the Text tool (use Handwriting or Sleepwalker font for the appearance of hand-written text) and type
a brief caption.
8. Drag the text box over the large white area under the photo, and center it under the photo. (For added effect,
rotate the text box slightly.)
Optional
1. Select all parts of the Polaroid.
2. Go to the Object menu and select Group.
3. Use Edit > Copy, Edit > Paste to add more Polaroids to the page.
4. Go to the Object menu, choose Ungroup for each new Polaroid to add different photos. After adding
the photos for each Polaroid, Group all elements.
5. Go to the Object palette and add a Rotation for each Polaroid.
6. Move the Polaroids on top of each other and use the Arrange options under the Layout palette to
arrange them as desired.

ONLINE DESIGN
*
7
walsworthyearbooks.com
Fake Duotone
Tools used: Aviary, Transparency
Job #: 000417A Pages: 016-017 08-Aug-2016 (RequestID: 35b055bc-6d3d-44bc-91c5-f611b883ac3b SpreadID: 6v65A4ducOxgBHWzj7wkFF7f Type: Preview PDC: https://sto.walsworthyearbooks.com.s3.amazonaws.com/pdf/Proof/35b055bc-6d3d-44bc-91c5-f611b883ac3b/6v65A4ducOxgBHWzj7wkFF7f.pdc)
1. From a photo album, select a photo and click Launch Editor to open Aviary.
2. With the photo opened in Aviary, click on the Effects button > Classic > B&W.
> >
3. After clicking B&W, click Apply , and then Save from the top right of the screen.
4. Open a spread, click the Shape tool and place a shape on the page.
5. Select the shape with the Selection tool, go to the Edit menu and click Copy, and then Paste.
6. Click on the Photo Tray, and choose the album that contains the black and white photo.
7. Drag the photo to one of the shapes on the page to place it. Crop the photo if needed to fit it in the shape.
8. Use the Selection tool and select the second shape.
9. Choose Fill from the left of the window and choose a Walsworth Formula Color.
10. Click on the Effects palette and adjust the Transparency to the desired percentage.
11. Drag the shape with the color over the top of the photo.
Optional
1. Resize the box on top of the picture. Go to Edit > Copy, and then Paste, to create extra boxes of
the same size.
2. Click the extra boxes and choose a different Walsworth Formula Color for each Fill.
Job #: 000417A Pages: 016-017 08-Aug-2016 (RequestID: 35b055bc-6d3d-44bc-91c5-f611b883ac3b SpreadID: 6v65A4ducOxgBHWzj7wkFF7f Type: Preview PDC: https://sto.walsworthyearbooks.com.s3.amazonaws.com/pdf/Proof/35b055bc-6d3d-44bc-91c5-f611b883ac3b/6v65A4ducOxgBHWzj7wkFF7f.pdc)

ONLINE DESIGN
*
8
walsworthyearbooks.com
Add Color to B/W Photos with Aviary
Tools used: Aviary
1. From a photo album, select a photo and click Launch Editor to open Aviary.
2. With the photo opened in Aviary, click on the Splash button, and choose either the Free Color or Smart
Color button (for this example the Free Color button was used).
>
3. After clicking either the Free or Smart Color button, choose a Brush Size and begin painting over the area
of the photo that will have color.
Free Color - Re-colors any part of the photo regardless of the color.
Smart Color - Looks at the color you want to add back in and only lls in parts of
the image that are similar in color.
Eraser - Used to correct mistakes.
Brush Size - Allows for painting over large or smaller areas
depending on the brush chosen.

ONLINE DESIGN
*
9
walsworthyearbooks.com
4. After completion, click Apply and then Save from the top right of the screen.

ONLINE DESIGN
*
10
walsworthyearbooks.com
Add Color to B/W Photos within the Page Editor
Tools used: Aviary, Clipping Path, Alignment
Job #: 000417A Pages: 016-017 08-Aug-2016 (RequestID: 35b055bc-6d3d-44bc-91c5-f611b883ac3b SpreadID: 6v65A4ducOxgBHWzj7wkFF7f Type: Preview PDC: https://sto.walsworthyearbooks.com.s3.amazonaws.com/pdf/Proof/35b055bc-6d3d-44bc-91c5-f611b883ac3b/6v65A4ducOxgBHWzj7wkFF7f.pdc)
1. From a photo album, select a photo and click Launch Editor to open Aviary.
2. With the photo opened in Aviary, click on the Effects button > Classic > B&W.
> >
3. After clicking B&W, click Apply and then Save from the top right of the screen.
4. Open a spread, and click on the Photo Tray. Choose the album that contains the black and white and color
photos.
5. Drag the two photos onto the page.
6. Use the Selection tool to resize the black and white photo first.
Note: If possible, choose a photo that requires little or no cropping as the color photos will need to match
exactly.
7. With the black and white photo selected, hold the Shift key and click the color photo. Then click the Layout
palette from the right side of the screen.
8. Use the Align Left and Align Top options so the color photo sits on top of the black and white photo.
A. Align Left - Vertically left-aligns objects.
B. Align Center (Horizontally) - Vertically aligns objects using the center handles.
Useful on mug pages where the name is to be centered under the photo.
C. Align Right - Vertically right-aligns objects.
D. Align Top - Horizontally aligns objects using the top handles
E. Align Center (Vertically) - Horizontally aligns objects using the center handles.
Useful on portrait pages where the names will be centered beside the photos.
F. Align Bottom - Horizontally aligns objects using the bottom handles.

ONLINE DESIGN
*
11
walsworthyearbooks.com
9. Use the Selection tool and select the color image. Resize it to match the size of the black and white photo.
10. Right-click on the color photo or go to the Photo palette (right side of screen) and choose Clipping Path.
11. Use the Clipping Path tools and create a path around the subject in the photo that will be in color.
12. Click Done.

ONLINE DESIGN
*
12
walsworthyearbooks.com
Ghosted Photos / Backgrounds
Tools used: Transparency
1. Start with either adding a shape to the page using the Shape tool, and dragging a photo to it from the Photo
Tray or simply drag a photo from the Photo Tray and resize it on the spread.
2. With the photo still selected, click on the Effects palette and change the Transparency to 50%.
Note: If using a photo as a background, keep it in place by selecting the photo, go to the Object menu, and
choose Lock Selected.
Optional
• Add text over a ghosted image or background using the Text tool.
• For the example, the text was Converted to a Shape using the Object menu.
• F0820 was applied as the Fill color, and a 2 pt. White border was also applied.
Optional
• Select the photo,go to Edit > Copy, and then Edit > Paste in Place.
• Leave the photo on top of the ghosted box, change the Transparency back to 0%, and resize the shape
to show a small area of the photo.
• For the example below - the Rounding option under the Effects palette was used to change the
rectangle to a rounded corner box; the percentage was changed to 100%.
• Using the Selection tool, the box was resized until it resembled a circle, and then a Shadow was
applied with:
- Offset = 3
- Opacity = 70%
- Angle = 45°
• A 6 pt. white Border was also applied to the circle.

ONLINE DESIGN
*
13
walsworthyearbooks.com
pdc)
ONLINE DESIGN
*
14
walsworthyearbooks.com
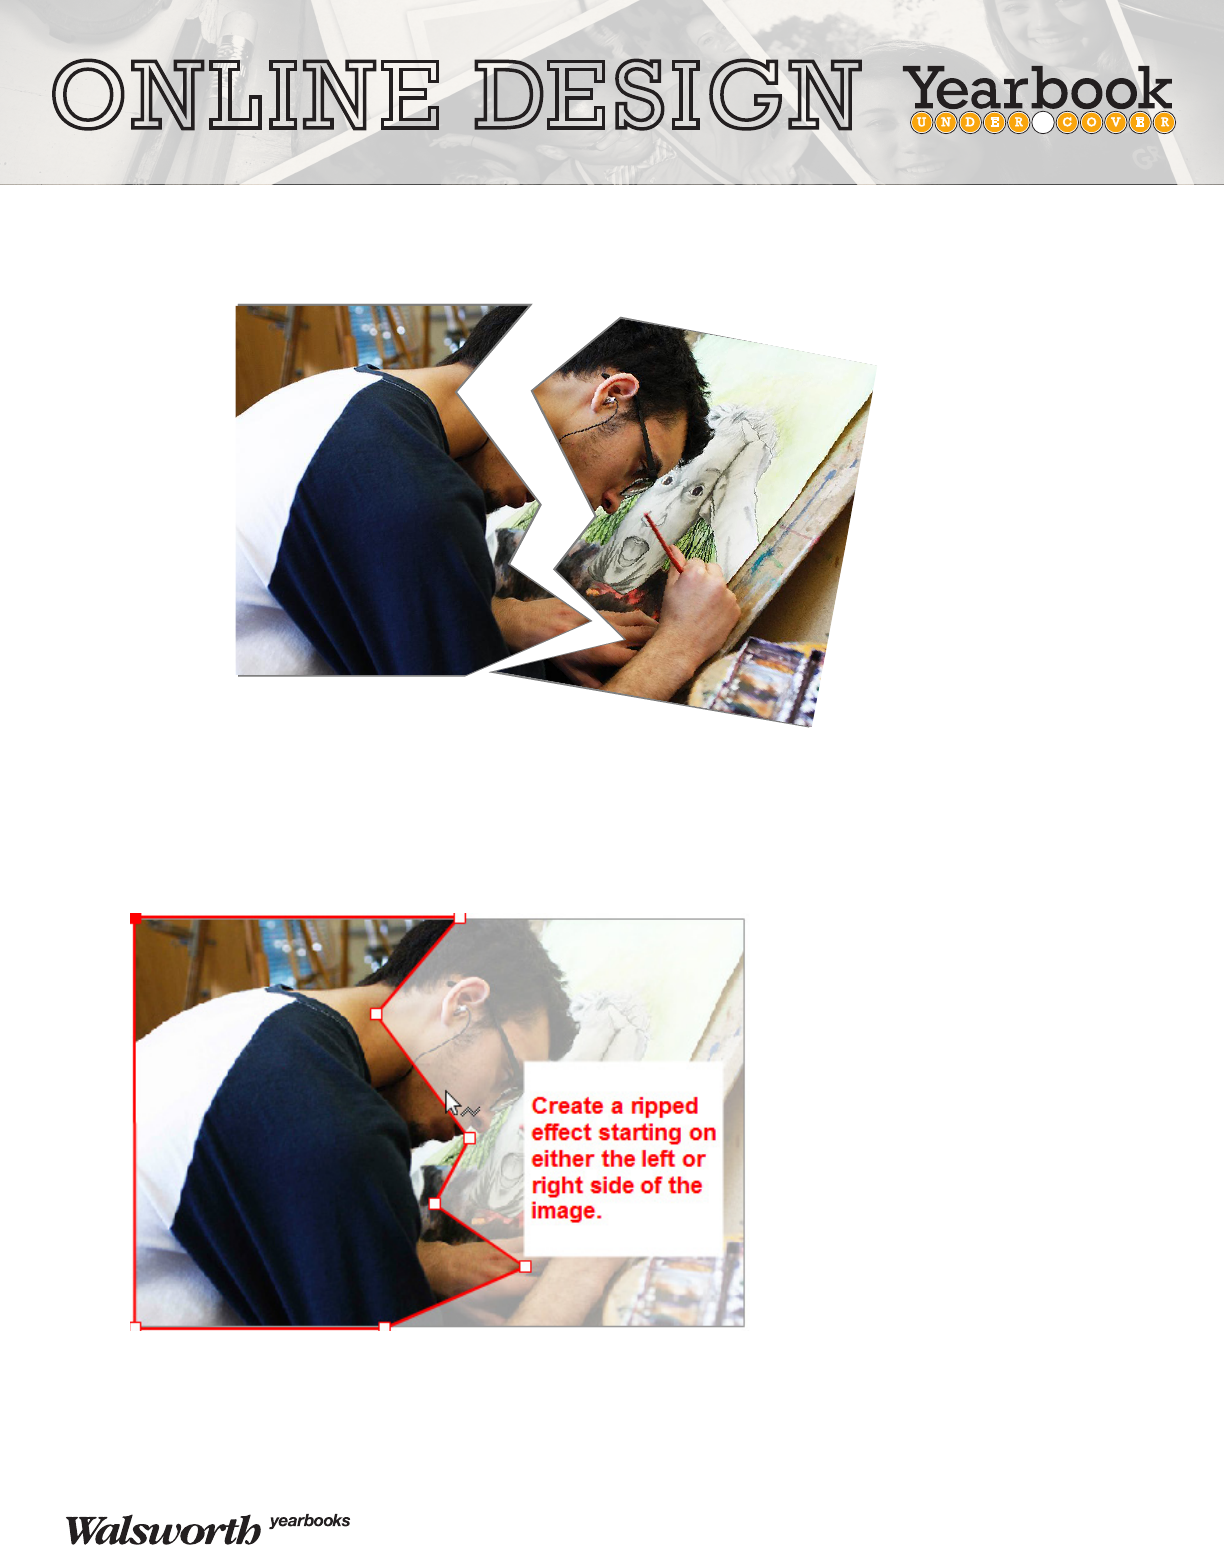
Torn Photo
Tools used: Clipping Path, Shadow
The 3 Amigos
Steven Jones says "Peace!!"
Job #: 000417A Pages: 016-017 08-Aug-2016 (RequestID: 35b055bc-6d3d-44bc-91c5-f611b883ac3b SpreadID: 6v65A4ducOxgBHWzj7wkFF7f Type: Preview PDC: https://sto.walsworthyearbooks.com.s3.amazonaws.com/pdf/Proof/35b055bc-6d3d-44bc-91c5-f611b883ac3b/6v65A4ducOxgBHWzj7wkFF7f.pdc)
1. Drag a photo from the Photo Tray and resize it on the spread.
2. Right-click the photo or go to the Photo palette (right side of screen) and choose Clipping Path.
3. Click on Clear path, and select the Angle Draw tool.
4. Starting in either the left or right corner of the image, create the first side for the ripped image.
5. Click Done to complete the path.
6. Select the first half of the image with the Selection tool, and go to Edit > Copy, and then Edit > Paste in Place.
7. Select the second half of the image with the Selection tool.

ONLINE DESIGN
*
15
walsworthyearbooks.com
8. Right-click on the photo or go to the Photo palette (right side of screen) and choose Clipping Path.
9. Select the Single Move tool and move the points in the corners to the opposite corners of the photo; this
quickly creates the second-half of the ripped photo.
10. After moving the two points, click Done to save the path.
11. Use the Selection tool to move the second-half of the image beside the first-half.
12. Select one side of the ripped image, click on the Object palette and apply a Rotation (for the example, a
rotation of 10° was applied.)
Optional
• Select both sides of the ripped image. Click on the Effects palette and apply a Shadow.
• For the example, the left side of the ripped image has a Shadow of:
• Offset = 2
• Opacity = 50%
• Angle = 0°
• The left side of the ripped image has a Shadow of:
• Offset = 2
• Opacity = 50%
• Angle = 175°
Use the Single
Move tool and
move these two
points to the
opposite corners
on the image.

ONLINE DESIGN
*
16
walsworthyearbooks.com
Photo in text
Tools used: Text tool, Convert Text to Shape
pdc)
pdc)
1. Select the Text tool and type the text that will contain a photo.
Note: The point size must be 24 points or larger and no more than 50 characters. It is also recommended
to use fonts that are thicker in shape. Make a copy of the text and drag it to the Pasteboard in the instance
that the text must be retyped. For the example, Impact was chosen.
2. After typing the text, go to Object > Convert Text to Shape.
3. Drag a photo from the Photo tray and place it in the text. Use Crop Photo to fill the text with the photo if needed.
Optional
1. Right-click the photo or go to the Photo palette (right side of screen) and choose Clipping Path.
2. Use the Single Move tool and adjust any of the points around the text.
3. Click Done to save the changes.
4. Select the text, go to the Effects palette and apply a Shadow to finish the effect.
pdc)
pdc)

ONLINE DESIGN
*
17
walsworthyearbooks.com
Multi-colored Gradient
Tools used: Shape, Gradient, Align and Distribute
1. Add a rectangle to the page by going to the Shape tool and clicking the rectangle.
2. With rectangle selected, go to the Effects palette and choose Gradient.
3. For the first part of the gradient, choose the Left to Right gradient direction.
4. Use the left Fill color choice box and pick the first color of the gradient. Select the right Fill color choice box to
pick the second color.

ONLINE DESIGN
*
18
walsworthyearbooks.com
5. Select the gradient box, go to Edit > Copy, and then Edit > Paste.
6. Under the Effects palette, pick the Right to Left gradient direction.
7. Change the first Fill color choice to a new color; leave the second Fill color as is.
8. With the new gradient box selected, go to the Edit menu > Copy, and then Edit > Paste.
9. Again, go to the Effects palette and pick the Left to Right gradient direction.
10. Leave the first Fill color as is; select the second Fill color and pick a new color choice.
11. Continue to copy, paste and swap the colors and gradient directions until the desired gradient is created.
12. Use the Selection tool and move each piece of the gradient, one beside the other.
13. Hold the Shift key and select all pieces of the gradient.
14. With all boxes selected, go to the Layout palette.
15. Under the Align option, choose Align Top.
16. Leave the boxes selected. Under the Layout palette, change the Spacing Distribution Amount under
Space evenly to 0p0.
17. Click the Distribute evenly horizontally option to move the boxes into place.

ONLINE DESIGN
*
19
walsworthyearbooks.com
Text on a Path
Tools used: Shape or Draw tool, Text on a path
1. Select either the Shape tool or the Draw tool and add a shape to the page (the Curve Draw tool was used for
the example above).
2. Right-click on the shape or go to the Object palette and choose Text on a path.
3. In the Text on a path window, type the text that will appear and apply the appropriate options.
4. Click Done to save the changes.
Note: Changes to the text will have to be done in the Text on a path window.

ONLINE DESIGN
*
20
walsworthyearbooks.com
The path was created using the Angle Draw tool.
Text on a path on a straight line. Text on a
path on a straight line.
straight
line. Text
on a path on a straight
path
on a
line. Text on

ONLINE DESIGN
*
21
walsworthyearbooks.com
Text in a Shape
Tools used: Text tool, Shape or Draw tool
1. Select either the Shape tool or the Draw tool and add a shape to the page. For the example, a rectangle was
added to the page. Then under the Effects palette, the Sides were changed to 3 to create a triangle.
2. With the shape on the page, select the Text tool. Click inside of the shape and begin typing the text.
3. Change the font, font size or justification to create the desired effect.

ONLINE DESIGN
*
22
walsworthyearbooks.com
Word Art
Tools used: Text tool, Convert Text to Shape, Border, Shadow
1. Select the Text tool and type the first character for the text.
2. Go to the Type palette, and apply the appropriate font. For the example Helvetica bold was used. The font size
was changed to 24 pts in order to convert the text to a shape.
3. Repeat this step for each character. To achieve the desired effect, each character must be typed separately.
4. Select each character with the Selection tool, and go to Object > Convert Text to Shape.
5. For each character:
• Apply a Fill color
• Change the Border color to white
• Apply a 10 pt. Border under the Object palette
• Go to the Effects palette and apply a Shadow (leave the settings as is)
• Use the Selection tool to resize the characters and to move them into the desired order.
• Go to the Layout palette and use the Arrange options if desired.
