
Genesis Confidential – Not to be released without written consent
TxEVER
Modified Commercial Off-the-Shelf Product for
Vital Events Registration System
Death Funeral Home User Guide
Version 1.0
06/01/2018

Page | 2
Revision History
Date
Description
Version
of
System
Author
06/01/2018
Initial Document
1.0
Valerie Hooven
Page | 3
TABLE OF CONTENTS
1 ABOUT THE TXEVER DEATH APPLICATION ............................................................................. 6
1.1 INTENDED AUDIENCE ........................................................................................................................ 6
2 SYSTEM OVERVIEW ......................................................................................................................... 7
2.1 APPLICATION FEATURES .................................................................................................................... 7
Contact Directory .................................................................................................................. 7 2.1.1
Internal Messaging ................................................................................................................ 7 2.1.2
Help Features ........................................................................................................................ 7 2.1.3
2.2 TECHNICAL SUPPORT RESOURCES ..................................................................................................... 8
TxEVER Help Desk Technical Support .................................................................................. 8 2.2.1
2.3 LOGIN SYSTEM ACCESS .................................................................................................................... 9
Session Timeouts ...................................................................................................................14 2.3.1
About Passwords ..................................................................................................................14 2.3.2
Logout/Exit the System .........................................................................................................16 2.3.3
2.4 DEATH DASHBOARD ........................................................................................................................17
2.5 NAVIGATION, DATA ENTRY AND TOOL TIPS ......................................................................................18
Using the Mouse ...................................................................................................................18 2.5.1
Using the Keyboard ..............................................................................................................18 2.5.2
Using Tool Tips .....................................................................................................................18 2.5.3
Using Internal Messaging ....................................................................................................19 2.5.4
Visual Cueing (Viz-e-Q©) .....................................................................................................19 2.5.5
Edit Checks (Fast-Fire©) .....................................................................................................20 2.5.6
Status Bar .............................................................................................................................21 2.5.7
2.6 FUNERAL DIRECTOR LIBRARY MAINTENANCE .................................................................................23
Funeral Director Profile .......................................................................................................24 2.6.1
Funeral Director Grid ..........................................................................................................24 2.6.2
Adding a Funeral Director from Library Maintenance ........................................................24 2.6.3
3 DEMOGRAPHIC DATA ENTRY AND VERIFICATION FUNCTIONS ......................................25
3.1 START AND SAVE A NEW RECORD ....................................................................................................25
3.2 PICK-UP AN EXISTING RECORD ........................................................................................................27
3.3 SEARCH FOR A RECORD ....................................................................................................................30
Search Screen .......................................................................................................................30 3.3.1
Wo rk Queue Search ..............................................................................................................32 3.3.2
3.4 CANCEL CHANGES ...........................................................................................................................33
Page | 4
3.5 UPDATE A RECORD ...........................................................................................................................34
3.6 ABANDON A RECORD .......................................................................................................................35
3.7 RETURN TO THE MAIN MENU ...........................................................................................................36
3.8 USING THE UNRESOLVED FIELDS LIST .............................................................................................36
3.9 DEMOGRAPHIC DATA ENTRY TOPICS ...............................................................................................36
Double Data Entry ...............................................................................................................37 3.9.1
AKA Name(s) Fields .............................................................................................................37 3.9.2
Pick List Navigation .............................................................................................................38 3.9.3
Death Age Entry ...................................................................................................................39 3.9.4
Screen Tab Navigation ..........................................................................................................40 3.9.5
Place of Death Facility .........................................................................................................40 3.9.6
Funeral Facility Profile ........................................................................................................40 3.9.7
Hispanic Origin and Race Fields Properties........................................................................40 3.9.8
3.10 RECORD COMMENTS ........................................................................................................................41
3.11 SSN VERIFICATION ..........................................................................................................................42
Automated Process ...............................................................................................................42 3.11.1
Response Generation ............................................................................................................42 3.11.2
3.12 DESIGNATE A MEDICAL CERTIFIER ...................................................................................................43
3.13 JP/MEDICAL EXAMINER REFERRAL .................................................................................................45
3.14 PRINTING FORMS .............................................................................................................................46
Print/Re-print Death Certificate Worksheet .........................................................................46 3.14.1
Print Burial Transit Permit ..................................................................................................46
3.14.2
Report of Death ....................................................................................................................46 3.14.3
Drop to Paper Form .............................................................................................................47 3.14.4
Verification of Death Facts ...................................................................................................47 3.14.5
3.15 DEMOGRAPHIC VERIFICATION .........................................................................................................48
Performing Demographic Verification .................................................................................48 3.15.1
3.16 DE-VERIFY RECORD / RECORD LOCKING .........................................................................................52
3.17 PERFORM DROP-TO-PAPER ..............................................................................................................53
3.18 GENERATING REPORTS .....................................................................................................................54
Demographic Amended Records Report ...............................................................................54 3.18.1
Disposition Overview Report................................................................................................55
3.18.2
Facility Delinquent Report (UnCertified) Report .................................................................56 3.18.3
Fatalities by County by Month Report..................................................................................56 3.18.4
Pending Cause of Death Listing Report ...............................................................................57 3.18.5
Timeliness by Funeral Establishment Report .......................................................................58 3.18.6
3.19 RELINQUISH A RECORD ....................................................................................................................58
Page | 5
3.20 RELEASE A RECORD .........................................................................................................................59
4 FACILITY STATISTICAL CORRECTION......................................................................................60
4.1 START A FACILITY STATISTICAL CORRECTION ..................................................................................60
Scan Supporting Documentation ..........................................................................................62 4.1.1
Upload Supporting Documentation ......................................................................................64 4.1.2
4.2 SUBMIT A FACILITY STATISTICAL CORRECTION ................................................................................65
4.3 CANCEL A FACILITY STATISTICAL CORRECTION ...............................................................................66
4.4 VIEW CORRECTIONS/SUPPORTING DOCUMENTS ..............................................................................66
4.5 REJECT FACILITY STATISTICAL CORRECTION ...................................................................................67
5 PERMIT PRINT QUEUE ...................................................................................................................69
5.1 ACCESS PERMIT PRINT QUEUE .........................................................................................................69
5.2 BURIAL TRANSIT PERMITS ...............................................................................................................69
Search for Burial Transit Permits Previously Not Printed ...................................................69 5.2.1
Search for Burial Permits Previously Printed ......................................................................70 5.2.2
Print Burial Permits .............................................................................................................71 5.2.3
5.3 DISINTERMENT PERMITS ..................................................................................................................72
Search for Disinterment Permits Previously Not Printed .....................................................72 5.3.1
Search for Disinterment Permits Previously Printed............................................................73 5.3.2
Print Disinterment Permits ...................................................................................................75 5.3.3
6 APPROVALS ........................................................................................................................................77
Page | 6
1 About the TxEVER Death Application
The Texas Electronic Vital Events Registrar (TxEVER) system improves timeliness and
accuracy of event registration in Texas.
1.1 Intended Audience
This user guide is for Funeral Directors who use the Web-Enabled Electronic Death
Registration System to create and process death records for the State of Texas.
A Funeral Director is a licensed professional typically associated with a single funeral
home, although they may be associated with and work for more than one funeral home.
The Funeral Director will complete and verify the portion of the Death Certificate which
in the TxEVER Death Application is referred to as ‘Demographic Data Entry and
Verification.’ Typically, the Funeral Director is the person who initiates the death
certificate; although the medical certifier may start a record if the cause of death is
certified at the time of death.
This user guide serves as a comprehensive reference for ‘funeral directors’ who
participate in the death registration by using the Demographic Data Entry and
Verification functions of the TxEVER Death Application. The concept of ‘Demographic
Data Entry and Verification’ encompasses the following: electronic completion and
signatures (PIN) for data filed by a Funeral Director and real time verification of
decedents’ Social Security Numbers with the Social Security Administration.
Page | 7
2 System Overview
2.1 Application Features
Contact Directory 2.1.1
A contact directory will be available in the system for users to access and search for other
users in the system directly. Stakeholders will be able to view other Facility and Local
stakeholders’ information.
The directory will be contingent upon the inclusion of each users email and contact
information, collected and created at the time of User Maintenance. Users have the option
to update this information and preferred contact via the Update My Profile menu option.
Internal Messaging 2.1.2
The internal messaging capability will allow users to send messages back and forth
within the system. A visible icon, located at the top right hand corner of the screen will
indicate a new message has been received. The unread notification will appear in the UI
until the user reads the unread message.
At any point a particular participants action is required on a record, that participant shall
be notified automatically through a system generated email. The message will include a
brief description of the action that needs to be taken.
Messages can also be sent between system users for any other reason. Users will be able
to look up the user ID of another user to send a message. A brief message history will be
viewable to the user.
Help Features 2.1.3
The following resources provide reliable ways to get answers to questions and support for
all of the functionalities included in the Death module:
Field Level Help
Module Level Help
System Level Help
About TxEVER Death Application
Help Desk Ticket
2.1.3.1 Field Level Help
Field Level Help provides specific help information related to the field in focus
which is displayed in the Field Level Help frame between the data entry tabs and
the data entry screen. The content in the Field Level Help frame can be configured
in Screen Configuration by a system administrator.

Page | 8
Figure 1: Field Level Help
2.1.3.2 System Level Help
System Level Help provides a searchable help index with various help topics of
interest pertaining to the functions and processes available within the TxEVER
system. Select the Death /Help/Help menu item to access System Level Help.
2.1.3.3 About TxEVER Death Application
About TxEVER Death Application details system information regarding the
current version of the TxEVER Death module. To access this option, select the
Death/Help/About menu item.
2.1.3.4 Help Desk Ticket
The system allows users to send a help desk ticket directly to the DSHS Center of
Excellence through a menu item. The Help Desk email address will automatically
populate the standard pre-defined recipient and message based on the context of the
ticket. It will be a no-reply sender. Users will have limited character space to
describe the issue and will be identified automatically by name and user ID. If the
user sends a help desk ticket within an open record, the email will be automatically
populated with the record ID number and location of the user at the time of help desk
ticket creation. This email will have a subject of the record ID number (EDR). This
information will not include protected health information (PHI). All help desk tickets
are logged and tracked.
2.2 Technical Support Resources
TxEVER Help Desk Technical Support 2.2.1
The TxEVER DSHS Center of Excellence help desk is the main source of technical
support for users of the TxEVER Death module. Users will be able to send a help desk
ticket from the interface. When the user selects the Help Desk Ticket menu option, the
Center of Excellence email address will prepopulate the message with a no-reply sender.
There will be limited characters to describe the issue and the initiating user will be
stamped on the ticket. If the user initiates a ticket within a record, the record number will
populate the subject line. The time and location will be stamped on the ticket also. No
personal health information (PHI) will be included in the ticket.
In order to report an issue to the Help Desk, click the Help/Contact Helpdesk menu

Page | 9
item.
Figure 2: TxEVER Splash Page
2.3 Login System Access
Prior to making any attempts to access the TxEVER system, the user needs to verify that
they have access to the following requirements:
Live Internet connection
Widely used Javascript-enabled standard web browser (IE8+, Mozilla Firefox, etc.)
Java runtime
Adobe acrobat reader for forms and letters

Page | 10
MS Excel for CSV flat files and for accessing/running reports
If one or more requirements are missing, the TxEVER Death application will not be
accessible and/or will not function properly. Follow the instructions below after verifying
that all technical requirements are met, as specified above.
1. Access the TxEVER Death module on the web:
a. Open the updated version of the web browser to establish a live internet
connection.
b. Type the application address in the URL box or select from Favorites:
https://txever.dshs.texas.gov/TxEverUI/Welcome.htm
2. The application splash page will load, as pictured below:

Page | 11
Figure 3: TxEVER Splash Page
3. Click the Log On to Texas Department of State Health Services button.
4. The Terms of Use Screen will load, as pictured below:

Page | 12
Figure 4: Terms of Use Page
5. Click the Yes button to confirm agreement with the terms of use.
a. Click the No button to be returned to the TxEVER splash page.
6. The TxEVER login screen will display:
Figure 5: TxEVER Login Page
7. Enter in a user name and password and click the Log In button.
8. The Select Location window will be displayed.

Page | 13
Figure 6: Select Location Window
a. Select the appropriate facility from the available choices in the drop-down list.
b. If the user works at multiple physical locations, the drop-down list will contain all
physical locations assigned to their user account.
c. Click OK. The main page of the TxEVER application will be displayed:
Figure 7: TxEVER Home Page
Note: The highlighted tab at the top of the screen determines what menus and
sub-menus will appear.
9. Click the Death tab to go to the Death Home screen.

Page | 14
Session Timeouts 2.3.1
If the system has not detected action within 20 minutes, the session will timeout and the
user will not receive further responses from the system. No unsaved work will be
automatically saved in the case of a time-out. Two minutes prior to a session timeout, the
system will issue the following warning message:
Figure 8: Timeout Warning Message
If the system appears to stop responding (i.e., no choices in some pick lists, cannot save a
record, cannot retrieve a record, etc.) it is likely that a session time-out has occurred and
the following message will alert the user of session timeout:
Figure 9: Timeout Message
To recover from a session time-out, exit and re-login to start a new session. Users should
save their work frequently to prevent session time-outs.
About Passwords 2.3.2
Users are assigned a temporary password at the time they sign up for use of the
application. The temporary password must be changed upon the user’s first login into the
system. At the time of a user’s first login into the application, the following screen will
appear:

Page | 15
Figure 10: Change Password Screen
The new password must meet all of the following criteria:
Number of password attempts before being locked out
Time between password attempts required for reset-time
Number of days until required password reset
Specific special character inclusion
Numeric character inclusion
Uppercase and lowercase character inclusion
Number of character minimum
The system defaults to the password criteria listed above, but a system administrator can
change the password settings at any time. If a user’s new password does not meet the
criteria, the following message will appear:

Page | 16
Figure 11: Password Check Failed Message
Passwords expire after 90 days. When this happens, the user will be alerted when an
attempt is made to login with an old password.
If a user attempts to log on but fails to successfully enter their password, after a DSHS
configurable number of unsuccessful login attempts, the user will be locked out of their
account. An authorized State user will be able to unlock a user’s account that has been
locked due to consecutive invalid login attempts. A user may also request a new
temporary password in the event that they forget their existing password by clicking the
Forgot Password button located on the Login screen.
Logout/Exit the System 2.3.3
Exit or log out of the TxEVER Death application using one of the following methods:
1. From the Main Menu, select the Function/Exit Application menu item to logout
OR
2. Click the Log Out button.
Note: Although closing the browser by clicking on the [X] (close window option) located
in the upper right corner of the screen will close the application; it is recommended that
the user exit by using the Logout icon or the Exit Application menu option instead. This
will ensure that the user’s session is also closed and prevent possible problems when the
user tries to login again.

Page | 17
Figure 12: Show Dashboard Button
2.4 Death Dashboard
From the Death Home screen, users may access the Death Dashboard by clicking on the
Show Dashboard button, as pictured in the above screenshot. The Death Dashboard
provides a summary of all pending death records for the login location in the TxEVER
Death Module.
Figure 13: Death Dashboard
Page | 18
Users may select a value from the Dashboard Filters drop-down list (pictured in the
above screenshot) to filter the grid of pending records to include only those records that
meet certain criteria.
2.5 Navigation, Data Entry and Tool Tips
The TxEVER Death module is designed with an emphasis on enhancing data entry
logistics by providing intuitive interfaces. Mouse navigation, keyboard navigation or a
combination of the two are equally accessible methods for maneuvering the system.
Using the Mouse 2.5.1
Use the mouse to navigate the TxEVER Death module. Click the various items
(hyperlinked text and/or icons) on the menu to perform functions related to demographic
data entry and verification. The mouse can also be used to navigate from one field to
another during data entry.
Using the Keyboard 2.5.2
The following keys allow for easy navigation through the screens in the TxEVER Death
application without using the mouse:
Tab Key: Moves cursor from one field to another. When a field is selected, the field will
be highlighted with a green background, blue background, and in some cases, a frame
will form around the selected field to aid the user.
Shift + Tab: Reverses the tab order and moves focus back to the previous control.
Enter: Initiates the action selected. Pressing Enter is equivalent to double-clicking the
mouse.
Left/Right/Up/Down Arrows: Used to navigate within a field or within a pick list. The
PgUp and PgDn keys may also be used.
Down Arrow for Dropdown Box: Pressing the Down Arrow key in a selected drop-
down box will reveal available selections in a list form. Use the Up or Down arrows to
scroll through the list.
Type-ahead Logic: Type-ahead logic provides another way to save time by eliminating
the number of keystrokes to pull up an item from a drop-down box. This feature enables
the user to begin typing and the list will filter according to what the user types.
Space Bar: Used to toggle a check box item on or off.
Using Tool Tips 2.5.3
Tool tips display information revealing an icon’s function. To view a tool tip, hover the
mouse cursor over an icon.

Page | 19
Using Internal Messaging 2.5.4
Messages can be sent to any user on the system using the internal messaging
functionality. The user can send a message by selecting the Send/Check New Messages
icon. The Web Messaging screen will appear, where the user can search for a select a
user in the system. The message has a limited amount of characters and will appear to the
recipient as an icon in the top right-hand corner.
Figure 14: Web Messaging Screen
The unread message notification will appear on the display for the recipient of a message
until they open/read the message. A brief history of their messages will be available to the
user.
Visual Cueing (Viz-e-Q©) 2.5.5
The Visual Cueing feature of the TxEVER Death module provides users with color-
coded field cues to indicate the status of each data field. Users have the ability to change
colors as per their own preferences using the User Parameters settings under the Death/
Tools/Utilities/User Parameters menu item.

Page | 20
Figure 15: User Parameters Screen
Edit Checks (Fast-Fire©) 2.5.6
2.5.6.1 Soft Edit
According to the NCHS, a soft edit is defined as: “An edit that identifies and queries
entries which are outside of the expected range, but which accepts out-of-range
entries.”
An example of a soft edit in the Death module involves the decedent’s education. If
the decedent’s documented level of education does not coincide with his/her
calculated age, the application will query the user as shown below:
Figure 16: Soft Edit Message

Page | 21
1. If the user alters one or more of the values so that the decedent’s documented
level of education coincides with his/her age and presses OK, the screen
disappears and the fields become resolved.
If the user does not alter any of the values and presses OK, the following message
appears:
Figure 17: Crosscheck Alert Message
2. If the user selects No, the soft edit will not be resolved and the user will return to
the crosscheck window.
If the user selects Yes, the soft edit becomes resolved and the values in all
crosscheck fields become resolved.
2.5.6.2 Hard Edit
According to the NCHS, a hard edit is defined as: “An edit that identifies and queries
entries which are outside of the expected range which must be corrected before the
record can be filed.”
An example of a hard edit in the Death module involves the date of death. If this
date is greater than the system date, the following message will appear:
Figure 18: Hard Edit Message
Status Bar 2.5.7
The Status bar will appear at the bottom left corner of the Demographic Data Entry
screen in the TxEVER Death module. Information appearing on the Status bar includes:

Page | 22
Figure 19: Status Bar
Field Name: Displays the name of the field currently in focus.
Field Status: Displays the status of the field currently in focus (Resolved/Unresolved).
Current Action: Displays the action that is currently being performed on the record.

Page | 23
2.6 Funeral Director Library Maintenance
In the TxEVER application, one or more of the users at a funeral home may be assigned
‘local administrator’ privileges. These local administrator privileges allow user(s) to
complete all demographic data entry processes, plus additional administrative processes
such as User Maintenance and Library Maintenance for their particular location(s).
Library Maintenance tables provide the capability for a management-level user at a
funeral home to maintain library tables used during data entry as ‘pick lists’. Library
tables serve to reduce data entry time by automatically filling in associated information.
The ability to add, update, search and view listings of the Library Maintenance Tables is
based on the security privileges assigned to each user.
Funeral Directors are responsible for submitting death records for further processing by
means of applying their PIN in the process known as Demographic Verification. Multiple
Funeral Directors are associated with each Funeral Facility and the Funeral Director
Maintenance process accounts for listing additional Funeral Directors for specific
facilities that appear on the list. The Funeral Director for the record is specified from the
‘Funeral Service Licensee’ list found on the Demographic 5 Tab of the Demographic
Data Entry process.
The Funeral Director Maintenance window consists of the following frames:
Funeral Director Profile
Funeral Director Grid
Figure 20: Funeral Director Library Maintenance Screen
Page | 24
Funeral Director Profile 2.6.1
The Funeral Director profile includes relevant information about a person acting in the
capacity of a Funeral Director.
When adding a Funeral Director profile, enter the following information:
Name (first and last are mandatory)
License Number
Display in Lists drop-down menu (mandatory)
The Display in Lists drop-down menu provides the option to have the table entry
displayed as a choice in the pick list as an available option during data entry. The Display
in Lists drop-down is useful in those cases when an entry added to a library table may
only apply to a single record.
Note: When an entry is added or modified in a library table, a duplicate check is
performed. If a duplicate entry is detected during the Save or Update process, the user
will be notified that a matching entry already exists and be prevented from adding or
updating the entry.
Funeral Director Grid 2.6.2
The Funeral Director grid displays a list of Certifiers/Attendants that are associated with
the current location. To view a specific funeral director’s profile, click the profile listing.
The Funeral Director Library Table grid is initially blank. Each local administrator will
create a list of available Funeral Director associated with their location that will appear
on the grid. Once the library table information is entered, the information will populate
the available pick lists for selection.
Adding a Funeral Director from Library Maintenance 2.6.3
If a user wants to add a Funeral Director to their location’s profile, they must complete
the following steps:
1. Select the Death/Tools/Library Maintenance/Funeral Directors menu item to load
the Funeral Directors Library Maintenance screen.
2. Enter the appropriate information for the entry.
3. To display in lists used during data entry, check Display in Lists.
4. Click Save.

Page | 25
3 Demographic Data Entry and Verification Functions
This section provides detailed information about the TxEVER Death aapplication
regarding functions related to Demographic Data Entry and Verification that allow
completion of the demographic section of the death certificate.
The TxEVER Death applications allows you to access and complete your section of a
record regardless of whether other case participants use the system or rely on the paper-
based method to complete their portion of the death certificate.
3.1 Start and Save a New Record
The NEW Record function allows authorized users to create/initiate a death record
within the TxEVER Death module.
1. Select the Death/Function/Demographic Data Entry item to initiate a new death
record.
If there are any records in the Late Records work queue, the application will issue a
message alerting the user to the presence of these late records as shown below.
Figure 21: Late Records Message
The initial Demographic Data Entry screen will appear.
2. Click on the New icon or select the Record/New menu item to load the New
Record Screen:

Page | 26
Figure 22: New Record Screen
3. Enter all available information about the decedent into the following fields:
Field Name
Value Required
Date of Death Type
Select a date of death type from the dropdown list
Date of Death
Enter Date
SSN
Enter SSN OR select value from SSN Missing Value
Variable dropdown list.
Record Type
Defaults to Identified
Decedent Last Name
Enter Text
Gender
Select a gender from the dropdown list
4. Minimally, the user must enter values into all fields listed above and click the Find
Record button.
a. If a match is NOT found, the application will display the following message:
Figure 23: Record Creation Confirmation Message
5. Click on OK to proceed with demographic data entry on a NEW record.
a. Clicking on Cancel will enable you to edit field items to re-initiate the search.

Page | 27
6. Click on the Save icon to save the record.
The application will perform an automatic SSN Verification and provide response codes,
instructions and notifications to the user, as applicable.
3.2 Pick-Up an Existing Record
The NEW Record function allows authorized users to create/initiate a death record
within the TxEVER Death application.
1. Click on the New icon or select the Record/New menu item to load the New
Record Screen:
2. The New record screen will appear:
Figure 24: New Record Screen
3. Enter all available information about the decedent into the following fields:
Field Name
Value Required
Date of Death Type
Select a date of death type from the dropdown list
Date of Death
Enter Date
SSN
Enter SSN OR select value from SSN Missing Value
Variable dropdown list.
Record Type
Defaults to Identified
Decedent Last Name
Enter Text
Gender
Select a gender from the dropdown list
4. Minimally, the user must enter values into all fields listed above and click the Find
Record button.
5. If a match is found that is owned by the same funeral home, the following message

Page | 28
will appear:
Figure 25: One Exact Match Owned by Same Location Message
a. Click the Continue with the existing record button to retrieve the matching
record or the Create a new record button to continue with the creation of the
new record.
b. If a match owned by another funeral home is found the application will
display the following message:
Figure 26: Match Owned by Another Funeral Home Message
i. Click the OK button to return to the New Record screen.
A user will not be able to take over ownership of a record from another funeral home
unless the second funeral home contacts the first funeral home or the State office directly
to request that the record be relinquished.
c. If a match that is not owned by another funeral home is found the application
will display the following message:
Figure 27: One Un-Owned Exact Match Found Message
i. Click the Accept button to accept ownership of the record.
ii. Click the Cancel button to decline the ownership of the record.

Page | 29
d. If multiple matches are found, the application will display the following
message:
Figure 28: Multiple Matches Found Message
i. Click the OK button to return to the New Record screen.
6. Proceed with demographic data entry by completing the information requested on
Demographic Tabs 1-5. See Demographic Data Entry Topics for more details on how
to complete the record.
Page | 30
3.3 Search for a Record
Searching for a record in the application can be accomplished using the following
options:
Search screen
Work Queue search
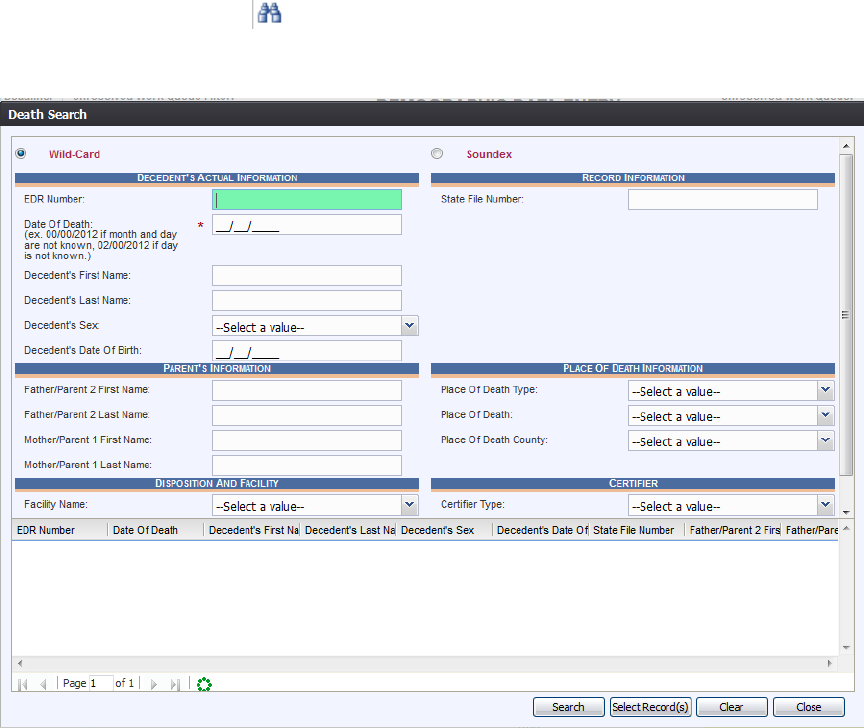
Search Screen 3.3.1
1. Click the Search icon or select the Record/Search menu item.
2. The Death Search screen will appear:
Figure 29: Death Search Screen
3. Enter all available information regarding the record that needs to be located.
Tip: Text fields such as names do not have to be complete. Enter the first
several letters instead of the entire text when spelling is in question but
include other items to reduce the number of matches.
Tip: Along with a name, including the year of death (which can be entered as
a series of 00s followed by a year - i.e. 00/00/2012) and gender and other
information will reduce the number of matches that are returned and cause
faster search results.

Page | 31
Tip: Choosing Soundex still requires the user to enter at least the Decedent’s
year of death. If the user also decides to search by a name, the full name must
be entered and the application will search for not only all exact matches but
names that sound familiar as well.
4. Click Search.
5. Records that match the search criteria will populate in the grid in the lower half of the
screen.
Figure 30: Death Search Screen with Results
6. Click the appropriate record to select. Select multiple records by holding down the
Ctrl key and clicking on records.
7. Click Select Record(s) to retrieve records to the Work Queue.
8. Select a record from the work queue by clicking on it to retrieve it to the screen.
9. The selected record will be retrieved by the system and its information will appear on
the screen as an active record for additional review and/or processing.

Page | 32
Work Queue Search 3.3.2
The Work Queue in the Demographic Data Entry process will contain the following:
Death records associated with the user’s login location that still require some
type of action.
The list in the work queue will be sorted by the date of death and will display the
decedent’s last name, decedent’s first name, and decedent’s date of death.
1. From the drop-down list, set the filter for the appropriate record type, as shown
below. Options include:
Figure 31: Unresolved Work Queue Filter
All Unresolved: All records that have been started but the information is not
yet complete.
Awaiting Medical Certification: All records that are awaiting medical
certification.
Demographic Data Entry Incomplete: All records on which demographic
data entry has not been completed.
Drop to Paper: All records that have been dropped to paper but not yet
submitted to the Registrar.
Late Records: All records not registered within the State-defined time period
(10 days).
Medical Certification Complete: All records with completed medical
certification.
Pending Acceptance: All records that have been designated to a medical
certifier but not yet accepted or rejected.
Pending Demographic Verification: All processes completed except for
demographic verification.

Page | 33
Records filed with Registrar: Records that have been submitted to the State
but are not yet registered.
Rejected: All records that have been rejected back to the funeral home by the
Registrar.
SSN Failed Verification: All records that have failed SSN verification.
SSN Pending Verification: All records with pending SSN verification.
2. From the record list, select the appropriate record by clicking on it, or with the focus
on the list, start typing the decedent’s last name (if available).
Figure 32: Unresolved Work Queue
3. The selected record will be retrieved by the system and its information will appear on
the screen as an active record for additional review and/or processing.
3.4 Cancel Changes
A user may cancel changes made to a record since it was last saved in Demographic
Data Entry.
1. Retrieve an existing record using the Work Queue Search or the Search Screen.
2. Enter information or modify information entered in any fields. If a user navigates
away from the current record by completing such an action as initiating a record
search or accessing a new record, the system will display the following message:
Figure 33: Save Changes Confirmation Message
a. Click No to cancel the changes made to the record.
b. Click Yes to save the changes made to the record.

Page | 34
3.5 Update a Record
The Demographic Data Entry menu item function allows authorized users to
create/initiate a death record as well as update an existing record within the TxEVER
Death module.
1. Select the Death/Function/Demographic Data Entry menu item.
a. If there are any records in the Late Records Work Queue, the following message
will appear:
Figure 34: Late Records Message
The initial Demographic Data Entry screen will load.
2. Search for a record using the Search Screen or the Unresolved Work Queue and
update unresolved fields on the record that is retrieved on the screen.
3. While a record with unsaved changes is on screen, select the Record/Save menu
option, or the Save icon.
The following message will appear:
Figure 35: Record Successfully Updated Message
All previously unsaved changes made to the record will be saved.
4. Proceed with demographic data entry by completing the information requested on the
data entry tabs. See Demographic Data Entry Topics and Technical Demographic
Data Entry Tips for more details on how to complete the record.

Page | 35
3.6 Abandon a Record
Any user can choose to abandon a record up until the record is released and assigned a
State File Number (SFN). If a record is registered, the record can be voided in Legal
View.
To abandon the record, select Record/Abandon or the Abandon icon .
The following message will appear:
Figure 36: Record Abandon Confirmation Message
Select No to cancel the action and return to the record or select Yes to continue
abandoning the record. Provide a reason for abandoning the record in the Comment box
shown below and press OK.
Figure 37: Abandon Record Comment Screen
The following message will appear:
Figure 38: Record Abandon Completed Successfully Message

Page | 36
3.7 Return to the Main Menu
Return to the Death module main menu at any time by selecting the Function/Home
menu item.
3.8 Using the Unresolved Fields List
Depending on the type of record, a number of actions need to be performed before a
record is ready to be submitted for further processing. To check if all data items were
completed, use the Unresolved Fields list to identify areas that require some sort of
action before the record is resolved. The unresolved list displays individual data fields
that need to be completed for a specific record before it can be resolved.
1. Retrieve a record.
2. Click Unresolved/StakeHolders to open the list.
The Unresolved Fields list will open.
Figure 39: Unresolved Fields List
3. To be directed to a particular unresolved field, click the field’s link. The system will
navigate to that particular field directly so that it may be resolved; the Unresolved
Fields list will close.
4. Click Unresolved List again to close the list and return to the data entry screen.
3.9 Demographic Data Entry Topics
The objective of this section is to address data entry completion topics so that records
may be available for further processing. Most of the data items that need to be completed
will only require the Tab key to advance to the field, typing the necessary information,
and then pressing the Tab key to advance again. This section describes the remaining
scenarios.

Page | 37
Double Data Entry 3.9.1
Certain fields (such as Decedent First Name) within the Demographic Data Entry screen
will require that the user enter the value into the main data entry screen and then confirm
the entered value by entering it again in a separate data entry interface. Fields that require
double data entry will present users with the following screen when the user tabs off the
field:
Figure 40: Double Data Entry Screen
Enter the value again and click the OK button to close the Double Data Entry screen. If
the value entered in the Double Data Entry screen matches the value entered on the main
data entry screen, the user will be moved to the next data field. If the values do not
match, the following message will appear:
Figure 41: Double Data Entry Error Screen
Click OK to close the message and return to the data entry screen. The value entered into
the field will be cleared and the double data entry process will be required again.
AKA Name(s) Fields 3.9.2
The AKA Name fields are among the first ones encountered once the record is initiated
by entering data on the New Record screen. TxEVER contains the ability to capture
multiple sets of decedent AKA (Also Known As) name fields (First, Middle, Last, Suffix)
if they are available.
To add an AKA Name:
1. Click on the ‘Add/Edit AKA Names’ button (located next to the title bar of the
Decedent’s Legal Name fields section on Demographic 1 tab)
Figure 42: Add/Edit AKA Names Button

Page | 38
2. Enter available names in the box that appears and press the Save/Update button.
Figure 43: Add/Edit AKA Names Screen
Pick List Navigation 3.9.3
Decedent’s Birthplace fields illustrate the concept of pick-list menus. Refer to examples
below to quickly retrieve entries and expedite data entry.
Figure 44: Decedent’s Birthplace Field
1. Set focus on the State/Country field by clicking on the field. Type the letters TE or
any other beginning letters of another state.
Typing TEXAS will also find TEXAS and typing SOUTH C will find
SOUTH CAROLINA but will require typing more letters before the desired
match is found.
Selecting a state will filter results in the County and City/Town pick-lists as
well.
2. With focus still on the State/Country field, click the checkbox. The pick-list

Page | 39
will now contain both states and countries.
Death Age Entry 3.9.4
Decedent’s Date of Birth fields require an ‘Age Units’ and ‘Age’ entries to determine
record processing sequence.
1. With the mouse, click on the Date of Birth field and use the Tab key to advance to the
Age Units field on the Demographic 1 tab.
Figure 45: Date of Birth and Age Fields
2. If you haven’t entered decedent’s Date of Birth already, do so now, and press Tab to
advance to the Age Units field.
3. In the Age Units field, use the mouse to click on the double-arrow icon or use the
Down Arrow key to open the list and select the appropriate age unit (Years, Months,
Days, Hours, Minutes.)
4. Enter the decedent’s age at the time of death. If the entered value does not coincide
with the value calculated by the system by taking into account the birth and death
dates, the following screen will be displayed:
Figure 46: Crosscheck Message
5. Correct the age and click OK. Use the Tab key to advance to the next field.

Page | 40
Screen Tab Navigation 3.9.5
When the last field on the Demographic 1 tab is resolved the next field that needs a
response is on the Demographic 2 tab.
Pressing Tab from the final field on the Demographic 1 tab automatically advances the
focus to the Next button at the bottom of the screen and the user can press Enter on the
keyboard to load the Demographic 2 tab. The user can also navigate to various screen
tabs by clicking on them with a mouse.
Place of Death Facility 3.9.6
Once a facility is selected, the address fields for a listed facility are automatically
populated. These types of fields are retrieved from the database and are referred to as
bypassed and disabled. The address information of a given facility cannot be directly
edited on the screen.
Funeral Facility Profile 3.9.7
Funeral facility name and profile is based on the login profile of the user who originally
initiated the record. The address fields are retrieved from the database and cannot be
directly modified on the screen.
Figure 47: Funeral Facility Profile Fields
Hispanic Origin and Race Fields Properties 3.9.8
Hispanic Origin allows selecting one choice from the available options. Use the mouse or
the spacebar key on the keyboard to check and select the single desired choice.
To change the choice, first un-check the selected choice.

Page | 41
Figure 48: Ethnicity and Race Fields
Race fields allow multiple choices.
Race check box fields can also be selected and de-selected using the mouse or the
keyboard. Use the Tab key and the Shift+Tab key to navigate to the desired choices
and the Spacebar or the mouse to select or de-select.
3.10 Record Comments
Some events require a corresponding comment. These comments are stored and can be
viewed in a grid on the Comments tab:
The following information regarding each comment will be stored:
Action that required the comment
The funeral home user logged in when the comment was entered
Date and time the comment was entered
Text of the comment (600 characters)
Comments may be entered or viewed by clicking on the Comments tab in Demographic
Data Entry.

Page | 42
3.11 SSN Verification
Social Security Number (SSN) verification is a pre-requisite for subsequent record
processing.
Important Note: after entering initial record data and saving the record you may need to
wait several minutes to get a Verification Status response and retrieve the response by
again saving the record at that time. Saving the initial record data and later returning to
complete the record by accessing the record from the Unresolved Work Queue will also
ensure that the SSN Verification Status is retrieved and saved on the record.
Automated Process 3.11.1
This is a behind-the-scenes process that is automatically triggered by data entered in the
Demographic Data Entry when the following fields become resolved and saved:
Decedent’s Last Name
Decedent’s First Name
Decedent’s Middle Name
Decedent’s Date of Birth
Decedent’s Gender
Decedent’s Social Security Number
State of Death
The system ‘looks’ for results of the request (if necessary) when the record is saved,
when it is again retrieved, and when the demographic verifier attempts to verify the
record. The demographic data entry screen contains an indicator of the SSN verification
status for the record.
Up to five (5) separate attempts can be made to verify/re-verify the SSN. The system will
count the attempts made and if three (3) or more attempts are made on the same record,
an entry will be made in the system audit log. Multiple attempts on the same record
could be an indicator that various names and/or Social Security Numbers are being
entered to ‘fish’ for matches.
Figure 49: SSN Verification Fields
Response Generation
3.11.2
The following responses will be interpreted as successful results: Passed(Y), FailSSN(1),
FailGender(2), FailDOB(3), FailDOBGender(4), FailName(5.) The ‘Passed’ response
indicates that all related information matched and the Social Security Number has been
verified as being correct for the named individual. The other 5 listed responses indicate a
discrepancy that should be investigated by the demographic verifier. The system will
provide the corresponding prompt, but the option to leave the record unchanged will exist
and will not prevent the record from being released.

Page | 43
3.12 Designate a Medical Certifier
This process will identify the medical certifier for this record and if they are participating
electronically it will send an e-mail notification and cause the death record to appear in
their work queue for acceptance. Before the medical certifier can actually work on the
record, s/he must accept the record. You can find records that need to be designated to a
Medical Certifier using the Unresolved Work Queue.
1. After retrieving a record that needs designation of a Medical Certifier using the
Search Screen or through the Work Queue, select the Record/Designate Medical
Certifier menu item to initiate the search/selection process.
2. The Medical Certifier Designation Screen will load:
Figure 50: Medical Certifier Designation Screen
3. Select the desired Certifier Type from the drop-down list.
4. Enter all available Medical Certifier information and click on the Search button to
initiate the search.
5. Select the desired medical certifier by clicking the associated row in the search results
grid.

Page | 44
Figure 51: Medical Certifier Designation Screen with Records Retrieved
6. Click on Designate to assign Medical Certifier and Office Location on the death
record. The medical certifier’s information will populate in the medical certifier fields
and the fields will disable.
7. The application will display a message regarding the status of the designation
(success vs. failure).
Figure 52: Designation Process Completed Successfully Message
8. Upon successful designation, click OK to close the Medical Certifier Designation
screen.
9. If designation fails, repeat designation process by returning to and following Step 1
above.

Page | 45
3.13 JP/Medical Examiner Referral
1. Retrieve a record that needs referral to a JP/Medical Examiner using the Search
Screen or through the Work Queue.
2. Select the Record/Refer to JP/Medical Examiner menu item to initiate the
search/selection process.
3. The application will load the Medical Certifier Designation Screen:
Figure 53: Medical Certifier Designation Screen
4. Select a value of Medical Examiner or Justice of the Peace from the Certifier Type
drop-down menu.
5. Enter full or partial data values into the provided search fields and then click the
Search button.
6. Search results will appear in the search results grid.
7. Select the desired medical certifier by clicking the associated row in the search results
grid and click Designate. The Medical Certifier Designation screen will close and the
medical certifier’s information will populate in the medical certifier fields and the
fields will disable.
Page | 46
3.14 Printing Forms
Print/Re-print Death Certificate Worksheet 3.14.1
The application provides Funeral Directors the ability to generate a Death Certificate
Worksheet.
1. Retrieve an existing record using the Work Queue Search or the Search Screen.
2. Select the Record/Print/Death Certificate Worksheet menu option.
3. The application will open the PDF version of the form that allows printing.
4. Click the Print icon in the PDF window to print the document.
5. When the document is printed, close the PDF browser window using the X in the
upper right-hand corner of the screen to return to the TxEVER application.
Print Burial Transit Permit 3.14.2
The application provides Funeral Directors the ability to generate a pre-populated
Disposition Burial Transit Permit once a record has been demographically verified.
1. Retrieve an existing record using the Work Queue Search or the Search Screen to
print a pre-populated disposition permit
2. Select the Record/Print/Burial Transit Permit menu option.
3. The application will open the PDF version of the form that allows printing.
4. Click the Print icon in the PDF window to print the document.
5. When the document is printed, close the PDF browser window using the X in the
upper right-hand corner of the screen to return to the TxEVER application.
Report of Death 3.14.3
The application provides Funeral Directors the ability to generate a Report of Death.
1. Retrieve an existing record using the Work Queue Search or the Search Screen.
2. Select the Record/Print/Report of Death menu option.
3. The application will open the PDF version of the form that allows printing.
4. Click the Print icon in the PDF window to print the document.
5. When the document is printed, close the PDF browser window using the X in the
upper right-hand corner of the screen to return to the TxEVER application.

Page | 47
Drop to Paper Form 3.14.4
The application provides Funeral Directors the ability to generate a Drop to Paper Form
once a record has been dropped to paper.
1. Retrieve an existing record using the Work Queue Search or the Search Screen.
2. Select the Record/Print/Drop to Paper Form menu option.
3. The application will open the PDF version of the form that allows printing.
4. Click the Print icon in the PDF window to print the document.
5. When the document is printed, close the PDF browser window using the X in the
upper right-hand corner of the screen to return to the TxEVER application.
Verification of Death Facts 3.14.5
The application provides Funeral Directors the ability to generate a Verification of Death
Facts once a record has been dropped to paper.
1. Retrieve an existing record using the Work Queue Search or the Search Screen.
2. Select the Record/Print/Drop to Paper Form menu option.
3. The application will open the PDF version of the form that allows printing.
4. Click the Print icon in the PDF window to print the document.
5. When the document is printed, close the PDF browser window using the X in the
upper right-hand corner of the screen to return to the TxEVER application.
6. The application will display the following message:
Figure 54: Record Successfully Marked to Indicate Verification of Death Facts Printed Message
7. Click OK to close the message and return to the Demographic Data Entry screen.
8. Once the Verification of Death Facts has been signed, click the Verification of Death
Facts has been signed checkbox located on the Demographic 5 tab.

Page | 48
3.15 Demographic Verification
This section describes different aspects of Demographic Verification and addresses
certain implications of this process.
Performing Demographic Verification 3.15.1
Demographic Verification is the process provided to demographic verifiers as a means
to electronically ‘sign’ the demographic portion of the death record after the review of
values of demographic items on the Death Certificate for submission to the Registrar.
Before demographic verification can be successfully performed, the following must be
accomplished:
Demographic Data Entry is complete
Receipt of acceptable response from SSN Verification Process
Printing of Verification of Death Facts
Important Note: A demographic verifier can only perform demographic verification on
records that identify him/her on the record as the demographic verifier.
1. Search for the desired record using the Work Queue Search by setting the unresolved
work queue filter to Pending Demographic Verification.
OR
By using the Search Screen method by clicking on the Submit button or selecting the
Record/Search menu item.
2. Select a record from the Work Queue drop-down list or from the Search Screen grid.
3. When the appropriate record appears on the screen, select the Record/Demographic
Verification menu item to initiate the demographic verification process.
4. The following message will be displayed:
5. Click the OK button to open the Death Certificate Order Interface screen.
6. Complete the fields on the DCOA Interface screen and click the Proceed button.
7. The application will display the following message:

Page | 49
8. Click Yes to confirm the order or click No to return to the previous screen.
9. The application will display the following message:
10. Click OK to close the message and return to the Demographic Data Entry screen.
11. Select the Record/Demographic Verification menu item to initiate the demographic
verification process.
12. The Demographic Verification Screen will display the following information:
a. Decedent’s Information: Decedent’s First Name, Middle Name, Last Name,
Suffix, Prefix, Sex and Date of Birth
b. Death Information: Date of Death, Funeral Director, Place of Death

Page | 50
13. Review the information to verify that you are demographically verifying the correct
record.
14. Click on Verification if all data items are correct.
a. If you would like to view a preview of a Death Certificate Abstract for the record,
click on ‘Preview’ to load a new browser window containing the Death
Certificate Abstract in a PDF format. If so desired, the user may print the Death
Certificate Abstract from this screen.
b. If all data items are not correct and need to be edited, click on Cancel to correct
the information in the demographic data entry screen. Save the corrections made
to the record and return to Step 1 instructions above to re-initiate demographic
verification.
15. If the record is not fully electronic and the Medical Certifier is not participating OR a
medical certifier is not designated on the record - the following message will be
displayed:

Page | 51
a. If the response to the Drop to Paper prompt is No the record will not be
demographically verified.
16. If the record is fully electronic or the response to the Drop to paper prompt is Yes the
application will display a screen with the following statement: ‘I verify that to the
best of my knowledge the demographic information on this record is complete and
accurate.’
17. Check the checkbox, enter your PIN and click on OK to complete demographic
verification.
18. The application will issue a message asking if the user wishes to proceed with
verifying the record—click Yes to continue with the verification or click No to cancel
the verification.
19. If the correct PIN has been entered and the record is fully electronic, the application
will issue the following message:
20. Click OK to close the message and return to the Demographic Data Entry screen.
a. If the record is Drop to Paper, the Death Certificate Worksheet will load in a new
browser window in PDF format.

Page | 52
21. Once a record has been demographically verified it is locked from further changes by
the Funeral Director. Certain circumstances will permit de-verification of a record to
allow the respective portion of the record to be edited again. See De-Verify
Record/Record Locking for details.
22. Depending on the type of record (fully electronic or not fully electronic), one of the
following actions will take place –
For a Fully Electronic record, if both Medical Certification and Demographic
Verification are complete, the record will be placed in the State Batch Print
queue.
For a record where the Medical Certifier is not participating electronically, a
Drop to Paper process will be initiated so that the Medical Certification of the
record may be completed on paper before it is sent to the Local Registrar.
3.16 De-Verify Record / Record Locking
Once the record has been demographically ‘verified’ the record is locked from further
changes by the respective participant. Certain circumstances will permit de-verification
of a record to allow the respective portion of the record to be edited again.
In some cases, the record may become ‘Locked’ and you may not be able to de-verify.
To de-verify a record:
1. Search for the record using the Search Screen by clicking on the ‘Search Record’
button.
2. Once the record is retrieved, select the Record/De-Verify menu item.
3. The application will issue the following message:
4. Click Yes to proceed with de-verification. Clicking No will cancel the de-verification
and return the user to the Demographic Data Entry screen.
Note: if clicking on the menu option results in no action, the option is probably ‘disabled’
because the record has not yet been Demographically Verified.
5. Enter a comment (150 characters) regarding the reason for de-verification in the
comment box:

Page | 53
6. Click OK to confirm de-verification. The application will issue a message confirming
that de-verification was successful:
7. Make changes, as appropriate, and follow the steps to perform Demographic
Verification.
3.17 Perform Drop-to-Paper
The Drop-to-Paper function in demographic data entry can be used when one or more
relevant entities are not participating in the use of the TxEVER Death application. When
invoked, ‘Drop to Paper’ will cause the record to be printed on the Death Certificate
Worksheet for forwarding to a non-participating entity for additional manual processing
prior to registration.
1. Search for the record using the Search Screen method or through the Work Queue
Search by setting the filter to Pending Demographic Verification.
2. Follow the steps to perform Demographic Verification by referring to section 3.15.1
Performing Demographic Verification.
3. For the cases where a medical certifier is not a participating owner on the record at
the time of demographic verification, the system will provide the following prompt:

Page | 54
a. If No is clicked, then the record will not be demographically verified.
b. If Yes is clicked, the record will be demographically verified.
4. A print preview of the Death Certificate Worksheet as a PDF document will load in a
separate browser.
5. Click the Print icon in the PDF window to print the document.
When the document is printed, close the PDF browser window using the X in the upper
right-hand corner of the screen to return to the TxEVER application.
Notes:
Once a record has ‘dropped-to-paper’ the electronic record becomes locked so
that no further action can be taken by external users but the drop to paper form
can be printed again as many times as necessary.
All subsequently required certification would occur on the paper document.
3.18 Generating Reports
Demographic Amended Records Report 3.18.1
The application provides funeral home users the ability to generate a Demographic
Amended Records report.
1. Select the Reports/Demographic Amended Records Report menu option.
2. The following screen will appear:

Page | 55
Figure XX: Demographic Amended Records Report Screen
3. Complete the fields on the input screen.
4. Select Excel or PDF for the report’s format.
5. Print the document from the PDF window or from Microsoft Excel.
6. When the document is printed, close the PDF window or Microsoft Excel using the
X in the upper right corner of the screen to return to the TxEVER system.
Disposition Overview Report 3.18.2
The application provides funeral home users the ability to generate a Disposition
Overview report.
1. Select the Reports/Disposition Overview Report menu option.
2. The following screen will appear:
Figure XX: Demographic Amended Records Report Screen
3. Complete the fields on the input screen.
4. Select Excel or PDF for the report’s format.
5. Print the document from the PDF window or from Microsoft Excel.
6. When the document is printed, close the PDF window or Microsoft Excel using the
X in the upper right corner of the screen to return to the TxEVER system.

Page | 56
Facility Delinquent Report (UnCertified) Report 3.18.3
The application provides funeral home users the ability to generate a Facility Delinquent
Report (UnCertified) report.
1. Select the Reports/Facility Delinquent Report (UnCertified) menu option.
2. The following screen will appear:
Figure 100: Facility Delinquent Report (UnCertified) Screen
3. Complete the fields on the input screen.
4. Select Excel or PDF for the report’s format.
5. Print the document from the PDF window or from Microsoft Excel.
6. When the document is printed, close the PDF window or Microsoft Excel using the
X in the upper right corner of the screen to return to the TxEVER system.
Fatalities by County by Month Report 3.18.4
The application provides funeral home users the ability to generate a Fatalities by
County by Month report.
1. Select the Reports/Fatalities by County by Month Report menu option.
2. The following screen will appear:

Page | 57
Figure 101: Fatalities by County by Month Report Screen
3. Complete the fields on the input screen.
4. Select Excel or PDF for the report’s format.
5. Print the document from the PDF window or from Microsoft Excel.
6. When the document is printed, close the PDF window or Microsoft Excel using the
X in the upper right corner of the screen to return to the TxEVER system.
Pending Cause of Death Listing Report 3.18.5
The system provides funeral home users the ability to generate a Pending Cause of
Death Listing report.
1. Select the Reports/Pending Cause of Death Listing Report menu option.
2. The following screen will appear:
Figure 104: Pending Cause of Death Listing Report Screen
3. Complete the fields on the input screen.
4. Select Excel or PDF for the report’s format.
5. Click Generate.
6. Print the report from the PDF window or from Microsoft Excel.

Page | 58
7. When the document is printed, close the PDF window or Microsoft Excel using the
X in the upper right corner of the screen to return to the TxEVER system.
Timeliness by Funeral Establishment Report 3.18.6
The system provides funeral home users the ability to generate a Timeliness by Funeral
Establishment report.
1. Select the Reports/Timeliness by Funeral Establishment Report menu option.
2. The following screen will appear:
Figure 105: Timeliness by Medical Certifier Type Report Screen
3. Complete the fields on the input screen.
4. Choose Excel or PDF for the report’s format.
5. Click Generate.
6. Print the report from the PDF window or from Microsoft Excel.
7. When the document is printed, close the PDF window or Microsoft Excel using the
X in the upper right corner of the screen to return to the TxEVER system.
3.19 Relinquish a Record
If the Funeral Home that originally entered a record is contacted by the family and
notified that they desire the services of a different funeral home, the Funeral Home of
Record will ‘Relinquish’ the record by removing their designation on the record as the
Funeral Home of Record. When the record is re-saved, the record will no longer be in the
work queue of the original Funeral Home. The new funeral home of record will ‘pick up’
the electronic record by entering a NEW record and having the NEW record match the
existing record.
To relinquish a record:
1. Retrieve an existing record using the Work Queue Search or Search Screen.

Page | 59
2. When the appropriate record appears on the screen, select the Record/Relinquish
menu item to initiate the relinquish process. The following confirmation message will
appear:
3.20 Release a Record
After both demographic verification and medical certification have been completed, a
record is ready to be released.
1. Retrieve an existing record using the Work Queue Search by setting the filter to
Medical Certification Complete.
2. When the appropriate record appears on the screen, select the Record/Release menu
item to initiate the release process. The following screen will appear:
3. Enter a valid PIN and click the OK button. Clicking Cancel will close the Enter PIN
screen and return the user to the previous screen.
4. The following message will be displayed:

Page | 60
4 Facility Statistical Correction
This section provides detailed information about the TxEVER Death application
regarding functions related to Facility Statistical Corrections.
4.1 Start a Facility Statistical Correction
The Statistical Corrections menu item function allows authorized users to submit a
statistical correction on a death record within the TxEVER Death module.
1. Select the Function/Facility Statistical Correction menu item.
2. The Statistical Import Review screen will load:
3. Retrieve an existing record using the Work Queue Search.
4. Select the Record/Statistical Correction menu option to open the desired record in
the Statistical Corrections screen, as shown below:

Page | 61
5. Click the Go button to open the record for statistical correction.
6. After coming to a field that needs to be corrected, click the icon located next to the
appropriate field.

Page | 62
6. Enter the corrected value into the field.
7. Add any supporting documentation at this time by completing the fields in the
Supplemental Documents section located at the bottom of the screen and then click
either the Scan Document or Upload Document icon.
Scan Supporting Documentation
4.1.1
To scan supporting documentation:
1. Add any supporting documentation at this time by completing the fields in the
Supplemental Documents section located at the bottom of the screen and then click
the Scan Document icon.
If the user does not intend to scan in any supporting documentation, they can press the
Save Document without Scan icon after entering a corrected value in the New Data
section.

Page | 63
2. The Scan Documents window will appear.
3. Enter the Document Type, Who Issued the document, the Date Issued and the
Image Description into the corresponding fields, select the desired scanner from the
List of Scanners, select RGB from the Scan Type and then click Scan Document.
4. Pressing Scan Document will load the image in the image preview section of the
screen. To save the document, click the Save Document button.
5. A notification will appear when the file has successfully saved or if the save has
failed.
6. Click the X in the right corner of the Scan window to close the window and return to
the Corrections screen.
7. The user can choose to scan more supporting documentation by clicking the Scan
Another Document icon and completing the scanning process again.
8. Save the changes by clicking the Save button in the New Data section of the
Corrections screen.

Page | 64
Upload Supporting Documentation 4.1.2
To upload supporting documentation:
1. Add any supporting documentation at this time by completing the fields in the
Supplemental Documents section located at the bottom of the screen and then click
the Upload Document icon.
2. The File Upload screen will appear.
3. Click the Browse button to open the File Upload screen.
4. Locate the desired .tif or .tiff file and click the Open button.
5. The File Upload screen will appear as seen below:

Page | 65
6. Click the Save button.
7. The following message will appear:
8. Click OK to close the message.
9. Save the changes by clicking the Save button in the New Data section of the
Corrections screen.
4.2 Submit a Facility Statistical Correction
To submit a statistical correction:
1. Select the Process/Accept menu item or click the Accept icon.
2. The following message will appear:
3. Click the Yes button to confirm acceptance of the correction. The following message
will appear:
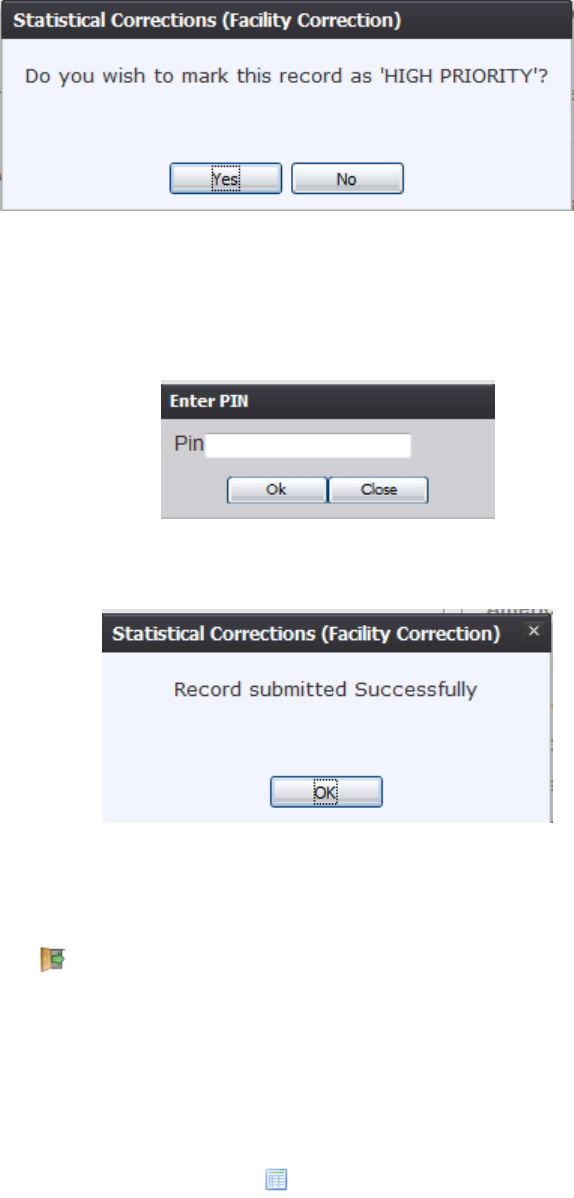
Page | 66
4. Click the Yes button to submit the correction as high priority.
a. Click the No button to decline submitting the correction as high priority.
5. The Enter PIN screen will appear:
6. Enter in a valid PIN and click the OK button.
7. The following message will appear:
4.3 Cancel a Facility Statistical Correction
To cancel a statistical correction:
1. With the Statistical Correction screen open, select the Process/Exit menu item or
click the Exit icon.
4.4 View Corrections/Supporting Documents
To view corrections/supporting documents:
1. With the Statistical Correction screen open, select the Process/View
(Corrections/Supporting Documents) menu item or click the View
Corrections/Supporting Documents icon.

Page | 67
4.5 Reject Facility Statistical Correction
The Reject Statistical Corrections menu item function allows authorized users to reject
completing a statistical correction on a death record within the TxEVER Death module.
1. After accessing the main Facility Statistical Correction screen and retrieving a record
from the work queue, select the Record/Reject Statistical Correction menu option.
2. The following message will appear:
3. Click the Yes button to confirm that the record has been reviewed.
a. Click the No button to close the message and be returned to the Statistical
Corrections screen.
4. The Reject Record screen will load:
5. Enter a reason for the rejection and click the OK button.
a. Click the Close button to close the screen and be returned to the Statistical
Corrections screen.
6. The application will display the following message:

Page | 68

Page | 69
5 Permit Print Queue
The Permit Print Queue screen allows for authorized funeral home users to print burial
and disinterment permits for death records.
5.1 Access Permit Print Queue
Access the Permit Print Queue screen by selecting Death at the top of the screen and
going to Function/Permit Print Queue.
5.2 Burial Transit Permits
Search for Burial Transit Permits Previously Not Printed 5.2.1
1. Access the Permit Print Queue screen by selecting Death at the top of the screen
and going to Function/Permit Print Queue.
2. Search for permits for printing by selecting the Burial Transit Permit item from the
Permit Filter dropdown item and leaving the All Previously Not Printed radio button
selected:
3. Click the Submit button to load all permits that have not been previously printed in
the search results grid.

Page | 70
Search for Burial Permits Previously Printed 5.2.2
1. Access the Permit Print Queue screen by selecting Death at the top of the screen
and going to Function/Permit Print Queue.
2. Select the desired group of records for printing by selecting the All Previously Printed
radio button and entering in the desired date range:
3. Click the Submit button to load all previously printed permits that match the
search criteria in the search grid.

Page | 71
Print Burial Permits 5.2.3
1. Access the Permit Print Queue screen by selecting Death at the top of the screen
and going to Function/Permit Print Queue.
2. Select the desired group of permits for printing by entering the selected criteria into
the search fields.
3. Click the Submit button to load all permits that match the search criteria in the search
grid.
4. Select the desired permit by clicking on a row in the grid. Information from the
selected permit will appear at the bottom of the screen:

Page | 72
5. Click the Print button to print the selected permit. Clicking Clear will clear the
information from the search grid and search fields.
6. The system will issue the following message:
7. Click OK to close the message and open the requested permit in a PDF window for
printing.
5.3 Disinterment Permits
Search for Disinterment Permits Previously Not Printed 5.3.1
1. Access the Permit Print Queue screen by selecting Death at the top of the screen
and going to Function/Permit Print Queue.
2. Search for permits for printing by selecting the Disinterment Permit item from the

Page | 73
Permit Filter dropdown item and leaving the All Previously Not Printed radio button
selected:
3. Click the Submit button to load all permits that have not been previously printed in
the search results grid.
Search for Disinterment Permits Previously Printed 5.3.2
1. Access the Permit Print Queue screen by selecting Death at the top of the screen
and going to Function/Permit Print Queue.

Page | 74
2. Select the desired group of records by selecting the All Previously Printed radio
button and entering in the SFN Year:
3. Click the Submit button to load all previously printed permits that match the
search criteria in the search grid.

Page | 75
Print Disinterment Permits 5.3.3
1. Access the Permit Print Queue screen by selecting Death at the top of the screen
and going to Function/Permit Print Queue.
2. Select the desired group of permits for printing by entering the selected criteria into
the search fields.
3. Click the Submit button to load all permits that match the search criteria in the search
grid.
4. Select the desired permit by clicking on a row in the grid. Information from the
selected permit will appear at the bottom of the screen:
5. Click the Print button to print the selected permit. Clicking Clear will clear the
information from the search grid and search fields.
6. The system will issue the following message:

Page | 76
7. Click OK to close the message and open the requested permit in a PDF window for
printing.

Page | 77
6 Approvals
Sign-off Sheet
I have read the above TxEVER Death Module Funeral Home User Guide and accept
the contents herein written.
Project Sponsor:
Date
Senior Project Manager:
Date
Genesis Project Manager:
Date
