84 Make: Volume 08
Photography by Zach DeBord/M27.com
Pummer, Dude!
Part robotic plant life, part techno-sculpture,
these desktop toys are easy and fun to make.
By Gareth Branwyn
TOYS
GAMES
&
M_084-086_Pumm_F1.indd 84M_084-086_Pumm_F1.indd 84 10/18/06 11:22:59 AM10/18/06 11:22:59 AM

85Make:
I
N MAKE VOLUME 06, I WROTE ABOUT BEAM,
a branch of robotics built on low-end, mainly
analog electronics that is inspired by biology.
I described how to build two types of bots in the
BEAM taxonomy: Solarrollers and Symets. One of
the more obscure members of the BEAM family
tree is the Sitter, an immobile robot with few or no
moving parts.
One of my favorite types of Sitters is the Pummer,
a nocturnal, robotic plant that soaks up the sun
during the day; stores that energy in batteries or
capacitors; and then, when it senses darkness,
feeds power to a light which pulses, or “pumms,”
away in the dark. Since the electronics are simple
and minimal, you can have fun with the design of
your Pummer, creating a swanky piece of high-tech
art that will intrigue everyone who sees it adorning
your geekosphere.
How a Pummer Works
In “A Beginner’s Guide to BEAM” (MAKE, Volume
06, page 54), we talked about different types of
Solarengines (SE), which are simple power circuits
for actuating miniature robots. We mentioned the
nocturnal type of Solarengine. This is the variety
of SE used in many Pummers. All SE circuits work
in much the same way: the solar cell captures light
energy, converts it to electrical energy, and sends
it to storage, either in capacitors or rechargeable
batteries. When a trigger value is reached, the
stored energy gets sent off to do some sort of work.
In a voltage-triggered SE, the trigger is a set voltage
ceiling. In a nocturnal SE, the trigger is a threshold
value of light.
Looking at the circuit diagram on the following
page, you might be asking yourself: where is the
sensor that tells the Pummer that it’s lights out and
time to get with the pummin’? Ingeniously, the solar
cell and the circuit itself serve this purpose.
During the day, when light hits the cell and the
cell is sending juice to storage, the diode in the
circuit keeps the enable line set to high. When the
level of light/current reaching the cell/circuit falls
below a certain value (as set by the value of the
parallel resistor), the enable goes low, triggering the
discharge cycle and the pumming of the LED(s).
The diode, being a sort of one-way valve in a circuit,
prevents the current from flowing back into the
charging part of the circuit; it has no place else to
go but along the discharge path.
Pummer Circuits
There are a number of different Pummer circuits
you can use, from simple ones that power a single
LED, to more sophisticated ones designed to maxi-
mize power collecting and discharging, and ones
that can power multiple LEDs. The one shown here,
used in the Solarbotics Bicore Experimenters BCP
Applications Project (see makezine.com/08/
pummer), balances simplicity with circuit efficiency
and bang-for-buck; i.e., it makes a pretty damn cool
Pummer without too many building headaches.
This nocturnal SE circuit makes use of another
hallmark BEAM circuit, the bicore, which is the
basic “neuron” of BEAM “intelligence” (see MAKE,
Volume 06, page 54 and page 58). Here, the two-
state oscillator is used to create the flashing/
pumming behavior. The C1 and C2 caps are used
to set the blink/pause rates, and C3 handles the
“decay” rate of the pumms. You can play around
with these rates by trying different capacitor
values on a breadboard.
Other Pummer circuits, including those that
can handle multiple LEDs, can be found on
Solarbotics.net, in /library/circuits. Costa Rica
BEAM (costaricabeam.solarbotics.net) has a fairly
thorough library of schematics for Pummers,
including a circuit for making a Type 1 Solarengine
(which uses a 1381 voltage trigger) into a darkness-
activated power circuit.
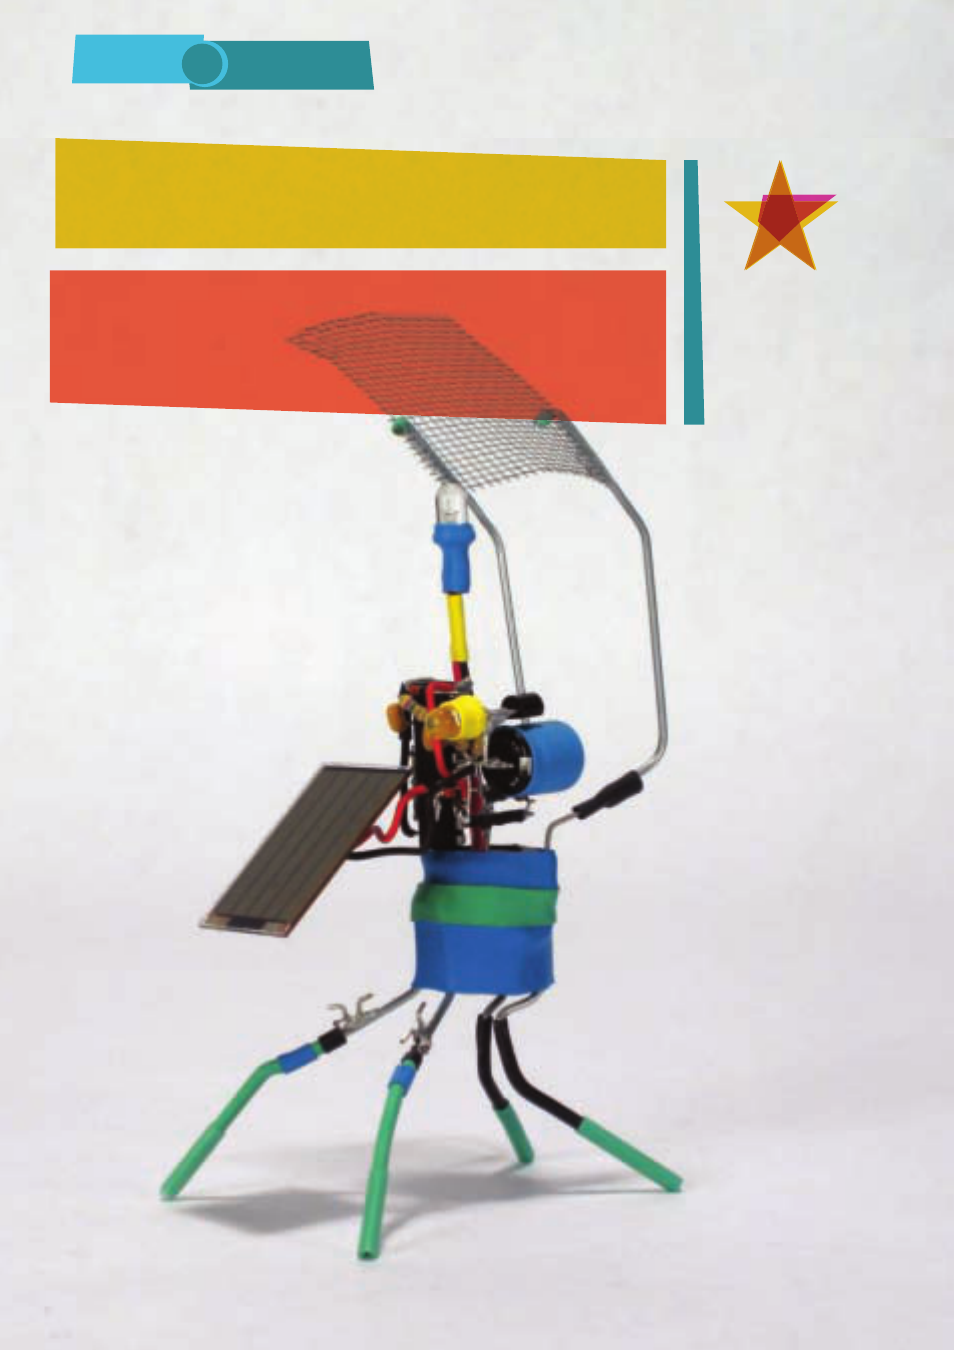
Pummer Designs
One of the cooler aspects of a Pummer is that,
because it’s a Sitter and has no moving parts and
no concerns over weight, etc., the design and aes-
thetics of the robot can take center stage. You can
build Pummers to look any way you want. A lot of
builders, inspired by the idea of Pummers being
a sort of robotic plant life, put the LED(s) on a long
stalk or on multiple stalks. But Pummers have
also been built in the shape of modern sculptures,
hexagons, triangles, cubes, even a dragon with solar
MATERIALS
To build this Pummer circuit, you’ll need:
Solar cell that can deliver 3V at 20mA
(I recommend the SCC2433a from Solarbotics)
74AC240 Octal Inverting Buffer IC
AAA NiCad batteries (2) or you can use 10F “gold”
capacitors (2)
0.22μF capacitors (2) often marked with “224” on the cap
1000μF capacitor or 3300μF for a longer fade-away
1kΩ resistor
4.7MΩ resistor
LED any color, high-intensity LED recommended
Diode A low-voltage type, such as the 1N5818
Schottky or a germanium diode, is best, but a silicon
one works too.
M_084-086_Pumm_F1.indd 85M_084-086_Pumm_F1.indd 85 10/18/06 11:23:32 AM10/18/06 11:23:32 AM

86 Make: Volume 08
Gareth Branwyn writes about the intersection of technology
and culture for Wired and other publications, and is a
member of MAKE’s Advisory Board. He is also “Cyborg-in-
Chief” of
Streettech.com.
cells on the wings and glowing LED eyes. Really,
your imagination and building skills are the only
limitations.
A large majority of Pummers are built using
paperclips as the main building component. Zach
DeBord, a BEAM builder from Chicago (whose
Pummers are pictured here) writes: “Buy a pack of
jumbo and regular sized paper clips. For the $2 you
spend, you’ll be able to build a whole fleet of robots.
I almost exclusively use paper clips and guitar
strings for my creations.”
Other common structural components are rubber
bands and heat-shrink tubing. “An assortment pack
of heat shrink (available at RadioShack and other
places) goes a long way,” says DeBord. “Not only are
your bots more interesting looking, but you can use
tubing in key places to reinforce weak joints.”
For more Pummer resources visit
makezine.com/08/pummer.
TOYS
GAMES
&
Zach DeBord’s collection of Pummers made from paper
clips, guitar strings, rubber bands, heat-shrink tubing,
and a dash of imagination.
Single-LED
High-Efficiency
Pummer
R2 4.7M 3V 20mA
D1
+
+
+
74AC240
C1
224
224
C2
R1 100K
R3 1K
+C3
LED
M_084-086_Pumm_F1.indd 86M_084-086_Pumm_F1.indd 86 10/18/06 11:23:54 AM10/18/06 11:23:54 AM
