
Foundry Licensing
VERSION 8.1

Licensing 8.1 Online Help. Copyright © 2019 The Foundry Visionmongers Ltd. All Rights Reserved. All Rights Reserved. Use of this Online
Help and the software is subject to an End User License Agreement (the "EULA"), the terms of which are incorporated herein by
reference. This Online Help and software may be used or copied only in accordance with the terms of the EULA. This Online Help, the
software and all intellectual property rights relating thereto are and shall remain the sole property of The Foundry Visionmongers Ltd.
("Foundry") and/or Foundry's licensors.
The EULA can be read here: End User License Agreement (EULA)
Foundry assumes no responsibility or liability for any errors or inaccuracies that may appear in this Online Help and this Online Help is
subject to change without notice. The content of this Online Help is furnished for informational use only. No part of this manual may be
reproduced, stored in a retrieval system, or transmitted in any form without the prior written permission of Foundry.
In addition to those names set forth on this page, the names of other actual companies and products mentioned in this Online Help
(including, but not limited to, those set forth below) may be the trademarks or service marks, or registered trademarks or service marks,
of their respective owners in the United States and/or other countries. No association with any company or product is intended or
inferred by the mention of its name in this Online Help.
Linux ® is a registered trademark of Linus Torvalds.
Windows ® is the registered trademark of Microsoft Corporation.
Mac, macOS, High Sierra, Mojave, Shake, Final Cut Pro, and QuickTime are trademarks of Apple, Inc., registered in the U.S. and other
countries.
The third-party libraries used in the Foundry Licensing Utility and their associated licences are available here:
https://learn.foundry.com/licensing/Content/User_Guide/third_party.html
The Foundry Visionmongers Ltd.
5 Golden Square
London
W1F 9HT
UK
Rev: Friday, December 6, 2019

Contents
Installing the Foundry Licensing Utility
8
Qualified Operating Systems
8
Installing on Mac
8
Installing from the Command Line
8
Installing on Windows
9
Installing from the Command Line
9
Installing on Linux
10
Installing .AppImage Archives
10
Installing .deb Archives
10
Installing .rpm Archives
11
Launching the FLU
11
Uninstalling the FLU
12
About Foundry Licenses
13
Installing Licenses
16
Purchasing a License
16
Finding the System ID
16
Installing a License Key
17
Installing Licenses Automatically
17
Installing Licenses Manually
18
Appending to an Existing License
19

Activation Keys
22
Viewing Installed Licenses
23
Detailed License Information
25
Licensing over a Network
27
About Server or Floating Licenses
27
Installing the Server Tools
29
Checking the Server Status
30
Telling the Client Machines Where to Find the
Licenses
31
License Server Administration
34
Where are the RLM Files?
34
Server Tools
34
Data Files
34
Managing the License Server
35
FLU Server Management
35
Command-Line Server Management
35
Starting the License Server
35
Stopping the License Server
36
Viewing the License Server Log
37
Web Server Console
37
Useful Commands for System
41

Administrators
Is the License Server Up and Running?
41
I’m Using Foundry Software on Machine "blue". Which Licenses is
the License Server "red" Offering?
41
What is My System ID Number?
42
What’s My <server_name>?
42
Show Me All My Licenses and Who has Checked Them Out.
42
Who Has Checked Out a Particular License?
42
I’ve been given a new floating license key, which I’ve edited into my
license file, but it has not been picked up by the server. What do I
do?
42
My Default Debug Log File (foundry.log) is Too Big. How do I Start a
New One Without Interrupting the rlm.foundry Daemon?
43
Removing FLT
44
Uninstalling Automatically
44
Uninstalling Manually
44
On Mac
44
On Windows
44
On Linux
45
Moving RLM Files
46
On Windows
46
On Mac OS X
46
On Linux
47
When is a License Taken or Dropped?
48
The Product Exits or is Deleted/Unloaded from the
Client
48

The Server and Client Machine Lose Contact with
Each Other
48
Setting a TIMEOUT or TIMEOUTALL Period
49
Replace Licenses
50
Which RLM Port?
51
Troubleshooting Licenses
52
Node-Locked and Client Licenses
52
Firewalls
53
The Problem
53
The Solution
53
Accessing the RLM Web Server on Mac
53
The Problem
53
The Solution
53
Windows Firewalls
54
Windows Program Exceptions
54
Windows Port Exceptions
55
Mac Firewalls
59
Windows Hidden Files
61
Contacting Support
62
Using the Diagnostics Tool in GUI Mode
62
Using the Diagnostics Tool in Command Line
Mode
62


USER GUIDE
Installing the Foundry Licensing
Utility
This topic guides you through installing the Foundry Licensing Utility (FLU). After installation, the FLU
can run from either a desktop icon, an explorer or Finder window, or from the command line using
arguments.
Qualified Operating Systems
• macOS Mojave (10.14)
• Windows 10 or Windows Server 2019 Standard (64-bit)
• CentOS 7 or Ubuntu 19 (64-bit)
Other operating systems may work, but have not been fully tested.
Installing on Mac
1. Download the installer from our website at www.foundry.com/licensing/tools
2. Run the .dmg installer.
3. Follow the on-screen instructions to install the Foundry Licensing Utility. By default, the FLU is
installed to the following location:
/Applications/FoundryLicensingUtility
Installing from the Command Line
To install the Foundry Licensing Utility from the command line, do the following:
1. Download the installer from our website at www.foundry.com/licensing/tools
2. Open a command-line tool for your operating system. For example, Terminal.
3. Navigate to the directory where you saved the installation file using the cd command. For
example, if you saved the installation file in /Users/<user_name>/ use the following command
and press Enter:
cd /Users/<user_name>/
8

USER GUIDE
9
4. To mount the .dmg installation file, use the hdiutil attach command. For example:
hdiutil attach FoundryLicensingUtility_<version>.dmg
5. Enter the following command:
pushd /Volumes/FoundryLicensingUtility <version>/
This stores the directory path in memory, so it can be returned to later.
6. Copy the FLU into the /Applications directory:
cp -r FoundryLicensingUtility.app /Applications/
7. Change to the directory stored by the pushd command:
popd
8. Finally, use the following command to eject the mounted disk image:
hdiutil detach /Volumes/FoundryLicensingUtility
Installing on Windows
1. Download the installer from our website at www.foundry.com/licensing/tools
2. Run the .exe installer.
3. Follow the on-screen instructions to install the Foundry Licensing Utility. By default, the FLU is
installed to the following locations depending on whether you installed for all users or only the
current user:
C:\Program Files\FoundryLicensingUtility
OR
C:\Users\<username>\AppData\Local\Programs\FoundryLicensingUtility\
Installing from the Command Line
To install the Foundry Licensing Utility from the command line, do the following:
1. Download the installer from our website at www.foundry.com/licensing/tools
2. Open a command-line tool for your operating system. For example, Command Prompt.
3. Navigate to the directory where you saved the installation file using the cd command. For
example, if you saved the installation file in C:\Users\<user_name>\Downloads\ use the
following command and press Enter:
cd C:\Users\<user_name>\Downloads\
4. Run the installation file from the current directory. For example:
FoundryLicensingUtility_<version>.exe
5. Follow the on-screen prompts to complete the installation.
Installing on Windows | Installing from the Command Line
USER GUIDE
10
Installing on Linux
Download the installer for your Linux distribution from our website at
www.foundry.com/licensing/tools
• .AppImage - Most distributions, other than CentOS 6.
• .deb - Debian/Ubuntu based distributions.
• .rpm - CentOS/RHEL distributions.
Note: If you're running CentOS/RHEL 6, the new FLU will not work due to dependencies on
certain libraries. Search CentOS 6 on https://support.foundry.com for more information.
Installing .AppImage Archives
AppImage bundles are not actually installed, they're downloaded and executed directly.
1. Move the AppImage to permanent file path, such as your home directory. For example:
mv ~/Downloads/FoundryLicensingUtility_<version>.AppImage ~/
2. Add executable permissions to the file using the chmod command:
chmod +x <file path>
For example:
chmod +x ~/FoundryLicensingUtility_<version>.AppImage
3. Check that the +x permissions are applied to the file using the ls -l command:
[biff@localhost FLU]$ ls -l
total 62928
-rwxrwxr-x. 1 biff biff 64435230 May 23 12:11 FoundryLicensingUtility_
<version>.AppImage
[biff@localhost FLU]$
Note: Your Linux distribution may handle AppImage files automatically or ask if you want to
integrate the application with the desktop environment. This does not affect the normal
operation of the FLU.
Installing .deb Archives
Double-click the .deb file and follow the onscreen prompts,
Installing on Linux | Installing .AppImage Archives

USER GUIDE
11
OR
Open the Terminal and enter:
sudo apt-get install <downloaded file>
For example:
sudo apt-get install /Users/biff/Download/FoundryLicensingUtility_
<version>.deb
The FLU is installed in /opt/FoundryLicensingUtility by default.
Installing .rpm Archives
Open the Terminal and enter:
sudo yum localinstall <downloaded file>
For example:
sudo yum localinstall /Users/biff/Download/FoundryLicensingUtility_
<version>.rpm
The FLU is installed in /opt/FoundryLicensingUtility by default.
Launching the FLU
Most installation methods create a Desktop icon or menu item to launch the Foundry Licensing
Utility, but you can run the app from the command line as well, if you prefer. The location of the
launcher is listed by operating system:
• Mac:
/Applications/FoundryLicensingUtility.app/Contents/MacOS/FoundryLicensingUti
lity
• Windows:
C:\Program Files\FoundryLicensingUtilty\FoundryLicensingUtility.exe
OR
C:\Users\<username>\AppData\Local\Programs\FoundryLicensingUtility\FoundryLi
censingUtility.exe
• Linux - /opt/FoundryLicensingUtility/foundry-licensing-utility
Launching the FLU | Installing .rpm Archives

USER GUIDE
12
Note: If you're using an .AppImage, run the file directly from its location on disk. For
example, on CentOS 7: /home/<username>/FoundryLicensingUtility_
<version>.AppImage
Uninstalling the FLU
To uninstall the Foundry Licensing Tools, follow the steps shown by operating system:
• On Mac, delete the application file here:
/Applications/FoundryLicensingUtility.app
• On Windows, run the uninstaller in:
C:\Program Files\FoundryLicensingUtilty\
OR
C:\Users\<username>\AppData\Local\Programs\FoundryLicensingUtility\
• On Linux, run the distribution specific uninstall command from the install directory:
• AppImage - delete the .AppImage file.
• .deb
sudo apt remove foundry-licensing-utility
• .rpm
sudo yum remove foundry-licensing-utility
Uninstalling the FLU | Installing .rpm Archives

USER GUIDE
About Foundry Licenses
Foundry offer several license models to cover the needs of most artists, from a single machine at
home to large-scale site licenses for hundreds of artists. To license Foundry products, you need one
of the following:
• A login-based license - allows you to activate a single entitlement on any authorized device up to
the entitlement's maximum number of activations.
Mari and Modo support login-based licenses, but other Foundry products may not. Have a look at
your products' documentation on www.foundry.com for more information.
• Free trial license - enables one of our products to work on one particular machine for 30 days. You
can only install a trial license once for each product on a single machine.
You can trial Foundry products by browsing to the required product page, for example
https://www.foundry.com/products/nuke, and clicking Try for free.
• A node-locked license - enables one of our products to work on one particular machine. It is
locked to the System ID on that machine. You might use a node-locked license on your computer at
home or if you don't have access to a network with an active license server.
For guidance on installing licenses, see Installing Licenses.
13

USER GUIDE
14
• A server license - enables one of our products to work on any networked client machine. The
server license, also known as a floating license, should be put on the server and is locked to the
System ID on that server. For guidance on installing licenses, see Installing Licenses. Server licenses
are primarily used for multi-seat facilities where a server controls a pool of floating licenses
automatically.
You also need to install the Foundry Licensing Tools in order to run a license server. See Installing
the Server Tools for more information.
|

USER GUIDE
15
For more in-depth guidance on server licenses, see Licensing over a Network.
Tip: If you want to know what a license looks like, have a look at Appendix A: License Syntax
for a description of the file syntax.
• An activation key - an automated path to a license. When used, the Activation Key is exchanged for
a license on the machine. They look something like this:
mari-0101-77d3-99bd-a977-93e9-8035
See Activation Keys for more details.
|

USER GUIDE
Installing Licenses
This topic explain how to obtain and install node-locked and floating licenses for your product. A
node-locked license enables a product on one particular machine, whereas a floating license enables
a product on any networked client machine.
Note: For a more complete explanation of licenses, license syntax, alternative license
directories, useful server commands, and much more, Licensing over a Network. To
troubleshoot licenses, refer to Troubleshooting Licenses.
Purchasing a License
For most Foundry licenses, we need to know your System ID to generate a license key. The System ID
returns a unique number for your computer. We lock our license keys to the System ID. Login-based
licenses do not require your System ID.
Note: For floating licenses, we need to know the System ID of the machine that serves the
licenses across the network not the client machine System IDs.
Finding the System ID
To display your System ID, install the Foundry Licensing Utility (FLU) from
https://www.foundry.com/licensing/tools and run it. See Installing the Foundry Licensing Utility for
more details.
In the left-hand menu, click System ID.
16

USER GUIDE
17
When you know your System ID, you can purchase license keys by:
• going to our website at www.foundry.com and navigating to the required product page,
• emailing us at sales@foundry.com,
• phoning our London office on +44 (0) 20 7479 4350 or our Austin office on +1 (512) 717 3885.
Installing a License Key
Once a license has been generated for you, we email you the license key. Installing a license is the
same for both node-locked and floating licenses, but floating licenses are installed on the server not
the local client machines. To install the license key:
• Automated method (recommended) - the easiest way to install a license is to use Foundry
Licensing Utility (FLU). See Installing Licenses Automatically for more details.
• Manual method - we do not recommend this, but you can install a license key by hand. You just
need the license key in a text file and your product. No other software is required. For more
information, see Installing Licenses Manually.
Installing Licenses Automatically
Once a license has been generated for you, we email you the license key and instructions on how to
obtain the Foundry Licensing Utility (FLU).
To install the license key, install the FLU and then do one of the following:
Installing a License Key |

USER GUIDE
18
Note: If you're installing a floating license, remember to follow these steps on the license
server not the local client machines.
1. Open the FLU.
2. Click Licences > Install.
3. Click Select File and browse to the location of the license key.
4. Click Install.
• If you installed a node-locked license key, your Foundry product is ready to use.
• If you installed a server license key, the FLU tells you if you need to install or restart the license
server tools to make the license available from the server. Follow the instructions on-screen to
complete the process.
Make a note of the server name displayed on the License Server page of the FLU on the
Connecting to this License Server panel. The server name is required to point other machines
toward your license server. See Telling the Client Machines Where to Find the Licenses for more
information.
Installing Licenses Manually
If you wish, you can install a license key by hand. The license key can be any plain text file with a .lic
file extension in a specific directory. The name of the file can be anything, but for node-locked
licenses we recommend:
foundry.lic
And for server licenses, we recommend:
Installing Licenses Manually |

USER GUIDE
19
foundry_float.lic
Floating license keys have <server_name> on the HOST line of the license. For example:
HOST <server_name> 000EA641D7A1 4101
You need to replace the string (including the < > brackets) with the hostname of the server machine.
For example:
HOST bobbins 000EA641D7A1 4101
Warning: Make sure you don’t save the key in a rich text (.rtf) file as it won’t work. You
should also avoid using Word or other word processing programs to create license files, as
these can add invisible control characters that cause licenses to fail.
Next, place the license in the following directory, depending on the operating system you are using:
Note: If you're installing a floating license, remember to follow these steps on the license
server not the local client machines.
On Mac OS X/macOS:
/Library/Application Support/TheFoundry/RLM/
On Windows
C:\ProgramData\The Foundry\RLM\
Note: The ProgramData folder may be hidden. You can make it visible using the Folder
Options in the Control Panel. See Windows Hidden Files.
On Linux:
/usr/local/foundry/RLM/
• If you installed a node-locked license key, your Foundry product is ready to use.
• If you installed a floating license key, proceed to Installing the Server Tools.
Appending to an Existing License
You can add a new license to an existing key using two methods:
• Automated method (recommended) - appending a license using the Foundry Licensing Utility is
the same process as installing a new license, either browse to a license file or drag and drop a file
into the FLU. See Installing Licenses Automatically for more information.
Appending to an Existing License |

USER GUIDE
20
• Manual method - edit the license file manually from the command line. This is not recommended
for most users. You can add a new license key by editing the foundry.lic text file and then using
rlmutil to re-read the file.
Here is an example floating license key for a machine called red with System ID 000EA641D7A1 that
serves two floating Mari licenses onto the network:
HOST red 000EA641D7A1 4101
ISV foundry
LICENSE foundry mari_i 2018.1231 permanent 2 share=h start=6-oct-2018
issued=6-oct-2018 _ck=fad7306732
sig="60Q04580SBD4AEEY4C93A1K0H718JRY9DWGP1HWR08AG1CY16HPHCKKQ44FDKGYQKE0BXKG
RJ3WBT"
If you are then sent an Ocula license key for the same machine, just add the LICENSE lines to your
existing file, ignoring any HOST or ISV lines, so that it would look like this:
HOST red 000EA641D7A1 4101
ISV foundry
LICENSE foundry mari_i 2010.1231 permanent 2 share=h start=6-oct-2010
issued=6-oct-2010 _ck=fad7306732
sig="60Q04580SBD4AEEY4C93A1K0H718JRY9DWGP1HWR08AG1CY16HPHCKKQ44FDKGYQKE0BXKG
RJ3WBT"
LICENSE foundry ocula_nuke_i 3.0 permanent 2 share=h start=6-oct-2010
issued=6-oct-2010 _ck=72d73079d7
sig="60PG4512DMXC338XEG3F0XBNPFREB6SHHD0QXA822M09MNJUB3E9VQUXKJP69DJ5CYR27AU
YFRS0"
Now re-read the license file with this command:
• Windows:
C:\Program Files\The Foundry\LicensingTools<version>\bin\RLM\rlmutil
rlmreread -c C:\ProgramData\The Foundry\RLM\
• Mac:
/Applications/TheFoundry/LicensingTools<version>/bin/RLM/rlmutil
rlmreread -c /Library/Application Support/TheFoundry/RLM/
• Linux:
/usr/local/foundry/LicensingTools<version>/bin/RLM/rlmutil rlmreread -c
/usr/local/foundry/RLM/
OR
Using a web browser, go to http://red:4102 and click Status > Reread.
Appending to an Existing License |

USER GUIDE
21
Appending to an Existing License |

USER GUIDE
22
Activation Keys
If you are using a product that has a Licensing dialog (such as Mari or Hiero) and currently have no
license, or are running a temporary license, your product prompts you at start-up to enter your
activation key into the Licensing dialog. This step is skipped if:
• you’ve already activated a permanent license, or
• you’re trying to activate a product that doesn’t have a Licensing dialog (for example, a set of plug-
ins). If this is the case, go to https://www.foundry.com/licensing/activate-product, enter your
activation key into the field provided, and follow the instructions on screen.
Note: If you have an Activation Key for a login-based license, go to
https://www.foundry.com/licensing/activate-product to activate your license.
If you’re trying to activate a product using the Licensing dialog, do the following:
1. Launch your product.
The Licensing dialog displays.
2. Click Install License.
3. Click Activation Key / License Text.
4. Enter your activation key and click Install.
Your product connects to our activation server, retrieves the correct license key for your system,
and installs it.
Your product launches when the download and installation are complete.
Appending to an Existing License |

USER GUIDE
Viewing Installed Licenses
The Foundry Licensing Utility enables you to view installed licenses on any machine, whether it's
stand-alone, part of a network, or a license server. Licenses are divided into four categories by state:
Valid, Expired, Replaced, and Invalid.
To view the licenses currently installed on your machine, install the Foundry Licensing Utility and go
to Licenses > View Installed.
Note: See Installing the Foundry Licensing Utility for more information on how to install the
FLU.
A Valid license is any license that includes all the correct details, such as System ID and Feature ID,
and has not expired.
23

USER GUIDE
24
Tip: Click a license entry to display more detailed information about that license. See
Detailed License Information for more information.
An Expired license is any license that includes all the correct details, such as System ID and Feature
ID, but has no Days Remaining. The FLU tells you the number of days since the license expired.
A Replaced license has been superseded by a replacement license of the same type, but the FLU
keeps a record of the previous license.
|

USER GUIDE
25
An Invalid license does not allow you to run Foundry applications. Licenses can be invalid for a
number of reasons, but the most common occurs when you try to install a license manually and
paste the license text incorrectly. The FLU does not allow you to install licenses that are invalid.
Detailed License Information
You can display more detailed license information by clicking a license in the Installed Licenses
panel.
Detailed License Information |

USER GUIDE
26
At the top of the panel, the licensed product, license type, and number of seats is displayed. The
license in the example is for Nuke on a single machine. If we ask you to send us your license file for
diagnostic purposes, you can click the button to copy the license text to the clipboard.
The License Details panel also contains the following information:
• Expiry Date - shows when the license expires. Foundry licenses are valid on the day of expiry, so in
the example, you could use Nuke on this machine until the end of the 6th August 2019.
• Maintenance End Date - shows when the maintenance period for this license ends. You can still
use a license past the maintenance date if it hasn't expired, but you are not entitled new releases of
the software.
• Feature ID - the Foundry product that the license allows you to use. In the example, nuke_i, which
is a Nuke interactive license. See Appendix A: License Syntax for a list of valid Feature IDs.
• Valid From - shows when the license period started.
• License System IDs - the system ID to which the license is tied. Foundry licenses only work on the
machine with this system ID. See Finding the System ID for information on how to find your system
ID.
• License Install Location - displays the file path to the current license file. You can click the path to
automatically open a file browser at the location shown. For example, on Windows, clicking the
install location opens the explorer in the C:\ProgramData\The Foundry\RLM directory.
• License - the raw license text contained in the license file. Click the button to copy the license
text to the clipboard.
Detailed License Information |

USER GUIDE
Licensing over a Network
These pages explain how to license your product over a network. Throughout this guide, we refer to
machines that serve licenses as servers and machines that ask for licenses as clients.
There are three stages to setting up server, or floating, licenses:
1. Install the license on the server machine - See Installing Licenses.
2. Install the server tools - See Installing the Server Tools.
3. Direct the client machines to the server where the license is installed - See Telling the Client
Machines Where to Find the Licenses.
Note: The Foundry Licensing Tools’ default settings do not support RLM licensing on virtual
machines (VMs). If you have any questions regarding licensing on VMs, please visit
support.foundry.com for more information.
This guide should cover all the information you need to use RLM licenses for Foundry products.
However, it is not meant to be an exhaustive exploration of all the features available with RLM
licensing. For in-depth information on RLM Licensing, go to www.reprisesoftware.com.
About Server or Floating Licenses
A server license, sometimes known as floating license, running on a server enables one of our
products to work on any networked client machine. Floating licenses are sometimes called counted
licenses. Floating licenses are installed on a server and locked to the server's system ID. See Finding
the System ID for more information.
Floating licenses on a server require additional software to be installed. This software manages those
licenses on the server, giving licenses out to client workstations that want them. The software you
need to manage these licenses is called the Foundry Licensing Tools (FLT), which is included with the
Foundry Licensing Utility download and can be installed and uninstalled from within the application.
Floating licenses often declare a port number. This is required if you have an internet firewall on your
license server so that you can permit license communication while blocking others. See Firewalls.
27

USER GUIDE
28
A floating license looks like this before installation. The <server_name> is replaced automatically
with the machine name when you install the license.
HOST <server_name> d49a20b9be26 4101
ISV foundry
LICENSE foundry mari_i 2017.1231 permanent 20 share=h start=4 oct-2010
issued=4-oct-2018 _ck=fa072c6a5a
sig="60P0453JHKQBGTB1HH7E3HNW843UJ627TSF4CXR22H7KNMYHG1B99WBSNHS1UE7FCN2W3AY8
KV"
For further information about the structure of the license key, see Floating License Syntax.
|

USER GUIDE
29
Installing the Server Tools
After installing a floating license, you need to install the server tools (FLT) to manage the licenses on
your network. Then you need to tell the client machines where to find the license. To install the server
tools:
1. Open the FLU.
2. Click License Server > Install.
3. Follow the on-screen prompts regarding advice about machine suitability and configuration.
4. On the Install Method page, choose how to install the server:
• Launch Installer - a semi-automated FLT installer to guide you through the process, step by
step.
• Install Manually - an advanced, command line method giving you greater control over the
install process.
5. When the process is complete, click Installed to confirm that the license server is installed locally.
6. The server name is displayed in the Connecting to this License Server panel. The server name is
required to point other machines toward your license server. See Telling the Client Machines
Where to Find the Licenses for more details.
|

USER GUIDE
30
Note: Your network setup may prevent other machines from connecting to the server using
this hostname. Consult your system administrator for more information.
Checking the Server Status
You can check the server Status using the RLM webserver. The server console is accessed from the
FLU under License Server > Control > License Server Dashboard or by going to http://<server_
name>:4102 where <server_name> is the hostname of your server. In the example,
http://thatcher.local:4102
Checking the Server Status |

USER GUIDE
31
Note: If you have a firewall on your license server, it may block requests for licenses from
your clients. See Firewalls for more information.
Telling the Client Machines Where to Find the Licenses
To point your Foundry product at the license server, you need to know the server port number and
hostname. You can find this information on the Foundry Licensing Utility's License Server page.
Make sure you're running the FLU on the server when you look for this information.
Telling the Client Machines Where to Find the Licenses |

USER GUIDE
32
When you have the port number and server name, do one of the following for each machine you wish
to have access to licenses on the server:
• Launch the Foundry Licensing Utility (FLU), click Licence Server Connections > Add Connection,
and then enter the License Server port number and hostname.
This creates and installs a client license.
• If your product displays a Licensing dialog when you launch it, click Install License and then Use
Server. Type <port number>@<license server hostname> (for example, 4101@red) and click
Install. Your client retrieves a license from the License Server and launches.
• Although not recommended, you can manually create a client license.
• Copy the foundry.lic file from the server to:
On Windows: C:\ProgramData\The Foundry\RLM\
Telling the Client Machines Where to Find the Licenses |

USER GUIDE
33
Note: The ProgramData folder may be hidden. You can make it visible using the Folder
Options in the Control Panel. See Windows Hidden Files.
On macOS: /Library/Application Support/TheFoundry/RLM/
On Linux: /usr/local/foundry/RLM/
• Rename the file and call it foundry_client.lic. Edit the file so it looks like this:
HOST red any 4101
or if you had your own server port number set:
HOST red 000a957bade9 30001
Telling the Client Machines Where to Find the Licenses |

USER GUIDE
34
License Server Administration
The following pages contain details on license management and administration, including file
locations and updating licenses.
Where are the RLM Files?
You can move the RLM files anywhere, but by default they are installed to the following directories.
We refer to this directory throughout this guide and assume all the RLM components we ship are
here.
Server Tools
The installer copies files to the following locations. We’ll refer to this location as the <app path>:
Mac:
/Applications/TheFoundry/LicensingTools<version>/bin/
Windows:
C:\Program Files\The Foundry\LicensingTools<version>\bin\
Linux:
/usr/local/foundry/LicensingTools<version>/bin/
Data Files
These include the license keys and log files. We’ll refer to these locations as the <data path>.
Mac:
/Library/Application Support/TheFoundry/RLM/
Windows:
C:\ProgramData\The Foundry\RLM\
Note: The ProgramData folder may be hidden. You can make it visible using the Folder
Options in the Control Panel. See Windows Hidden Files.
Linux:
/usr/local/foundry/RLM/
Where are the RLM Files? | Server Tools

USER GUIDE
35
Managing the License Server
This topic contain information about basic license server tasks such as starting and stopping the
server, viewing operational logs, and some useful commands for day to day use.
FLU Server Management
You can perform basic tasks from the Foundry Licensing Utility from the License Server page.
Launch the Foundry Licensing Utility and click License Server in the left-hand menu to view the
available functions.
• Manage Server Licences - install new licenses and view existing licenses on the server. See
Installing Licenses for more information.
• Control Server - you can stop, start, and restart the license server from this page, or access the
Web Server Console.
• Uninstall License Server - you can uninstall the server tools from you computer by clicking
Uninstall and following the on-screen instructions. Uninstalling the server tools does not remove
any licenses you have installed on the machine.
Command-Line Server Management
Starting the License Server
The license server starts automatically when you reboot your machine, but you can start it manually:
• Launch a command-line tool and enter one of the following OS-specific commands:
• Mac
cd /Applications/FoundryLicensingUtility.app/Contents/bin
FLU Server Management | Starting the License Server

USER GUIDE
36
./FoundryLicenseUtility -s start
• Windows
cd C:\Program Files\FoundryLicensingUtility\bin
OR
cd C:\Users\<username>\AppData\Local\Programs\FoundryLicensingUtility\bin
FoundryLicenseUtility.exe -s start
• Linux
cd /opt/FoundryLicensingUtility/bin
./FoundryLicenseUtility -s start
• You can also use a web browser to navigate to the http://<server_name>:4102 server page. For
example, http://red:4102. Click the Status button, and click Start on the Foundry License Server.
Note: On Mac OS X, if you’re browsing from the License Server itself, you must add .local in
the browser address: http://<server_name>.local:4102.
Stopping the License Server
To stop the license server:
• Launch a command-line tool, navigate to the Foundry Licensing Utility (FLU) install directory, and
enter one of the following commands:
• Mac
cd /Applications/FoundryLicensingUtility.app/Contents/bin
./FoundryLicenseUtility -s stop
• Windows
cd C:\Program Files\FoundryLicensingUtility\bin
OR
cd C:\Users\<username>\AppData\Local\Programs\FoundryLicensingUtility\bin
FoundryLicenseUtility.exe -s stop
• Linux
cd /opt/FoundryLicensingUtility/bin
./FoundryLicenseUtility -s stop
• On all platforms, if your product uses RLM licensing, you can also use a web browser to navigate to
the http://<server_name>:4102 server page and click Stop.
Command-Line Server Management | Stopping the License Server

USER GUIDE
37
Note: On Mac OS X, if you’re browsing from the License Server itself, you must add .local in
the browser address: http://<server_name>.local:4102.
Viewing the License Server Log
You can view the license server log even if you don’t have administrator privileges. To do so:
• Launch a command-line tool, navigate to the Foundry Licensing Utility (FLU) install directory, and
enter one of the following commands:
• Mac
cd /Applications/FoundryLicensingUtility.app/Contents/bin
./FoundryLicenseUtility -s status
• Windows
cd C:\Program Files\FoundryLicensingUtility\bin
OR
cd C:\Users\<username>\AppData\Local\Programs\FoundryLicensingUtility\bin
FoundryLicenseUtility.exe -s status
• Linux
cd /opt/FoundryLicensingUtility/bin
./FoundryLicenseUtility -s status
• You can also use a web browser to navigate to the http://<server_name>:4102 server page and click
the Status button.
Note: On Mac OS X, if you’re browsing from the License Server itself, you must add .local in
the browser address: http://<server_name>.local:4102.
Web Server Console
The RLM web server console allows you to perform the following tasks:
• retrieve server and license status (similar to rlmstat)
• cause the servers to re-read the license files (rlmreread)
• switch debug (rlmswitch) or report log (rlmswitchr) files
• move the current report log file to a new name (rlmnewlog)
• shutdown and startup the license servers (rlmdown/rlmreread).
Viewing the License Server Log | Stopping the License Server

USER GUIDE
38
Using this web-based interface, you can administer the license server from any platform, and you
do not need to install the RLM utilities - you only need a web browser.
• Main Status - if you select Status from the menu on the left, the main status screen is displayed
in the view area as shown below.
• Server Status - click on an ISV button in the Server Status column to display a detailed status
display for an individual ISV server in the view area. This displays some server statistics in a table
at the top, followed by a table of all the licenses served by this ISV server.
Web Server Console | Stopping the License Server

USER GUIDE
39
• License Status - if you click on the usage... button in the Show License Usage column above,
you see the license status screen, as shown.
• Reread/Restart/Shutdown - click Reread/Restart Servers from the menu on the left (or from
the REREAD column in the ISV server status display) to display the Reread/Restart Servers
screen in the view area. Enter an ISV name and click REREAD/RESTART. This restarts the server if
it is not running, or sends it a reread command if it is running.
Web Server Console | Stopping the License Server

USER GUIDE
40
You can also type all to refresh or restart all discovered servers.
Web Server Console | Stopping the License Server

USER GUIDE
41
Useful Commands for System
Administrators
Type all these commands from the Foundry RLM applications directory on the server. The <app
path> varies by operating system:
Mac:
/Applications/TheFoundry/LicensingTools<version>/bin/RLM/rlmutil
Windows:
C:\Program Files\The Foundry\LicensingTools<version>\bin\RLM\rlmutil.exe
Linux:
/usr/local/foundry/LicensingTools<version>/bin/RLM/rlmutil
The <data path> containing licences and log files also varies by operating system:
Mac:
/Library/Application Support/TheFoundry/RLM/
Windows:
C:\ProgramData\The Foundry\RLM\
Note: The ProgramData folder may be hidden. You can make it visible using the Folder
Options in the Control Panel. See Windows Hidden Files.
Linux:
/usr/local/foundry/RLM/
Is the License Server Up and Running?
<app path> rlmstat -c <data path>
I’m Using Foundry Software on Machine "blue". Which Licenses is the License Server
"red" Offering?
<app path> rlmstat -c <port>@red -a
Web Server Console | Is the License Server Up and Running?

USER GUIDE
42
What is My System ID Number?
<app path> rlmhostid
What’s My <server_name>?
<app path> rlmhostid host
Show Me All My Licenses and Who has Checked Them Out.
<app path> rlmstat -c <data path> -a
OR
Use a web browser to go to http://<server name>:4102 and click Status > Server Status to view
license usage.
Note: On Mac, if you’re browsing from the License Server itself, you must add .local in the
browser address: http://<server_name>.local:4102.
Who Has Checked Out a Particular License?
<app path> rlmstat -c <data path> -p mari_i
I’ve been given a new floating license key, which I’ve edited into my license file, but it has
not been picked up by the server. What do I do?
• Launch the Foundry Licensing Utility, click License Server > Control, and then click Restart.
• Alternatively, from the command-line:
<app path> rlmreread -c <data path>
• You can also use a web browser to go to http://<server name>:4102 and click Reread/Restart
Servers. Enter the server name you want to reread and click Reread/Restart.
Note: On Mac OS X, If you’re browsing from the License Server itself, you must add .local in
the browser address: http://<server_name>.local:4102.
Web Server Console | What is My System ID Number?

USER GUIDE
43
My Default Debug Log File (foundry.log) is Too Big. How do I Start a New One Without
Interrupting the rlm.foundry Daemon?
<app path> rlmswitch foundry october.log
Web Server Console | My Default Debug Log File (foundry.log) is Too Big. How do I Start a New One

USER GUIDE
44
Removing FLT
To stop the license server and uninstall the Foundry Licensing Tools from your machine, you can use
the FLU or your operating system's manual process to uninstall the tools.
Uninstalling Automatically
1. Launch the FLU and click License Server > Uninstall.
The Uninstall License Server panel displays.
2. Click Start Uninstall to stop the server and uninstall the Foundry Licensing Tools.
Uninstalling Manually
On Mac
To stop the Foundry License Server and remove FLT from your machine, run the FLT Uninstaller
script from a terminal with root or sudo permissions:
/Applications/TheFoundry/LicensingTools<version>/uninstall.sh
On Windows
To stop the Foundry License Server and remove FLT from your machine, navigate to Program Files >
The Foundry > Licensing Tools<version> and double-click the uninstall executable file.
Uninstalling Automatically | On Mac

USER GUIDE
45
On Linux
To stop the Foundry License Server and remove FLT from your machine, run the script:
/usr/local/foundry/LicensingTools<version>/uninstall.sh
Uninstalling Manually | On Linux

USER GUIDE
46
Moving RLM Files
If you want to move a floating license key to another directory you need to shut the license server
down first, if it is running. You then need to edit the startup scripts to look in the new location and
restart the license server.
On Windows
1. First, stop the license server if it’s running. See Managing the License Server for more information.
2. Click Start, type regedit, and then press Return on your keyboard.
3. Open the hierarchical structure HKEY_LOCAL_MACHINE > SYSTEM > CurrentControlSet > Services >
Foundry License Server:
4. Move down the Registry as shown and select ImagePath.
5. Assuming your licenses are in C:\tmp, insert this into the path as shown:
"C:\Program Files\The Foundry\LicensingTools8.1\bin\rlm.foundry.exe" "-c"
"C:\ProgramData\The Foundry\RLM;C\tmp" "-ws" "4102" "-dlog"
"C:\ProgramData\The Foundry\RLM\log\foundry.log" -service
Note: Semi colons are used to separate license directories on Windows.
6. Quit regedit.
7. Restart the license server. See Managing the License Server for more information.
On Mac OS X
1. First, stop the license server if it’s running. See Managing the License Server for more information.
On Windows | On Linux

USER GUIDE
47
2. Open /Library/LaunchDaemons/uk.co.thefoundry.rlm.plist using a plain text editor.
3. Replace these lines:
<string>-c</string>
<string>/Library/Application Support/TheFoundry/RLM/</string>
With this, assuming your license is in /home/licenses:
string>-c</string>
<string>/Library/Application
Support/TheFoundry/RLM/:/home/licenses</string>
4. Restart the license server. See Managing the License Server for more information.
On Linux
1. First, stop the license server if it’s running. See Managing the License Server for more information.
2. Open /etc/init.d/foundryrlmserver using a plain text editor.
3. Replace this line:
FnLicDir=/usr/local/foundry/RLM
With this, assuming your license is in /home/licenses:
FnLicDir=/usr/local/foundry/RLM:/home/licenses
4. Restart the license server. See Managing the License Server for more information.
On Linux | On Linux

USER GUIDE
48
When is a License Taken or
Dropped?
Product licenses are checked out from the server when the product is first used on the client. Plug-in
products generally take a license when the first plug-in of the set is used.
When a license is returned to the server depends on a number of things. Let’s consider the following
scenarios:
• The Product Exits or is Deleted/Unloaded from the Client
• The Server and Client Machine Lose Contact with Each Other
The Product Exits or is Deleted/Unloaded from the Client
If the product exits or is deleted/unloaded from the client, the license is given back to the server.
Plug-in products generally return the license when the last plug-in of the set is removed from the
effects tree or layer stack. The exact point at which a license is returned by a plug-in product is host-
specific, and can be unpredictable.
The Server and Client Machine Lose Contact with Each
Other
Should the server and client machines lose contact with each other (due to a network error, a crash,
or some other failure), licenses are returned to the server according to the TIMEOUT or TIMEOUTALL
flag set in the options file (foundry.opt):
• If you installed an RLM license using the Foundry Licensing Utility (FLU), the options file was created
automatically, with the TIMEOUTALL flag set to 3600 seconds (in other words, one hour). This means
the server waits for one hour before deciding that the client has crashed or failed in some other
way, then deems the license released, and makes it available on the network again. If you want to
change the default timeout period, you need to edit the options file. For instructions on how to do
this, see Setting a TIMEOUT or TIMEOUTALL Period.
• If you installed an RLM license manually, you must create the options file and set a TIMEOUTALL or
TIMEOUT period yourself. If you don’t, the server does not have a default timeout period and may
never release the license in some circumstances. For more instructions, see Setting a TIMEOUT or
TIMEOUTALL Period.
The Product Exits or is Deleted/Unloaded from the Client | On Linux

USER GUIDE
49
Setting a TIMEOUT or TIMEOUTALL Period
1. Create the options file if one doesn’t already exist. It should be a plain text file called foundry.opt
placed in the same directory as the license (unless a different options file location is specified in
the license file itself, either on the VENDOR or ISV line).
2. In the options file, you can set the TIMEOUT on a per-product basis, for example:
TIMEOUT 3600 mari_i
TIMEOUT 600 katana_r
The lines above tell the server that if it has not had communication with a mari_i client for an
hour, it should consider the license released. However, for the katana_r client, it should wait only
10 minutes before deciding the license is free to be served again.
You can also use:
TIMEOUTALL 3600
This tells the server that all features, except those with their own TIMEOUT flags, should time out
after one hour.
Note: For RLM licenses, the options file TIMEOUT can only be set to a minimum of 3600
seconds (1 hour), unless your license contains a min_timeout=<secs> flag.
3. Once you have edited your options file, you need to stop and start the license server. See
Managing the License Server for more information.
The Server and Client Machine Lose Contact with Each Other | Setting a TIMEOUT or TIMEOUTALL

USER GUIDE
50
Replace Licenses
You may see the word replace in your RLM license file. This flag is used in conjunction with the
issued flags to roll together multiple licenses.
For example, in the following RLM license for Mari, the replace flag forces RLM to ignore any mari_i
licenses with an issued date older than 1st December 2017.
HOST red 2c4138a7d9ba 4101
ISV foundry
LICENSE foundry mari_i 2013.1231 permanent 2 share=h min_timeout=30
start=1-dec-2017 issued=1-dec-2017 replace
_ck=07d7a84d33
sig="60PG4580SR8RRKV7XM5E8J1XPV0BEV00PSASH0UV08A4MHS
EMWMKW520H34RNCGKM0XUVT229BT0"
The Server and Client Machine Lose Contact with Each Other | Setting a TIMEOUT or TIMEOUTALL

USER GUIDE
51
Which RLM Port?
Although the default port used by RLM is 5053, Foundry has opted to use port 4101 for all its licenses
to ensure there are no conflicts with any other RLM license servers that may be running on the server.
If, however, no port is specified on the HOST line of a license, or in the foundry_LICENSE
environment variable, the port defaults to 5053. For example, the following entry:
HOST red 000EA641D7A1
behaves in the same way as:
HOST red 000EA641D7A1 5053
Licenses sent to you by Foundry appear as follows:
HOST red 000EA641D7A1 4101
If you wish to change this port number, ensure that you modify all your client licenses in the same
way.
The Server and Client Machine Lose Contact with Each Other | Setting a TIMEOUT or TIMEOUTALL

USER GUIDE
Troubleshooting Licenses
There are many reasons why your license key may fail to work. These pages guide you through some
common problems and how to fix them.
Note: The Foundry Licensing Tools’ default settings do not support RLM licensing on virtual
machines (VMs). If you have any questions regarding licensing on VMs, please visit
support.foundry.com for assistance.
Node-Locked and Client Licenses
If you have a node-locked license inside a client license file that is pointing to the server for its
licenses, the node-locked license won’t work. You must use separate files for the node-locked licenses
and client licenses. We recommend the following naming conventions:
• Node-locked - foundry.lic
• Client - foundry_client.lic
For example, the Mari interactive license in this client license file won't work because it is looking on
the license server “red” for a license.
HOST red 000EA641D7A1 4101
ISV foundry
LICENSE foundry mari_i 2017.1006 permanent uncounted hostid=000ea641d7a1
share=h start=6-oct-2016 issued=6-oct-2016 _ck=fbf430af8c
sig="60PG4515BFTJCYAXSYJ6GTUJ3B9NRRGF3VUUKD022M0BXU48SSESUGSAFJ8BAD5BN883526E
TKQ0"
52

USER GUIDE
53
Firewalls
The Problem
You have set up a floating license, but client machines are not able to get a license from the server.
Everything seems to be set up correctly. The server is running and is floating licenses. The client is
correctly pointing to the server using a foundry_client.lic file or an environment variable. So what’s
wrong?
The Solution
This could be any number of things, but if everything is set up correctly, it could be the firewall on the
server blocking perfectly legitimate requests from the client. In order to fix this, you need to specify
ports for your servers and allow these to be open.
• If you’re on Windows, see Windows Firewalls.
• If you’re on Mac OS X, see Mac Firewalls.
• If you’re on Linux, consult your system administrator.
Accessing the RLM Web Server on Mac
The Problem
On Mac, you’re browsing to http://<server_name>:4102, on the License Server itself, looking for the
RLM Web Server page, but you can’t connect.
The Solution
Due to Mac system architecture, you must add .local to the URL address when you’re browsing from
the License Server itself:
http://<server_name>.local:4102
Note: You can use this address on other platforms, but it’s not necessary.
Firewalls | The Problem

USER GUIDE
54
Windows Firewalls
Two firewall exception methods are available to enable client machines to checkout licenses and
connect to the web service in the License Server: programs and port numbers.
Windows Program Exceptions
1. Go to Control Panel > System and Security > Windows Defender Firewall and then click on the
Advanced settings link.
2. Select Inbound Rules in the left-hand panel and click New Rule as shown below.
3. Select Program and then click Next.
Windows Program Exceptions | The Solution

USER GUIDE
55
4. Select This program path and then browse to the following location:
C:\Program Files\The Foundry\LicensingTools<version>\bin\RLM
Add rlm.foundry.exe.
5. Click Next.
6. Click Allow the connection and then click Next.
7. Select all the checkboxes that apply to the rule. Domain, Private, and Public in the example
below.
8. Click Next and enter a meaningful name for the rule, such as RLM_HOST.
9. Click Finish to complete the process.
10. Stop and Start the license server as described in Managing the License Server.
Windows Port Exceptions
To add a port exception, you need to change your license file to include two different port numbers
using an options file entry.
If you installed a license using the FLU, the options file was created automatically in the same
directory as your license. If, however, you installed your license manually, create a plain text file called
foundry.opt in the same directory as the license. See Where are the RLM Files? for the license file
location.
A typical licence including port numbers and an options file might look like this:
HOST red 000ea641d7a1 4101
ISV foundry OPTIONS=foundry.opt PORT=12345
Windows Port Exceptions | The Solution

USER GUIDE
56
Note: You may want to check with your system administrator that the port number you
choose is not already in use by another program.
A foundry.opt file for Mari should contain the following line:
TIMEOUT mari_i 3600
Or, for all RLM licensed products:
TIMEOUTALL 3600
After editing the license and options file, stop and start the license server as described in Managing
the License Server. In the license server interface, click Status and check that the ports specified are
listed and that the server is running.
Next, go to your firewall settings and add Inbound Rules for TCP ports with the port numbers in the
HOST and ISV lines.
1. Go to Control Panel > System and Security > Windows Defender Firewall and then click on the
Advanced settings link.
2. Select Inbound Rules in the left-hand panel and click New Rule as shown below.
Windows Port Exceptions | The Solution

USER GUIDE
57
3. Select the Port radio button and then click Next.
4. Select TCP and Specific local ports and enter the port number in the field provided (4101 in the
example).
5. Click Next.
6. Select Allow the connection and click Next.
7. Select when the new rule should be applied using the checkboxes. In the example, the rule is
applied at all times, but you can modify this as required.
8. Click Next.
9. Enter a meaningful name for the new rule, for example RLM_HOST, and write a description, if
required.
10. Click Finish.
11. Select the new rule from the Inbound Rules list and click Properties.
12. Click the Programs and Services tab, select This program, and browse to <app
path>/rlm.foundry.exe as shown.
13. Click Open to return to the Properties dialog.
Windows Port Exceptions | The Solution

USER GUIDE
58
14. Click Apply, and close the dialog.
15. Repeat the process for the ISV port, replacing the port number and rule name.
16. Click the Programs and Services tab, select All programs that meet the specified conditions.
17. Click OK to close the dialog.
Windows Port Exceptions | The Solution

USER GUIDE
59
Mac Firewalls
You need to adjust your firewall settings. How to do this depends on your firewall and the version of
Mac you are running, but here’s how to do it on macOS 10.14 (Mojave):
1. Launch System Preferences.
2. Click on Security & Privacy and go to the Firewall tab.
3. Click the Firewall Options button.
Note: You may need to click the lock icon at the bottom-left to enable changes.
4. Under the list of incoming connections, click on the + button.
Windows Port Exceptions | The Solution

USER GUIDE
60
• Navigate to /Applications/TheFoundry/LicensingTools<version>/bin/RLM
• Select rlm.foundry and click Add.
Windows Port Exceptions | The Solution

USER GUIDE
61
Windows Hidden Files
On Windows, the C:\ProgramData directory may be hidden. You can make it visible by navigating to
Control Panel > Appearance and Personalization > Show hidden files and folders and then
selecting Show hidden files, folders and drives.
Windows Port Exceptions | The Solution

USER GUIDE
62
Contacting Support
If you have looked through this help and haven’t found the answer to your question, then please:
1. Have a look through the frequently asked questions at https://support.foundry.com.
2. Run the Foundry Licensing Utility’s diagnostics tool in GUI mode or from the command-line. This
creates a text file that you can send to us for assistance. See Using the Diagnostics Tool in GUI
Mode or Using the Diagnostics Tool in Command Line Mode.
Using the Diagnostics Tool in GUI Mode
1. Launch the Foundry Licensing Utility (FLU).
2. Go to the Help tab, and click Create Report.
This gathers lots of information on your machine that helps us diagnose the problem. No
personal information is gathered.
3. Click Save Report to write out a text file we can use to assist you when you visit
support.foundry.com or click Open Ticket.
Using the Diagnostics Tool in Command Line Mode
1. Launch a your operating system's command-line tool.
2. Enter one of the following commands.
Mac
/Applications/FoundryLicensingUtility.app/Contents/bin/FoundryLicenseUtili
ty -d
Windows
C:\Program Files\FoundryLicensingUtility\bin\FoundryLicenseUtility.exe -d
OR
C:\Users\<user_
name>\AppData\Local\Programs\FoundryLicensingUtility\bin\FoundryLicenseUti
lity.exe -d
Linux
/opt/FoundryLicensingUtility/bin/FoundryLicenseUtility -d
This gathers lots of information on your machine that helps us diagnose the problem. No
personal information is collected.
3. The tool prompts you to save a text file we can use to assist you when you visit
support.foundry.com. To do so, enter Y.
Using the Diagnostics Tool in GUI Mode | The Solution

USER GUIDE
63
Tip: By default, the file is saved to your home directory and given an automated file name. If
you’d like to specify a different directory and name, use -f <path> instead. For example, on
Windows:
FoundryLicenseUtility.exe -f C:\temp\log.txt
Using the Diagnostics Tool in Command Line Mode | The Solution

USER GUIDE
Appendix A: License Syntax
Node-Locked License Syntax
A node-locked or uncounted RLM license looks like this:
LICENSE foundry katana_i 2012.1006 permanent uncounted hostid=000ea641d7a1
share=h start=6-oct-2012 issued=6-oct-2012 _ck=fbf430af8c
sig="60PG4515BFTJCYAXSYJ6GTUJ3B9NRRGF3VUUKD022M0BXU48SSESUGSAFJ8BAD5BN883526E
TKQ0"
Node-locked RLM licenses are broken down into 11 parts:
• LICENSE - indicates the start of an RLM license feature.
• foundry - the vendor name. All licenses from the Foundry must contain the vendor name foundry.
• katana_i - the product to be licensed. In this example, it’s a Katana interactive license. A background
render license would be katana_r.
• 2012.1006 - the maintenance date. All Katana releases built before this date will run until the license
timeout. All releases built after this date will not run.
• For non-maintenance products, this is often just the version of the product, for example 3.0.
• permanent - this is a permanent license. If this field were a date 5-jul-2012, it would be a temporary
license with that expiry date.
• uncounted - this is a node-locked license. Floating licenses have a number in place of the
uncounted tag.
• hostid - also known as the System ID, this is the ethernet (mac) address of the machine to be
licensed.
• share - this indicates how multiple checkouts from the same client machine are treated. share=h
indicates licenses are shared by the same host.
• start=6-oct-2012 - the date when the license starts. This date may be in the future.
• issued - the day the license was made, which may differ from the license start date.
• ck and sig - the encrypted license key. It represents a unique hash of the information in the license
and is used to validate the license.
64

USER GUIDE
65
Floating License Syntax
A floating or counted RLM license looks like this:
HOST <server_name> <server host id> <port>
ISV foundry <options file> <port>
LICENSE foundry mari_i 2012.1006 permanent 10 share=h start=6-oct-2012
issued=6-oct-2012 _ck=fb063057fd
sig="60PG451E0VM5S81E5EWRYM8E82CMKYR6SSB93P822M0AT1UU7FWA85M9P34UKXK4HMD7ERG6
5YA0"
Floating licenses are broken down into a HOST line, an ISV line, and one or more LICENSE lines:
HOST - The host line indicates which server may provide the floating licenses in the license file.
• <server_name>, also known as the hostname, is the name of the license server, for example red.
• <server host id>, also known as the rlmhostid or System ID, is a unique number for that machine.
• <port> is the user-defined server port number over which requests from the client are made to the
RLM daemon.
ISV - The ISV line indicates which vendor made the license. The vendor line helps decode the license
line for the Foundry's specific licensing keys and identify the vendor licensing daemon.
• <options file> is the plain text file that controls the behavior of the server. Specifying an options file
in the license is optional.
• <port> is the user-defined port over which the vendor daemon communicates to the client. If left
blank, the port number is picked for you.
Note: The host port number and the ISV port number MUST be different, and remember to
avoid port 4102, which is reserved for the web server.
LICENSE - license feature line. The only difference from a node-locked license is that uncounted is
replaced with the number of available floating licenses and the hostid in omitted from the LICENSE
block.
The above license works on any 10 hosts simultaneously. It licenses all Mari releases built before 6
October 2012 and it begins 6 October 2012.
Client License Syntax
Client RLM licenses typically have just one line, which may be:
HOST <server name> <server host id> <port number>
Floating License Syntax |

USER GUIDE
66
or
HOST <server name> any <port number>
License Feature IDs
The Feature ID describes the product that the license is for and the type of license, either interactive (_
i) or render (_r) and maintenance (maint). Interactive licenses grant you access to the interface of the
product in question. Render licenses run in 'headless' mode, so you can only render existing scripts.
Maintenance licenses grant you free product upgrades within the current release cycle allowing you
to run the latest major and minor releases of the application to get access to new features and bug
fixes.
The following Feature IDs are valid:
Feature ID Description Website
3delight_r A render license for 3Delight as
shipped with Katana 3.0 and later.
https://www.3delight.com/page/3delight-nsi
flix_i An interactive license for Flix. https://www.foundry.com/products/flix
foundry_
production_i
A collective interactive license for
Nuke Studio, Modo, and Mari.
https://www.foundry.com/products/production-
collective
foundry_
creation_i
A collective interactive license for
Modo, Mari, and Hiero.
https://www.foundry.com/products/creation-
collective
hiero_i An interactive license for Hiero. https://www.foundry.com/products/hiero
hieroplayer_i An interactive license for
HieroPlayer.
katana_i An interactive license for Katana. https://www.foundry.com/products/katana
katana_r A render license for Katana.
License Feature IDs |

USER GUIDE
67
Feature ID Description Website
mari_i An interactive license for Mari. https://www.foundry.com/products/mari
mari_r A render license for Mari.
marinc_i An interactive license for Mari Non-
Commercial. Non-Commercial
versions of software provide a sub-
set of full product functionality.
modo_i An interactive license for Modo. https://www.foundry.com/products/modo
modonc_i An interactive license for Modo
Non-Commercial. Non-
Commercial versions of software
provide a sub-set of full product
functionality.
nuke_i An interactive license for Nuke. https://www.foundry.com/products/nuke
nuke_r A render license for Nuke.
nukenc_i An interactive license for Nuke
Non-Commercial. Non-
Commercial versions of software
provide a sub-set of full product
functionality.
nukestudio_i An interactive license for Nuke
Studio.
nukex_i An interactive license for NukeX.
nukexassist_
i
An interactive license for Nuke
Assist.
Nuke Plug-ins
caravr_
nuke_i
An interactive license for CaraVR,
providing that you already have a
Nuke license.
https://www.foundry.com/products/cara-vr
caravr_ A render license for CaraVR,
License Feature IDs |

USER GUIDE
68
Feature ID Description Website
nuke_r providing that you already have a
Nuke license.
caravrmaint_
nuke_i
An interactive license for CaraVR
including maintenance, providing
that you already have a Nuke
license.
caravrmaint_
nuke_r
A render license for CaraVR
including maintenance, providing
that you already have a Nuke
license.
ocula_nuke_i An interactive license for Ocula,
providing that you already have a
Nuke license.
https://www.foundry.com/products/ocula
ocula_nuke_
r
A render license for Ocula,
providing that you already have a
Nuke license.
License Feature IDs |

USER GUIDE
Appendix B: FLT Variables
Environment Variables FLT Recognizes
There are many occasions when you might need to set an environment variable to tailor the
functionality of FLT. The following table lists the environment variables FLT recognizes.
Environment
Variable
Description
foundry_LICENSE Sets the location of the license file.
If you move your license file, you can set this to point to the new location.
You can also use this to point client machines to a floating license on a license
server machine.
foundry_LICENSE_
LOG
Sets the location of the log file that gets generated if there are problems with
licenses.
69
USER GUIDE
70
Setting Environment Variables
Setting environment variables differs for each operating system. Here’s a brief guide in case you can’t
find your systems administrator.
Windows
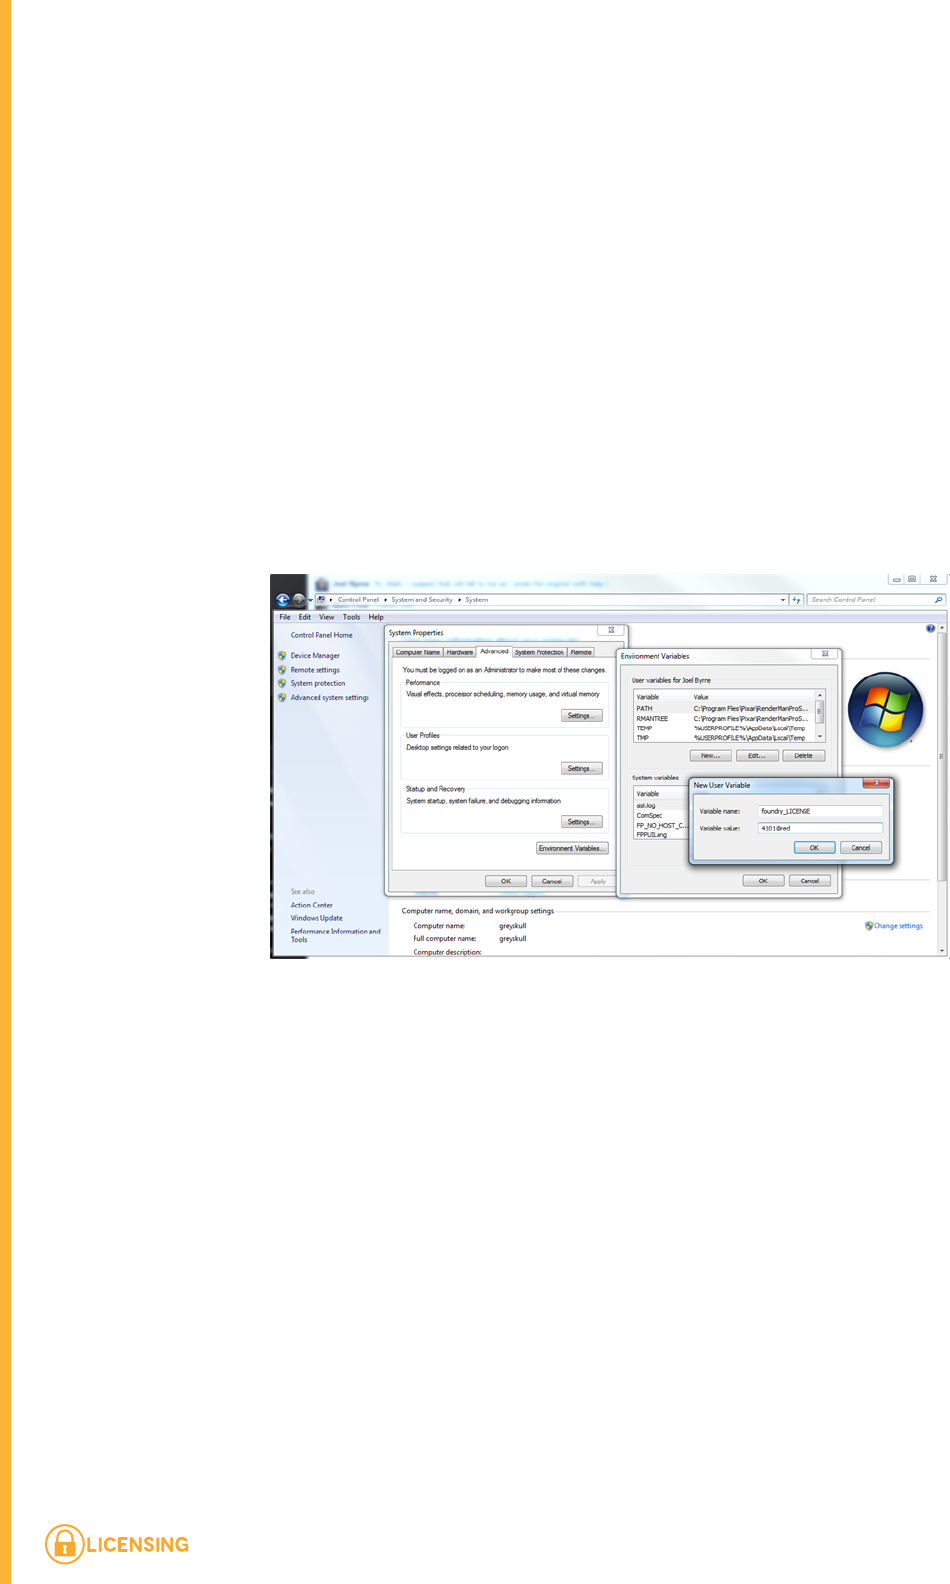
1. Go to Control Panel > System and Security > System.
2. Click Advanced system settings in the left-hand panel and then the EnvironmentVariables
button. You can specify system-wide variables that all users will pick up or user variables to
restrict the environment variable to one particular user.
3. Click on New and enter the variable name and value.
Mac
You can easily set an environment variable that is active in one terminal only:
1. The procedure for setting an environment variable depends on what your default shell is. To get
the name of the shell you are using, launch a terminal (Applications > Utilities > Terminal) and
enter:
echo $SHELL.
2. Depending on the output of the previous step, do one of the following:
• If your shell is a csh or tcsh shell, enter:
setenv foundry_LICENSE /tmp/foundry.lic
• If your shell is a bash or ksh shell, enter:
export foundry_LICENSE=/tmp/foundry.lic
Windows |

USER GUIDE
71
You then need to run the product from the same terminal that you used to set the environment
variable. If you open another terminal, this environment variable is not set in that terminal unless you
type it in there too.
For a more permanent solution, you can set an environment variable for all processes launched by a
specific user by creating an environment file in the user’s home directory:
~/.MacOSX/environment.plist
Note: The tilde ( ~ ) represents the home directory of the target user, and the command is
case sensitive, so take care to copy the string exactly.
You have to create the .MacOSX directory yourself using a terminal (by typing mkdir .MacOSX in
your home directory). You also have to create the environment file yourself. The environment file is
actually in XML/plist format (make sure to add the .plist extension to the end of the filename or this
won't work). An example environment file is shown below. The file can be created using
/Developer/Applications/Utilities/PropertyListEditor.app or you can use a text editor if you’re
careful with the formatting. We can also send you one if you wish.
<?xml version="1.0" encoding="UTF-8"?>
<!DOCTYPE plist PUBLIC "-//Apple Computer//DTD PLIST 1.0//EN"
"http://www.apple.com/DTDs/PropertyList-1.0.dtd">
<plist version="1.0">
<dict>
<key>foundry_LICENSE</key>
<string>/tmp/foundry.lic</string>
</dict>
</plist>
In this case we set the environment variable foundry_LICENSE to /tmp/foundry.lic. Note also that the
environment variable is only active once you’ve logged out and logged back in.
Linux
1. The procedure for setting an environment variable depends on what your default shell is. To get
the name of the shell you are using, launch a shell and enter:
echo $SHELL.
2. Depending on the output of the previous step, do one of the following:
• If your shell is a csh or tcsh shell, enter:
setenv foundry_LICENSE /tmp/foundry.lic
• If your shell is a bash or ksh shell, enter:
export foundry_LICENSE=/tmp/foundry.lic
Linux |

USER GUIDE
72
3. You then need to run the product from the same terminal that you used to set the environment
variable. If you open another terminal, this environment variable is not set in that terminal unless
you type it in there too.
4. To make this permanent for any shell launched, you can edit your .cshrc, .tcshrc, .bashrc, or
.kshrc file in your home directory.
5. If you want it to be system wide, then /etc/profile can be used (or /etc/environment on some
flavors of Linux).
Linux |
