
Vocera Vina Web User Guide
Version 6.2.0

ii VOCERA VINA WEB USER GUIDE
Notice
Stryker Corporation or its divisions or other corporate affiliated entities own, use or have applied for the following trademarks or service marks: Stryker, Vocera. All other trademarks are
trademarks of their respective owners or holders. The absence of a product or service name or logo from this list does not constitute a waiver of Stryker's trademark or other intellectual property
rights concerning that name or logo. Copyright © 2023 Stryker.
Last modified: 2023-02-14 08:31
Acapella-620-Docs build 509

iii VOCERA VINA WEB USER GUIDE
Contents
About the Vocera Vina Web User Guide.........................................................................................................................................5
Getting Started With Messaging....................................................................................................................................................... 6
Logging Into the Vina Web.........................................................................................................................................................................6
Logging Out..................................................................................................................................................................................................7
Setting Presence and Availability...............................................................................................................................................................8
Viewing Online Help................................................................................................................................................................................... 9
Uploading the Log....................................................................................................................................................................................... 9
About Conversations........................................................................................................................................................................... 11
Conversation Priority................................................................................................................................................................................ 11
Starting a Conversation............................................................................................................................................................................ 12
Starting a Group Chat..........................................................................................................................................................................15
Creating a Group Chat From a Conversation..................................................................................................................................... 20
Adding a Context to a Group Chat......................................................................................................................................................21
Starting a Care Team Chat.................................................................................................................................................................. 23
Adding a Message......................................................................................................................................................................................26
Message States......................................................................................................................................................................................28
Sending a Quick Response................................................................................................................................................................... 28
Acknowledging a Message................................................................................................................................................................... 29
Conversations with Unread Messages..................................................................................................................................................... 30
Viewing Participants................................................................................................................................................................................. 31
Adding Participants to a Conversation....................................................................................................................................................32
Leaving a Conversation............................................................................................................................................................................ 34
Searching Conversations........................................................................................................................................................................... 34
Personal Titles........................................................................................................................................................................................... 35
About Templates................................................................................................................................................................................... 36
About Mass Notifications......................................................................................................................................................................... 36
Using a Staff Template............................................................................................................................................................................. 37
Using a Patient Template..........................................................................................................................................................................39
Completing a Template Alert................................................................................................................................................................... 43
About Alerts........................................................................................................................................................................................... 45
Receiving an Alert.....................................................................................................................................................................................45
About Alert Details................................................................................................................................................................................... 47
Leaving or Completing an Alert...............................................................................................................................................................49
About Personal Messages...................................................................................................................................................................51
About Favorites..................................................................................................................................................................................... 52


5 VOCERA VINA WEB USER GUIDE
About the Vocera Vina Web User Guide
The Vocera Vina Web User Guide describes how to perform tasks using the Vina Web.
You can use this document as you work with the Vina Web, and you can get the same information from
the console's context-sensitive help. The organization of this guide generally matches the layout of the
Vina Web.

6 VOCERA VINA WEB USER GUIDE
Getting Started With Messaging
To start using the Vina Web, you must first log into it.
After you have logged in, online help is available.
Logging Into the Vina Web
You can typically log into the Vocera Platform Web Console using the credentials you provide for other
applications in your organization (your Active Directory credentials).
Use the following steps to log into the Vocera Platform Web Console using Active Directory authentication:
1. In your browser, type the URL of the Vocera Platform Web Console that your administrator has
provided for you.
The Vocera Platform login screen appears.
2. Specify the following values:
Field Description
Username Enter your username (up to 250 characters).
Password Enter your password (up to 127 characters).
3. Click Log In.
The Vocera Platform Web Console screen appears.

GETTING STARTED WITH MESSAGING
7 VOCERA VINA WEB USER GUIDE
4. If the Vina Web page is not visible, select Messaging from the panel at the left.
The Vina Web page appears.
Logging Out
When you are finished using the Vocera Platform Web Console, log out.
To log out from the Vocera Platform Web Console:
1. Click the presence icon in the top right corner of the Vocera Platform Web Console.
The presence dialog box appears.

GETTING STARTED WITH MESSAGING
8 VOCERA VINA WEB USER GUIDE
2. Click Logout at the bottom of this dialog box.
The system logs you out.
Setting Presence and Availability
You can specify that you are unavailable, either for a specified period of time or until you make yourself
available again.
To specify a period of time in which you are unavailable
1. Click the presence icon at the top right corner of the Home screen, as shown in the following
screenshot.
A popup menu appears, displaying a list of options to select.

GETTING STARTED WITH MESSAGING
9 VOCERA VINA WEB USER GUIDE
2. Select one of the following:
•
Cick one of the options in the Select unavailable duration section to specify that you are
unavailable for a predefined period of time. After this time has elapsed, you are listed as available.
•
Click Manual to specify a custom unavailability interval. You remain unavailable until you make
yourself available again.
•
Click on one of the options in the Select a custom preset section. The custom preset feature is
available only if this feature is enabled by your system administrators.
When you have specified an unavailability interval, the presence icon turns red indicating a DND or
unavailable status.
You can click the red presence icon again to revert back to an avaialble status indicated by a green color.
Viewing Online Help
You can access an online version of this guide from the Vina Web.
To view the online help:
1. Click the Help link at the top right corner.
An online version of the Vocera Vina Web User Guide appears in a separate browser tab.
Uploading the Log
From the Vina Web, you can upload a log file to the server that contains information on messages sent and
received. This can help you identify any problem that occurs.

GETTING STARTED WITH MESSAGING
10 VOCERA VINA WEB USER GUIDE
1. Click the menu icon to the right of your name and profile picture.
2. From the popup menu that appears, click Log Upload.
The log file is uploaded to the server.

11 VOCERA VINA WEB USER GUIDE
About Conversations
You can use the Vina Web to send messages and start chat-style conversations to communicate with other
users in your network.
When you start the Vina Web, the Home screen displays a list of the conversations and group chats that
you have participated in. From this screen, you can:
• Start a conversation with another user.
• Start a group chat with multiple users.
• Continue an existing conversation or group chat.
Note: Your administrator may have defined the maximum number of conversations or group chats
that can appear on your screen. Contact your administrator if you have any concerns about this.
Note: You can miss a message if it is sent in a conversation or group chat that has scrolled off your
screen.
Conversation Priority
In the Vina Web, conversations and alerts are grouped into priority classes. This ensures that high-priority
tasks are easily located for urgent resolution.
The priority classes are:
• Unread alerts or urgent-priority mass alerts (highest priority)
• Alerts and conversations with unsent, unacknowledged, or unread messages
• Read and accepted alerts and conversations (lowest priority)
The more detailed sorting order is:
• Urgent priority mass alerts
•
Unread or unaccepted alerts:
• Unread or unaccepted urgent priority alerts
• Unread or unaccepted high priority alerts
• Unread or unaccepted normal priority alerts
•
Alerts or conversations with unacknowledged acknowledgement-requested messages:
• Alerts with unacknowledged acknowledgement-requested messages (sorted in priority order)
• Conversations that have a patient context with unacknowledged acknowledgement-requested
messages
• Conversations with unacknowledged acknowledgement-requested messages
•
Alerts or conversations that contain a message that failed to send:

ABOUT CONVERSATIONS
12 VOCERA VINA WEB USER GUIDE
• Alerts that contain a message that failed to send (sorted in priority order)
• Conversations that have a patient context that contain a message that failed to send
• Conversations that contain a message that failed to send
•
Alerts and conversations in which the latest message is unread:
• Alerts in which the latest message is unread (sorted in priority order)
• Conversations in which the latest message is unread
• Conversations in which the latest message is unread
•
Read or accepted alerts and conversations:
• Conversations that have a patient context
• Conversations that do not have a patient context
• Urgent priority alerts
• High priority alerts
• Normal priority alerts
Within a specific category, conversations are sorted with the most recent first.
Starting a Conversation
From the panel that displays the list of conversations, you can start a new conversation.
1. In the panel that displays the list of conversations, click the New icon.
2. From the pop-up menu that appears, select New Chat.

ABOUT CONVERSATIONS
13 VOCERA VINA WEB USER GUIDE
The Start a Chat panel appears.
This screen displays a link to your department and links to any favorites that you have specified. If
your department is not visible, your administrator has configured your system to not display your
department on this screen.
Note: In this panel, if you type a context in the Add Context field or click Patient to specify
a patient context, you create a group chat, not a 1-on-1 conversation with another person. See
Starting a Group Chat on page 15 for details on how to create a group chat.
3. In the Start a Chat panel, do one of the following to select the contact with which you want to have a
conversation.

ABOUT CONVERSATIONS
14 VOCERA VINA WEB USER GUIDE
In the Search field, type text consisting of some or all of the contact's name. All contacts
matching this search text are displayed. Click the entry for the contact with which you want
to start a conversation.
If the contact is a member of a group, click the group to display the contacts that are
members of the group, then click the member to start the conversation. If the group contains
subgroups, click a subgroup name to display its members.
If the contact is defined as a favorite, click the link for that contact to start the conversation.
(See About Favorites on page 52 for more information on Favorites.)
The color dot at the top right of the contact's profile picture or initials indicates the contact's
availability:
• Green: the contact is online.
• Gray: the contact is offline.
• Red: the contact is online but is unavailable. See Setting Presence and Availability on page 8 for more
information on presence and availability.
4. When you have selected a message participant, the chat screen appears.

ABOUT CONVERSATIONS
15 VOCERA VINA WEB USER GUIDE
In the Chat screen, you can start the conversation. See Adding a Message on page 26 for information
on how to do this.
If you have previously started a 1-on-1 conversation with this contact, the existing conversation is
rejoined. Conversations that are between more than two users or contain a patient reference are always
new conversations.
Starting a Group Chat
You can create a group chat to start a conversation with one or more participants. You can specify a text
context or a patient context for this group chat.
1. In the panel that displays the list of conversations, click the New icon.
2. From the pop-up menu that appears, select New Group Chat.

ABOUT CONVERSATIONS
16 VOCERA VINA WEB USER GUIDE
The Start A Group Chat panel appears.
This screen displays a link to your department and links to any favorites that you have specified. If
your department is not visible, your administrator has configured your system to not display your
department on this screen.
From this panel, shortcuts are defined when you right-click a group, a department or an individual user
that may allow you to send a message or update your favorites list.
• If you right-click a group, you can select Message Group to send a message to the entire group. If
the group is not a favorite, select Make Favorite to make this group a favorite. If the group already
is a favorite, select Remove Favorite to remove the group from your favorites list.
• If you right-click a department, you can select Message Department to send a message to the
entire department.
• If you right-click a user, and the user is not a favorite, select Make Favorite to make this user a
favorite. If the user is a favorite, select Remove Favorite to remove the user from your favorites
list.
3. To define a context for this group chat, do one of the following:
•
In the Add Context field, type the context that you want to use.

ABOUT CONVERSATIONS
17 VOCERA VINA WEB USER GUIDE
Press Enter to save this context. This is useful if you want to define a subject for your new group
chat.
•
To specify a patient that this conversation is to be about, click Patient. The Start a Group Chat panel
changes color to indicate that the conversation now has a patient context. Patients that are assigned
to you are displayed.
Note: This option is available only if your administrator has granted you permission to view
patient data.
Do one of the following to select the patient for this conversation.

ABOUT CONVERSATIONS
18 VOCERA VINA WEB USER GUIDE
In the Search field, type two or more letters or numbers to display a list of all patients
whose name or location matches the text that you have typed. In this list, click a patient
name to specify this patient as the context.
Click the name of your department to list all patients belonging to members of the
department. In this list, click a patient name to specify this patient as the context..
Click a patient name to specify this patient as the context.
After you have selected your patient, click Staff to select the persons with which you want to have
the group chat.
Note: From this screen, you can start a group chat with the members of the care team for the
patient that you have selected. See Starting a Care Team Chat on page 23 for more details.
4. Do any or all of the following:
•
Click the names of one or more favorites to add them as chat participants.
•
Click the name of your department if it is visible. From the list of department members that appears,
click the name of one or more members to add them as chat participants.
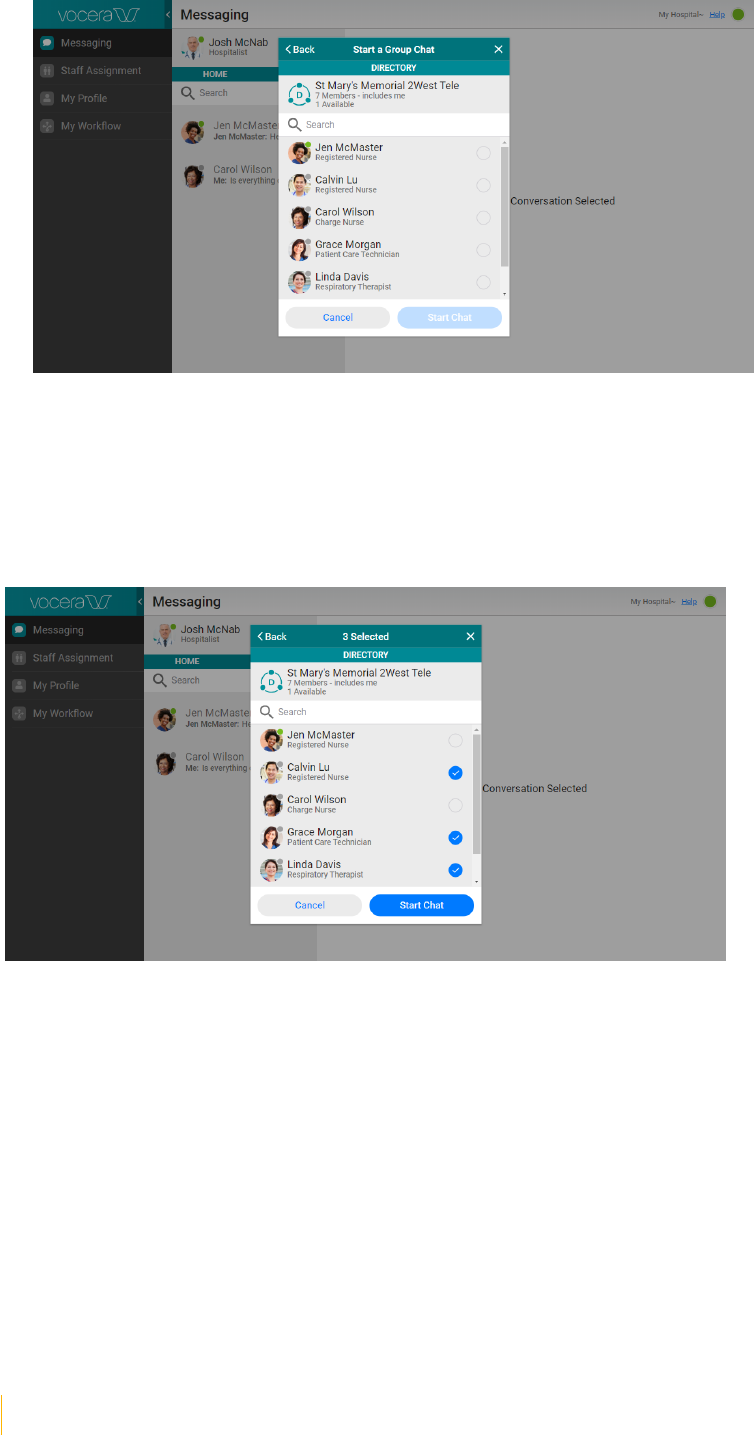
ABOUT CONVERSATIONS
19 VOCERA VINA WEB USER GUIDE
•
In the Search field, type all or part of the name of a group or user. A list of groups and users that
match this search text appears. In this list:
• Click the names of one or more users to add them as chat participants.
• Click the name of a group to display a list of its members, and then click the names of one or
more group members to add them as chat participants. If the group contains subgroups, click a
subgroup name to display its members.
5. Click Start Chat to start the group chat.
The Vina Web creates a chat room that your selected participants have been invited to join.

ABOUT CONVERSATIONS
20 VOCERA VINA WEB USER GUIDE
Creating a Group Chat From a Conversation
If you are in a conversation with one other person, you can create a group chat with this person and
define a context for it.
1. In your conversation, click Create Chat with Context.
A New Group Chat window appears. The person with which you are having the conversation is already
selected.

ABOUT CONVERSATIONS
21 VOCERA VINA WEB USER GUIDE
Note: You can add additional people to this conversation if you want.
2. Follow the instructions in Adding a Context to a Group Chat on page 21 to create the context for
your new group chat.
3. Click Start Chat to create the new group chat with the context that you have provided.
Adding a Context to a Group Chat
Each group chat in the Vina Web can have a context, which is the subject of the chat. If a group chat does
not have a context, or has a context that is not a patient link, you can specify a context.
1. To define a context for a group chat, do one of the following:
•
In the Add Context field, type the context that you want to use.

ABOUT CONVERSATIONS
22 VOCERA VINA WEB USER GUIDE
Press Enter to save this context. This is useful if you want to define a subject for your new group
chat.
•
To specify a patient that this conversation is to be about, click Link Patient. The Start a Group Chat
panel changes color to indicate that the conversation now has a patient context. Patients that are
assigned to you are displayed.
Note: This option is available only if your administrator has granted you permission to view
patient data.
Do one of the following to select the patient for this conversation.

ABOUT CONVERSATIONS
23 VOCERA VINA WEB USER GUIDE
In the Search field, type two or more letters or numbers to display a list of all patients
whose name or location matches the text that you have typed. In this list, click a patient
name to specify this patient as the context.
Click the name of your department to list all patients belonging to members of the
department. In this list, click a patient name to specify this patient as the context..
Click a patient name to specify this patient as the context.
Starting a Care Team Chat
You can start a group chat with some or all of the members of the care team assigned to a patient, with
the patient as the context of the group chat.
Note: This option is available to you only if your administrator has granted you permission to view
patient data.
1. In the panel that displays the list of conversations, click the New icon.
2. From the pop-up menu that appears, select New Group Chat.

ABOUT CONVERSATIONS
24 VOCERA VINA WEB USER GUIDE
The Start A Group Chat panel appears.
3. To specify a patient that this conversation is to be about, click Patient. The Start a Group Chat panel
changes color to indicate that the conversation now has a patient context. Patients that are assigned to
you are displayed.
Do one of the following to select the patient for this conversation.

ABOUT CONVERSATIONS
25 VOCERA VINA WEB USER GUIDE
In the Search field, type two or more letters or numbers to display a list of all patients whose
name or location matches the text that you have typed. In this list, click a patient name to
specify this patient as the context.
Click the name of your department to list all patients belonging to members of the
department. In this list, click a patient name to specify this patient as the context..
Click a patient name to specify this patient as the context.
4. After you have created the patient context, click Care Team to display the care team for this patient if
it is not already displayed.
5. Click the names of one or more care team members to include them as chat participants, or click next
to the patient name to include the entire care team.
6. Click Start Chat to start the group chat with the patient care team members.

ABOUT CONVERSATIONS
26 VOCERA VINA WEB USER GUIDE
Adding a Message
You can add a new message to a conversation or group chat that you are in.
1. To send a message, type the text in the field at the bottom of the screen.
2. To ask for an acknowledgment to your message, click the exclamation marks icon located to the left of
the text.

ABOUT CONVERSATIONS
27 VOCERA VINA WEB USER GUIDE
This is a convenient way to mark message text as high priority and ensure that it is acknowledged and
not just read.
3. Click the Send icon to send the message. This icon is located at the bottom right of the screen.
The sent message appears on the screen of all other participants in the conversation or group chat. If you
have sent a message that requires an acknowledgement, the screen indicates this.
If the message has been acknowledged by all participants, a checkmark icon appears.
ABOUT CONVERSATIONS
28 VOCERA VINA WEB USER GUIDE
For a complete list of all possible statuses for sent and received messages, see Message States on page
28.
Message States
Each sent message in a conversation or group chat displays a message state that is based on the current
users and the most recent received delivery information. Each received message indicates whether you
have read or acknowledged it.
Each sent message displays one of the following message states:
State Description Timestamp Shown
<None> Message sent, but no received response from the server. <None>
Failed Not received by server. The client has disconnected or 20
seconds have elapsed.
Time the failure was detected
Sent Received by the server in a conversation or chat. Time the server received the
message
Delivered to some No one has read or acknowledged the message. Some of the
users have received the message, but not all.
Most recent received time
Delivered No one has read or acknowledged the message. All users have
received the message.
Most recent received time
Read by some No one has acknowledged the message. Some of the users
have displayed the message, but not all.
Most recent displayed time
Read No one has acknowledged the message. All users have
displayed the message.
Most recent displayed time
Acknowledged by
some
Some of the users have acknowledged the message but not all. Most recent acknowledged
time
Acknowledged All of the users have acknowledged the message. Most recent acknowledged
time
Each received message displays one of the following states:
State Description Timestamp Shown
Received The message has been received, but the entire message has
not been displayed on the screen.
N/A
Read You have read the message. The time that you read the
message
Acknowledged You have acknowledged the message. The time that you
acknowledged the message.
Sending a Quick Response
Some of the messages that are most frequently used in a conversation or group chat are available in a
menu for easy access. This enables you to send a quick response when you receive an urgent message.
1. To send a quick response in a conversation or group chat, click the Quick Message icon.

ABOUT CONVERSATIONS
29 VOCERA VINA WEB USER GUIDE
2. Choose a quick response from the list that appears.
The quick response appears in your conversation.
Your administrator may have organized the available quick responses into convenient categories, such as
Help, Requests, and Status Update. This makes it easier for you to locate the appropriate message.
Acknowledging a Message
You may be sent a message that requires you to acknowledge to the sender that you have seen it.
If you receive a message that requires acknowledgment, it is displayed with a red background:

ABOUT CONVERSATIONS
30 VOCERA VINA WEB USER GUIDE
Click Accept to acknowledge the message.
Conversations with Unread Messages
If you have any active conversations that contain messages that you have not read, a number appears next
to the Messaging link in the left pane.
The number next to the Messaging link is the number of conversations containing unread messages, not
the total number of unread messages.
In the list of conversations, the conversations that contain unread messages have their last message
displayed in bold.

ABOUT CONVERSATIONS
31 VOCERA VINA WEB USER GUIDE
Viewing Participants
You can view the list of participants in any conversation or group chat.
1. In your conversation or group chat, click the Info link at the bottom right.
A list of the participants appears.
2. Click the Back link to hide the list of participants.

ABOUT CONVERSATIONS
32 VOCERA VINA WEB USER GUIDE
Adding Participants to a Conversation
If you are in an existing group chat, you can add other participants to it. If you are in a conversation with
one other person, and you want to add other participants, you can create a new group chat consisting of
you, the other person in the conversation, and the new participants.
Note: The maximum number of participants in a conversation is 50.
1. In your conversation or group chat, click the Add link at the bottom left. From the popup menu that
appears, select Create Group Chat if you are in a conversation, or select Add Participant if you are
already in a group chat.
One of the following appears:
• If you are adding a participant to a group chat that has a patient context, a panel appears that
contains two tabs: a Care Team tab that enables you to add a patient care team member to the
conversation, and a Staff tab that enables you to add any staff member to the conversation.
• For all other group chats and conversations, a panel appears that enables you to add any staff
member to the conversation.
2. If you are in a group chat with a patient context, and you want to add a care team member to the chat,
click the Care Team tab and click the names of the care team members that you want to add.

ABOUT CONVERSATIONS
33 VOCERA VINA WEB USER GUIDE
3. If you want to add one or more staff members to the chat, click the Staff tab if you are in a group chat
with a patient context, and then do any or all of the following:
•
Click a group name to display the members of the group. If the group contains subgroups, click a
subgroup name to display its members. Click the name of a member to add him or her to the group
chat.
•
Click the name of a favorite to add this user to the group chat.
•
In the Search box, type two or more characters. A list of groups and users that match your search
text appears. In this list, do one of the following:
•
Click the names of one or more users to add them to the group chat.

ABOUT CONVERSATIONS
34 VOCERA VINA WEB USER GUIDE
• Click the name of a group to display a list of its members. In this list, click one or more members
to add them to the group chat.
4. Click Add to add the new users to the existing group chat. If you are in a 1-on-1 conversation, a new
group chat is created that contains the user in the 1-on-1 conversation and the new users that you have
just added.
Leaving a Conversation
You can leave a conversation that you are participating in.
1. To leave a conversation, hover over it and click the X button that appears.
The conversation is moved to the archive, and is no longer displayed in your list of conversations.
Note: You can search archived conversations for specific text or participant names. See Searching
Conversations on page 34 for details.
Searching Conversations
You can search for all conversations that contain specific text or include a specific participant. This search
can include archived conversations that you have left.
1. In the search field, type the text that you want to match.

ABOUT CONVERSATIONS
35 VOCERA VINA WEB USER GUIDE
A list of matched conversations appears. Conversations that have been archived are grouped separately.
2. Click on a conversation to view it.
Personal Titles
If a contact has a personal title defined (such as MD or RN), this title always appears after the user's name.

36 VOCERA VINA WEB USER GUIDE
About Templates
Your administrator may have created templates for you to use. These templates enable you to send
emergency information quickly.
The following types of templates may be available to you:
•
Mass Notifications: these are user-generated alerts that are sent globally or to a group. This template
type can be used for emergencies, such as a lockdown. You can specify the level of urgency of the mass
notification.
•
Staff Events: this is another type of user-generated alert that can be sent globally or to a group, but
is typically used for non-urgent communication. It can have most of its fields pre-populated to make it
easier to communicate with a large number of users.
•
Patient Events: this is a patient-specific template that can be used to communicate important
information about a change in a patient's status, such as a request for transport for patient discharge.
You do not need to type the patient details or location to use this type of template.
•
Location Events: this is a template that is related to a specific location. This is useful, for example, if
you want a room to be cleaned for use by a new patient: you can send a pre-populated user-generated
alert to environmental services, specifying the room number.
About Mass Notifications
If your administrator has assigned you to a group, you may receive mass notifications sent to all members
of the group.
The icon next to the mass notification indicates the priority:

ABOUT TEMPLATES
37 VOCERA VINA WEB USER GUIDE
Icon Priority
Urgent
High
Normal
Using a Staff Template
You can use a template to quickly send a user-generated alert to other staff members.
1. In the panel that displays the list of conversations, click the New icon.
2. From the pop-up menu that appears, select New Staff Template.
The Start A Template panel appears.

ABOUT TEMPLATES
38 VOCERA VINA WEB USER GUIDE
In this panel, Mass Notifications templates and Staff Events templates appear if your administrator has
made them available to you.
Each template that is available to you displays a TO: field that lists the group that will receive the user-
generated alert generated from this template. If Select A Group is listed instead of a group name, you
will specify the group that is to receive this user-generated alert when you select this template.
3. In the list of templates available to you, click the template that you want to use.
4. If Select A Group is listed in the TO: field for the template, select the group that is to receive the user-
generated alert generated from this template.
5. If the template includes fields to be filled in (for example, the time and location of a staff meeting), in
the screen that appears, fill in the fields to complete the template.

ABOUT TEMPLATES
39 VOCERA VINA WEB USER GUIDE
The text displayed in the fields indicates what you need to type in.
6. If the template contains text that can be edited, click in the text field. Edit the text as needed, or type
the new text that you want to include.
7. Click Send to send the user-generated alert that you have built from the template.
Using a Patient Template
You can use a template to quickly send a user-generated alert that is related to a patient.
1. You can either create a new conversation and select the patient to associate with the patient template,
or use a patient template with an existing conversation for which a patient context has been defined.
•
If you are creating a new conversation:
1.
In the panel that displays the list of conversations, click the New icon.

ABOUT TEMPLATES
40 VOCERA VINA WEB USER GUIDE
2.
From the pop-up menu that appears, select New Patient Template.
The Start A Patient Template panel appears.
Note: If your administrator has not granted you permission to view patient data, you see
the New Location Template option instead. In this case, the behavior is the same, but you
select a location instead of a patient.
3.
Select a patient or location from the list, or select a group and then select a patient or location.

ABOUT TEMPLATES
41 VOCERA VINA WEB USER GUIDE
•
If you are using a template with an existing conversation, click the Add link at the bottom left and
select New Template.
2. In the list of templates available to you, click the template that you want to use.
In this list, Patient Events templates and Location Events templates appear if your administrator has
made them available to you.
Each template that is available to you displays a TO: field that lists the group that will receive the user-
generated alert generated from this template. If Select A Group is listed instead of a group name, you
will specify the group that is to receive this user-generated alert when you select this template.
3. If Select A Group is listed in the TO: field for the template, select the group that is to receive the user-
generated alert generated from this template. If the template sends a user-generated alert to a specific
team member, select the team member.

ABOUT TEMPLATES
42 VOCERA VINA WEB USER GUIDE
4. If the template includes fields to be filled in (for example, the type of patient assistance needed), in the
screen that appears, fill in the fields to complete the template.
The text displayed in the fields indicates what you need to type in.
5. If the template contains text that can be edited, click in the text field. Edit the text as needed, or type
the new text that you want to include.
6. Click Send to send the user-generated alert that you have built from the template.

ABOUT TEMPLATES
43 VOCERA VINA WEB USER GUIDE
Completing a Template Alert
If you have sent a user-generated alert using a template, you can mark it as complete as soon as you are
satisfied that the user-generated alert has been received.
1. Click the Info link at the bottom right.
2. In the panel that appears, click Complete.
3. Click OK to confirm that you want to complete the user-generated alert.

ABOUT TEMPLATES
44 VOCERA VINA WEB USER GUIDE
The user-generated alert is removed from your list of conversations. This conversation is still available in
the conversation archive.

45 VOCERA VINA WEB USER GUIDE
About Alerts
The Vina Web supports the ability to send and receive alerts, which enables you to respond to urgent or
important situations immediately. Alerts can be related to patients assigned to you, or can be unrelated to
a specific patient.
Here is some of the functionality that alerts provide:
•
Alerts are indicated using both menu and desktop notifications.
This ensures that you are made aware that you have received an alert even if you are not actively using
the Vina Web at the time that the alert arrives.
•
Alerts are displayed uniquely based on priority.
Alerts can be of normal, high, or urgent priority, and are color-coded to indicate this priority.
See Conversation Priority on page 11 for details on the order in which alerts and conversations are
displayed on your screen.
•
Receive automatic invitations to join alerts.
When you receive an alert, you can choose to accept the alert and join a conversation with others who
have also accepted the alert and anyone who has been invited to join. You can also choose to decline the
alert, or you can view the details of the alert before deciding to accept or decline it.
•
Common alerts can be created using a template.
If your facility has standard alert types that it generates regularly, you can define templates that enable
you to generate these alerts quickly. Templates can be configured to specify the patient or location that
is related to the alert.
Important: Your Vina Web may have been configured to receive alerts only if you are also logged
into Vocera Vina, the Vocera badge, or the Vocera Smartbadge. The alerts that you may receive may
also depend on what alert generators have been installed at your facility. Contact your administrator
for details on the alerts that you may receive.
Alerts that expect a response within a specified time will expire after this time is reached.
Note: You can miss a message if it is sent in an alert that expires before you read it.
Receiving an Alert
When you receive an alert, you receive a notification if the alert has not already been accepted and if it
has not yet expired, or if the alert can be accepted by multiple people and you have not accepted it. The
alert is added to the list of conversations in the Home screen.
If the context of the alert is a specific patient, information on this patient is displayed in the alert if your
administrator has granted you permission to view patient data. Otherwise, the location of the patient is
displayed.

ABOUT ALERTS
46 VOCERA VINA WEB USER GUIDE
Icon Priority
Urgent
High
Normal
1. When the notification appears:
•
If the notification does not provide responses:
• Click Accept to accept the alert.
• Click Decline to decline the alert.
• Click View to view the alert before deciding whether to accept or decline it. See About Alert
Details on page 47 for more information.
•
If the notification includes a selection of multiple choice responses, click the response that you want
to send.
2. If you are viewing an alert that you have not accepted or declined, click Accept/Decline to display the
Accept, Decline, and View options again.

ABOUT ALERTS
47 VOCERA VINA WEB USER GUIDE
About Alert Details
When you are viewing an alert, you view the Alert Details screen, which displays detailed information for
the alert.
The Alert header contains the context of the alert, which can be a patient or a location.
To display information about the alert, click the Info icon at the bottom right.

ABOUT ALERTS
48 VOCERA VINA WEB USER GUIDE
This displays the Info tab, which lists the alert description and participants.
To close the Info tab, click the Back icon.
The background color for the ribbon in the Alert Details screen depends on the priority of the alert:
Color Priority
Urgent

ABOUT ALERTS
49 VOCERA VINA WEB USER GUIDE
Color Priority
High
Normal
An alert conversation is like any other conversation for which a patient has been specified. See About
Conversations on page 11 for more information on conversations.
Leaving or Completing an Alert
If an Alert has been accepted by any recipient, you can leave the Alert. You can complete an Alert if
you have accepted the Alert, if you originated the Alert, or if you have the necessary administrative
permissions.
To leave an Alert, click Leave.
To complete an Alert, click Complete. This completes the Alert for everyone who has received it.
The Complete option appears if you have the right to complete the Alert. Otherwise, the Leave option
appears.
If the Accept/Decline option appears instead of Leave or Complete, no one has accepted the alert and
you have not declined it.


51 VOCERA VINA WEB USER GUIDE
About Personal Messages
An administrator can send you a personal message if he or she needs to communicate with you.
If no response options have been provided, click View to view the message, or click Dismiss to dismiss it.
If response options have been provided, click the response option that you want to send:
When you select a response, it appears in the conversation for this message.

52 VOCERA VINA WEB USER GUIDE
About Favorites
The Favorites feature lets you create a list of users and groups you communicate with frequently.
Maintaining a favorites list allows you to find a user or group without having to search the directory.
Favorites can be individuals or groups.
Adding a Favorite
You can use the Start a Group Chat panel to add a favorite to your list. You can also remove a favorite that
you have previously specified.
1. In the panel that displays the list of conversations, click the New icon.
2. From the pop-up menu that appears, select New Group Chat.

ABOUT FAVORITES
53 VOCERA VINA WEB USER GUIDE
The Start A Group Chat panel appears.
3. Locate the group or user that you want to add as a favorite or remove from your favorites list.
4. Right-click on the group or user, and select Make Favorite to add the favorite, or select Remove
Favorite to remove the favorite.
5. Click the X at the top right to exit, or follow the instructions in Starting a Group Chat on page 15 to
start a new group chat.

ABOUT FAVORITES
54 VOCERA VINA WEB USER GUIDE
